Alcolizer WM4 User Manual
For more information, please visit alcolizer.com
Table of Contents
Advertisement
WM4 User Manual
Product User Manual
Di
Disclaimer – External Documents note to reader
The BAC reading obtained by correct use of this device is only considered accurate at the
time of testing. Great care has been taken to ensure the accuracy of each reading.
Neither the manufacturer, the distributor, nor the owner accepts liability or responsibility
due to any action or claim arising from the reading produced by this device, whether used
correctly or incorrectly.
REF: WM4 User Manual V7.docx
Page 1
© Alcolizer Technology
Advertisement
Table of Contents

Related Manuals for Alcolizer WM4


Summary of Contents for Alcolizer WM4
- Page 1 Neither the manufacturer, the distributor, nor the owner accepts liability or responsibility due to any action or claim arising from the reading produced by this device, whether used correctly or incorrectly. REF: WM4 User Manual V7.docx Page 1 © Alcolizer Technology...
-
Page 2: Table Of Contents
Contents Introduction ........................5 Description of WM4 ......................5 Variants ........................5 Accessories ........................6 Specifications....................... 6 Equipment Overview ....................7 Installation Procedure ...................... 10 Installing the Back Plate .................... 10 3.1.1 Mounting location....................10 3.1.2 Mounting height and position ................10 3.1.3... - Page 3 Hardware ....................... 34 13.2 Configuration ......................35 14 Self-Check ......................... 36 15 Epsom TM20 Printer Setup ....................37 16 Breath Test Authorisation ....................37 16.1 Serial Port Authorisation ..................37 REF: WM4 User Manual V7.docx Page 3 © Alcolizer Technology...
- Page 4 16.3 Coin Mechanism Authorisation ................38 17 Factory Servicing and Troubleshooting ................39 17.1 Factory Servicing ....................39 17.2 Field Servicing ......................39 17.3 Troubleshooting..................... 39 18 Calibration ........................41 REF: WM4 User Manual V7.docx Page 4 © Alcolizer Technology...
-
Page 5: Introduction
1 Introduction This User Manual details the operation of the Alcolizer Technology Wall Mount 4 (WM4) alcohol breath testing instrument. WM4s come in a variety of models with various configurations. Depending on the type of WM4 purchased, this manual may contain information that is not applicable to your model. -
Page 6: Accessories
• Card Reader, • iPad Connectivity, (using Wifi connection router) • Printer, • Wiegand. Some accessories require specific installation and operating instructions. Please, contact your Alcolizer Technology representative for further advice. 2.3 Specifications Item Specification Dimensions 560mm (H) x 390mm (W) x 190mm (D) -
Page 7: Equipment Overview
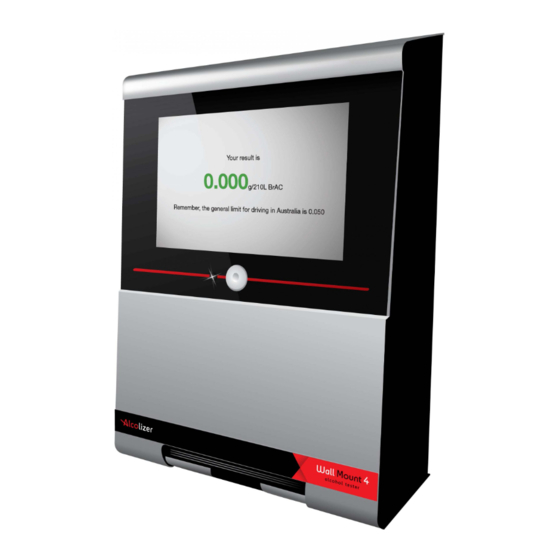
2.4 Equipment Overview The WM4 is a wall mounted or free standing (on an approved stand) alcohol breath testing machine. It is designed for high volume, fixed point commercial and industrial alcohol breath testing applications. The Alcolizer WM4 incorporates innovative and pioneering technology with features providing speed and efficiency for all testing requirements. - Page 8 Serving data decal lock Information decal Serial number decal REF: WM4 User Manual V7.docx Page 8 © Alcolizer Technology...
- Page 9 REF: WM4 User Manual V7.docx Page 9 © Alcolizer Technology...
-
Page 10: Installation Procedure
The instrument must be mounted and positioned at a height to accommodate the majority of users and in such a way to allow access to the key lock and to allow the machine to swing open. REF: WM4 User Manual V7.docx Page 10 © Alcolizer Technology... -
Page 11: Mounting Instructions
Fix the back plate to the wall using masonry fixing hardware (e.g. medium duty anchors). The fixings should be strong enough to support the instrument (at least 20kg) and any incidental loading such as a person leaning or pulling on the instrument. REF: WM4 User Manual V7.docx Page 11 © Alcolizer Technology... -
Page 12: Mounting And Starting The Instrument
WARNING Do not use adhesives (Liquid Nails) as the method of fixing as these are not considered to be a reliable or safe fixing means for the WM4. 3.2 Mounting and Starting the instrument 3.2.1 Mounting Mount the instrument in accordance with the following procedures:... -
Page 13: Operating Instruction
Place straw in the sample port. CAUTION Never inject fluids into the sample port. This could render the instrument inaccurate for subsequent tests or temporarily disable it and may void any instrument warranty REF: WM4 User Manual V7.docx Page 13 © Alcolizer Technology... - Page 14 Start blowing and continue blowing until the progress bar reaches 100%. During the blow sequence, a beeping sound will be heard. Stop blowing when the display shows Stop Blowing. This will also be indicated by a long beep. REF: WM4 User Manual V7.docx Page 14 © Alcolizer Technology...
-
Page 15: Analysing The Breath Sample
If the blow is invalid, cease blowing, wait until the Insert Straw and Blow screen is displayed and then provide another sample. REF: WM4 User Manual V7.docx Page 15 © Alcolizer Technology... -
Page 16: Owner Servicing
5.1 Straw Replenishment Should the straw bin require replenishing, perform the following procedures: Turn the WM4 off at the power point. Open the instrument by unlocking it and swinging it open. Open the straw bin by lifting the latch and removing the cover by manoeuvring it forward. -
Page 17: Cleaning
2. Do Not exceed the length of the bristles through the sample port. 3. Continue a backward & forward motion with the brush for about 5 minutes. 4. Test by blowing a breath sample through the unit. REF: WM4 User Manual V7.docx Page 17 © Alcolizer Technology... -
Page 18: User Controls
Do not come in contact with any exposed components. Inside the WM4 are buttons which can be used to access certain menus during setup and fault finding. Users should not access the machine and press these buttons unless specifically requested to by instructions in this manual or verbally when in contact with your Alcolizer Technology technical representative. -
Page 19: Keyboard
Alcolizer Technology technical representative. Access the USB ports by unlocking the WM4 and swinging it open. There are four ports located on the main circuit panel. CAUTION Use care when inserting the connector to the port to ensure neither are damaged. -
Page 20: User Interface
To access the User Menu, perform the following steps: Connect a keyboard in accordance with paragraph 0. Press the F1 key to access the WM4 User Menu area. Press the left Alt key to bring up available menu choices. Press the down key and move down to the required menu (e.g. Settings). -
Page 21: Status
The status page will provide a variety of information for the user: 7.2.1 Identification • Serial Number: A number that uniquely identifies the WM4. This number is also printed on the side panel safety label located on the side of the instrument. -
Page 22: Status Led Lights
Do not come in contact with any exposed components. The WM4 status can also be assessed by viewing the status LEDs on the main circuit board while the unit is on. Only STAT4 and STAT5 LEDs display status. STAT4 displays the Log Export State and STAT5 displays the WM4 State. -
Page 23: Settings
(via the wired Ethernet connection). There is no need to manually adjust it if connected to the internet. In order for the WM4 to display the correct date and time, the time zone must be set correctly. The display format is set to YYYY-MM-DD HH:MM:SS and cannot be changed. -
Page 24: Shutdown Instrument
Power Off: Shutdown the instrument so that mains power can be removed. This method or the OFF button on the PCBA localised internally in the WM4 are the only two ways to correctly power off the instrument. REF: WM4 User Manual V7.docx Page 24 ©... -
Page 25: Custom Appearance
The Elements area allows customisation of user interface text for a variety of breath testing screens. Display custom text on the screen as follows: Connect a keyboard/mouse and access the User Menu in accordance with the procedures at paragraph 7.1. REF: WM4 User Manual V7.docx Page 25 © Alcolizer Technology... -
Page 26: Intervals
9.4 Intervals It is possible to adjust the timings for some screen display intervals. Descriptions of how the timings apply to the display are presented for each adjustable interval. REF: WM4 User Manual V7.docx Page 26 © Alcolizer Technology... -
Page 27: Logs
Breath Analysis Block Set . Data analysis is disabled. • Breath Analysis Block Cleared . Data analysis enabled. • Fuel Cell Changed . Fuel cell changed, configuration and data was reset. REF: WM4 User Manual V7.docx Page 27 © Alcolizer Technology... -
Page 28: Export
JSON: JavaScript Object Notation in a format suitable for integration with automated systems. It is also possible to erase the current event log records on the device using the Erase Event Log button. REF: WM4 User Manual V7.docx Page 28 © Alcolizer Technology... -
Page 29: Networks
The network IPv4 Configuration can be set to obtain an IP address automatically or use a static IP address. Establish an internet connection as follows: Connect the WM4 to an internet receptacle via the Ethernet cable. Connect a keyboard/mouse and access the User Menu in accordance with the procedures at paragraph 7.1. -
Page 30: Gsm Set Up
The TCP port number. 11.2.2 Alcolizer Portal The Alcolizer Portal enables your device to post logs and status information from the instrument to the portal which is a Cloud service. This portal provides a real-time solution with analytical and statistical tools. -
Page 31: Email
12 Email 12.1 Email Settings The WM4 is equipped for forwarding email notifications of status and logs. To configure the email function, perform the following steps: Establish an internet connection via the Ethernet cable. This step is not required if the instrument has a GSM modem. -
Page 32: Settings - Mail Server
Due to the very long time out periods specified for email configuration, if there is an issue with the Mail Server settings, it can take a very long time REF: WM4 User Manual V7.docx Page 32... -
Page 33: Email Reports
• The Start Time chosen is on the 29th of September 2013, 12 noon. • The Report Interval is Weekly. • The next email will be sent on the 6th of October 2013, 12 noon. REF: WM4 User Manual V7.docx Page 33 © Alcolizer Technology... -
Page 34: Relays
Relays The WM4 is equipped with three relay outputs on the circuit board and their outputs can be configured to trigger in response to a breath test result. To access the Relays Menu refer to paragraph 7.1. If a relay output is enabled, the relay will trigger for the specified duration if the breath test result is greater than or equal to the minimum value and less than the maximum value. -
Page 35: Configuration
In this situation the instrument will activate two relays in the situation where one relay shares a nonzero maximum with the minimum value from another relay. REF: WM4 User Manual V7.docx Page 35 © Alcolizer Technology... -
Page 36: Self-Check
One, many, or all tests can be run. Some tests require a degree of user interaction and if this occurs instructions will appear on the screen indicating how to proceed. REF: WM4 User Manual V7.docx Page 36 © Alcolizer Technology... -
Page 37: Epsom Tm20 Printer Setup
3. It is recommended to turn the WM4 off. 4. Carefully open the WM4. 5. Connect printer to the WM4 using USB cable supplied with the printer. Use any available USB port located on the board. 6. Close the WM4. Then, turn on the WM4 and the printer. - Page 38 The americium serial protocol operates on both serial ports with the following settings: • Protocol version: am-spec-02 • Date/Time: local time (not UTC) Please contact your Alcolizer Technology representative for further advice. 16.2 Wiegand USB device The Wiegand support operates via USB serial connections and allows a test to be authorized via a Wiegand card reader.
- Page 39 Alcolizer’s facility. NOTE The next service date is defined by the number of days that a WM4 was left ON and performed auto-calibrations (365 in total). The system will display a warning message based on the number of auto-calibrations. If a device was stored by a customer for six months before it was turned on, the service will happen 18 months after it was dispatched.
- Page 40 Note: this could be performed instantly screen after initial start-up. but may take up to 24 hours. The instrument continues to display Contact Alcolizer Technology for further advice: an Out of Order message. 1300 789 908. The instrument is displaying a...
- Page 41 If the problem persists, contact Alcolizer on Liquid Detected 1300 789 908. 18 Calibration The WM4 self-calibrates every 24 hours for the duration of its service life, and requires no user calibration. REF: WM4 User Manual V7.docx Page 41 © Alcolizer Technology...
Need help?
Do you have a question about the WM4 and is the answer not in the manual?
Questions and answers