Table of Contents
Advertisement
Quick Links
Assembly Instructions
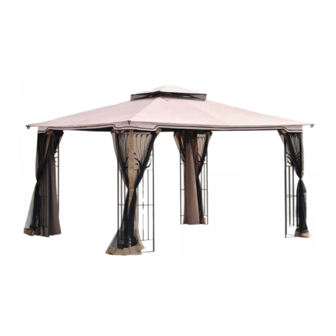
ITEM#L-GZ043PST-7L
10'x12' Leaf Gazebo
IMPORTANT:
Please read and follow all safety statements, warnings, assembly instructions, use & care directions, before
attempting to assemble.
WARNINGS:
1. Assembly Instructions must be followed.
2. Pegs supplied must be used to hold this gazebo in place when upright.
3. Warranty does not cover damage due to extreme weather conditions.
4. Do not use candles, matches or open flames of any kind in or near a tent.
5. Do not cook inside the tent.
6. Build campfires downwind and several meters away from a tent and be sure to fully extinguish campfires before
leaving a campsite or before retiring for the night.
7. Exercise extreme caution when using fuel-powered lanterns or heaters inside a tent and use battery-operated
lanterns whenever possible.
8. Do not refuel lamps, heaters or stoves inside a tent.
1
Advertisement
Table of Contents

Related Manuals for Sunjoy L-GZ043PST-7L


Summary of Contents for Sunjoy L-GZ043PST-7L
- Page 1 Assembly Instructions ITEM#L-GZ043PST-7L 10’x12’ Leaf Gazebo IMPORTANT: Please read and follow all safety statements, warnings, assembly instructions, use & care directions, before attempting to assemble. WARNINGS: 1. Assembly Instructions must be followed. 2. Pegs supplied must be used to hold this gazebo in place when upright.
- Page 2 9. Extinguish or turn off all lanterns before going to sleep. 10.Do not smoke in a tent. 11.Do not store flammable liquids inside a tent 12. KEEP ALL FLAME AND HEAT SOURCES AWAY FROM THIS TENT FABRIC. This tent is made of flame-resistant fabric.
- Page 3 Panel 1 Panel 2 Pole 1 Pole 2 Pole 3 Pole 4 Top Pole Hanging Pole Corner connector Center connector Long side support pole Canopy Top canopy Bug netting Short side support pole Hook Privacy Panel Pipe for Privacy Panel Pipe Connector...
- Page 4 Tools required: ladder, hammer (not included) ASSEMBLY STEPS: Step 1: Frame Assembly 1.1 Use bolt (AA) and flat washer (BB) to joint panel 1(A,) and panel 2(B) ( Fig.1) 1.2 Insert pole (D) into pole (C) and pole (F) into pole (E) (Fig. 2) 1.3 Connect pole (C,D,E,F) with Panel (A,B) to set up a quadrate frame (Fig.3 )
- Page 5 Fig.7 Fig.6 Step 2: Top Assembly (Note: Ladder needs to be used in step 2.4 and 2.5) 2.1 Insert corner connector (I) into the holes at the top corner of panel (A,B) (Fig. 5) 2.2 Insert hook (P) into center connector (J) (Fig.4) 2.3 Assemble hanging pole (H) and top pole (G) (Fig.5) 2.4 Connect one end of the top pole (G) with center connector (J) (Fig 6).
- Page 6 Fig.11 Fig.12 Fig.10 Step 3: Canopy, Bug Netting and Privacy Panel Assembly Note: Ladder is needed to assemble canopy 3.1. Assemble the canopy (L) on top frame (do not tighten), fully assemble top canopy (M) on top pole (G). Tie the bug netting between the canopy (L) and top canopy (M) and then fully stretch canopy (L).
- Page 7 Extra Parts Electrical cord tie 10 PCS Note: Please keep these extra parts since they are not covered in product warranty. Use these extra parts to fasten the electrical cord with the top beam if a light is used. USE & CARE: 1.
Need help?
Do you have a question about the L-GZ043PST-7L and is the answer not in the manual?
Questions and answers