Table of Contents
Advertisement
Advertisement
Chapters
Table of Contents

Related Manuals for Schaerer Ambiente 1 SUSA


Summary of Contents for Schaerer Ambiente 1 SUSA
- Page 1 Ambiente 1 SUSA User manual 04.2007 www.schaerer.com...
- Page 2 ADDITIONAL SAFETY INFORMATION This Symbol requires special attention. It will inform you in detail on the safety instructions, commissioning, usage, operation, handling and programming of the Ambiente 1 SUSA. It contains important safety instructions to ensure safe use and opera- tion.
-
Page 3: Instructions
All information, illustrations, and specifications in this manual are based on the latest product information avail- able at the time of publication approval. M. Schaerer AG reserves the right to change the content at any time without any prior notice. -
Page 4: Symbols And Pictograms
Instructions Symbols and pictograms Note: This section provides you with important notes and information. Attention! This note indicates possible damage to property as well as possible financial and statutory penalties (e.g. loss of rights to claim under guarantee, liability suits, etc.). Danger! This note indicates a risk of severe and/or fatal injury if specific procedural rules are violated. -
Page 5: Table Of Contents
Instructions Contents Chapter Page 1 Instructions ..............................1-1 1.1 Copyright ..............................1-1 1.2 Symbols and pictograms ...........................1-1 1.3 Contents ..............................1-1 2 Safety instructions ............................2-1 2.1 General..............................2-2 2.2 Safety symbols ............................2-2 2.3 Prevention of accidents / Operational Safety ....................2-3 2.4 Hygiene ..............................2-5 2.5 Designated use............................2-5 2.6 Liability...............................2-6 3 Product description............................3-1 3.1 Espresso machine data..........................3-2... - Page 6 Instructions Page 1-4 BASO-1 SUSA – 02.01 – V02...
- Page 7 Safety Instructions Contents Chap. Text Page SAFETY INSTRUCTIONS ..............2-2 General ..............................2-2 Safety symbols ..........................2-2 Prevention of accidents / Operational Safety ................2-3 Hygiene ..............................2-5 Designated use ..........................2-5 Liability ..............................2-6 BASO-1 SUSA - 03.02 - V02 Page 2-1...
-
Page 8: Safety Instructions
Safety Instructions SAFETY INSTRUCTIONS This chapter warns you about possible dangers when operating your new machine. The information contained herein on how to recognize hazardous situations enables a safe and proper operation. General The espresso machine will be handed over by a service technician authorized by the manufacturer. -
Page 9: Prevention Of Accidents / Operational Safety
Safety Instructions Prevention of accidents / Operational Safety In the event of incorrect operation or misuse, one or more of the following might occur: • Risk to life and limb of the operator, third persons or animals that are in close proximity to the machine, •... - Page 10 Never touch live parts! Attention! Malfunctions must be repaired by authorized and qualified personnel only. Attention! Only use original Schaerer spare parts. Electric shock! Immediately report damaged cables and plugs to an authorized and qualified technician and have them repaired or replaced.
-
Page 11: Hygiene
M. Schaerer AG. The operating manual is an integral part of the above agreement of use. Any usage other than within the limits specified herein shall be regarded as not in accordance with the designated use. -
Page 12: Liability
Safety Instructions Liability Guarantee and liability claims in the event of injury to people and damage to property cannot be entertained if they are due to one or more of the following causes: • Any use other than the designated one •... -
Page 13: Product Description
Product description Table of Contents Chapter Text Page Product description ................3-2 Espresso machine data ........................3-2 3.1.1 Overview.............................3-2 3.1.2 Espresso machine operating panel ....................3-3 3.1.3 Serial plate............................3-3 3.1.4 Installation layout / Power, Water Supply and Drain Requirements ..........3-4 Operating information for the espresso machine .................3-5 3.2.1 Dimensions and weight ........................3-5 3.2.2... -
Page 14: Espresso Machine Data
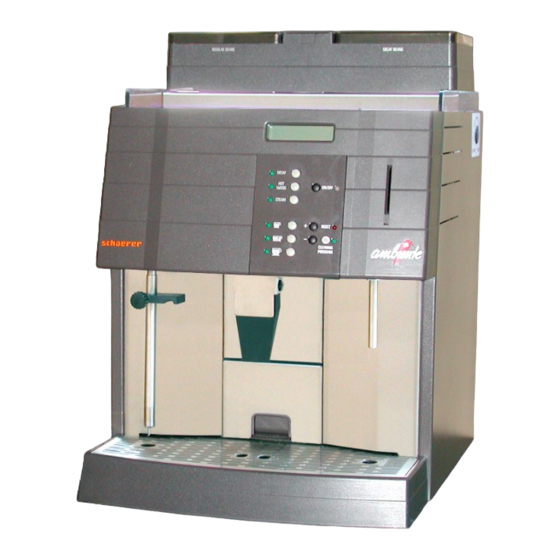
Product description PRODUCT DESCRIPTION Espresso machine data 3.1.1 Overview Legend: Coffee beans container Funnel for cleaning tablet Two-line illuminated LC display Operating panel Espresso outlet Hot water wand Steam wand Cup plate frame Cup plate Drip tray grill Drip tray Page 3-2 BASO-1 SUSA - 02.03 - V02... -
Page 15: Espresso Machine Operating Panel
Product description 3.1.2 Espresso machine operating panel S t a n d b y Two-lined illuminated LCD-Display DECAFbutton and LED DECAF Stand-By- (ON / OFF) Button incl. LED ON / OFF WATER Card reader STEAM Free programming product button incl. LED and prod- Reset- plus-button uct symbols... -
Page 16: Installation Layout / Power, Water Supply And Drain Requirements
Product description 3.1.4 Installation layout / Power, Water Supply and Drain Requirements Front View of a Finished Installation Machine width: 17 inches / 43,2 cm Espresso machine Free space (in order to fill bean hoppers) above ma- chine: 7 inches / 17,8 cm Power outlet located be- hind machine (see below) Machine height: 27 inches /... -
Page 17: Operating Information For The Espresso Machine
Product description Operating information for the espresso machine 3.2.1 Dimensions and weight Width:........16.5 Inch..420 mm Height: ........24.2 Inch..615 mm Depth: ........20.0 Inch..510 mm Outlet height Espresso ... 7.2 Inch..185 mm Weight........33 kg Subject to modification! 3.2.2 Power supply... -
Page 18: Chip Card Functions
Product description Note: Ideally, water hardness should be 1-2 GPG or 1-25 ppm (5-7 dH / 8-12 fH). Chlorine content should not exceed 100 mg per liter. The ideal pH value is 7. Local regula- tions apply. Water pressure: Minimum pressure:1 bar Maximum pressure:3 bar Note: We recommend setting the decompression valve to 3 bar. -
Page 19: Setup
Product description Setup 3.4.1 Initial setup of the espresso machine The espresso machine must be installed and commissioned by a service technician authorised by the manufacturer. 3.4.2 Set-up conditions 3.4.2.1 Location Danger! • Prior to installing, ensure that the espresso machine will not be positioned on a hot surface or near an oven. - Page 20 Product description Page 3-8 BASO-1 SUSA - 02.03 - V02...
-
Page 21: Operation
Operation Table of contents Chapter Text Page OPERATION ..................4-2 Introduction............................4-2 Operating Modes ..........................4-2 Messages displayed when espresso machine is ready for operation........4-3 Routine operation ..........................4-3 4.4.1 Refilling of espresso beans ........................4-3 4.4.2 Pre-checks............................4-3 4.4.3 Switching on the espresso machine....................4-4 4.4.4 Preparing - Preparing DECAF products .....................4-4 4.4.5... -
Page 22: Introduction
Operation OPERATION Introduction This chapter describes the basic functions of the espresso machine. Read them care- fully to ensure easy and problem-free routine operation. Note: Proper installation and programming of the espresso machine by an authorized ser- vice technician are crucial for a smooth operation and good product quality Danger! •... -
Page 23: Messages Displayed When Espresso Machine Is Ready For Operation
Operation Messages displayed when espresso machine is ready for operation Empty the grounds container. Up to five more espressos can be made; after that, the ..espresso machine locks. Container full The temperature of an instantaneous water heater has fallen to more than 10°C below .. -
Page 24: Switching On The Espresso Machine
Operation 4.4.3 Switching on the espresso machine Turn on the espresso machine by pressing the [ ON / OFF ] button. The green LED next to the button will illuminate. If the espresso machine has been turned off for a long periodsof time, the fol- lowing message will appear: select beverage heating steam... -
Page 25: Preparing - Espresso And Hot Water
Operation Press the desired product button. select beverage choice .. supply .. The LED next to the pressed button illuminates. If you do not want to dispense any other products on this level, press the prod- uct button assigned to the [Shift] button to return to level 1. Do not remove the cup before the LED next to the product button is switched off. -
Page 26: Extended Idle Times
Operation Danger! When the boiling point is reached, the beverage may start to spill. During steam delivery, ensure that the steam pipe remains immersed in the liquid. Heat the liquid to the desired temperature. Ensure that the steam pipe is always immersed in the liquid. -
Page 27: Chip Card Functions
Operation 4.5.2 Extended idle time of more than 4 weeks: Complete steps 1 to 5 as described in "Several weeks". The boilers must be fully drained for hygienic reasons. To empty the boil- ers, ask a customer service authorized by the manufacturer for assistance. Attention! If you resume operation at later point in time, ensure that you open the water supply first and only then switch on the power supply. -
Page 28: Save Data " Chip Card
Operation 4.6.2 "SAVE DATA " chip card Note: The SAVE DATA chip card is a backup card to which all the espresso machine data can be saved. If so configured by the service technician, the system requires the setting changes to be saved on the SAVE DATA chip card with a corresponding display message. - Page 29 Operation Press [ DECAF ] button to load the data from the chip card to the espresso ma- chine: ... Load ... An acoustic signal indicates that the data have been transferred. The date of the last backup is displayed: last backup 12:00 01.14.2003...
- Page 30 Operation Page 4-10 BASO-1 SUSA - 02.04 - V02...
-
Page 31: Cleaning
Cleaning Contents Chap. Text Page CLEANING..................5-2 Important general notes on cleaning....................5-2 Daily cleaning............................5-3 5.2.1 Interior Cleaning ..........................5-3 5.2.2 Exterior cleaning ..........................5-6 BASO-1 SUSA - 02.05 - V02 Page 5-1... -
Page 32: Important General Notes On Cleaning
Cleaning CLEANING Important general notes on cleaning Danger! Never reach into the machine while the automatic cleaning cycle is running. Keep clear of the beverage outlets. Danger! Never clean the machine with a hose or a pressure cleaner. Do not use steam cleaning devices. -
Page 33: Daily Cleaning
Cleaning Daily Cleaning Daily cleaning The intervals in which the cleaning program is to be carried out are programmed by the service technician. When cleaning is required at pre-set time the display will show: select beverage clean machine Attention! A power outage will cause the automatic cleaning cycle to start again. standby Press the button [ ON / OFF ]. - Page 34 Cleaning Daily Cleaning Pull the espresso grounds container out of the machine within 5 seconds. The following message is displayed: use brush The LED of the button [ ] will illuminate and the LEDs of the buttons [ HOT WATER ] and [ LARGE ] flash.
- Page 35 Cleaning Daily Cleaning Push the espresso grounds container back into the espresso grounds container slot. Note: As soon as the grounds container is inserted the brewing unit will move back into its original position. The following message will now be displayed: cleaning program insert tablet The LED of the buttons [...
-
Page 36: Exterior Cleaning
Cleaning Daily Cleaning 5.2.2 Exterior cleaning Danger! Do not clean the outside of the machine un- til the rinsing cycle has finished. Attention! Never clean the outside while the cleaning cy- cle is still running! Never use scouring tools, pads or abrasive agents, chemicals or cleaning tools made of metal. - Page 37 Error messages and malfunctions Table of contents Chapter Text Page Error messages and malfunctions ..........6-2 Display messages..........................6-2 Error messages with display......................6-4 6.2.1 Error messages - espresso machine....................6-4 6.2.2 Chip card error messages ........................6-7 Malfunctions without display messages..................6-8 Page 6-1 BASO-1 SUSA - 02.06 - V02...
-
Page 38: Error Messages And Malfunctions
Schaerer cleaning tablet in the tablet opening. (sTxt-024) - When you first press the cleaning program... - Page 39 Error messages and malfunctions Display Cause Rectification 1) This usually indicates that the right hop- 1) If so, fill hopper with beans max. 1.8 lbs / per is empty. 0.75 kg per container and hit the ‘reset’ select beverage button to continue the grind cycle. grinder right empty 2) It may also mean that the bean flow into the grinder is blocked (i.e.
-
Page 40: Error Messages With Display
Error messages and malfunctions Error messages with display 6.2.1 Error messages - espresso machine Danger! Inform your authorized customer service representative immediately if you cannot clear an error message using the tips below! Do not attempt to repair the espresso machine yourself! Display Cause Rectification... - Page 41 Error messages and malfunctions Display Cause Rectification - An object (e.g. a stone) is stuck in the - Press the [RESET] button. grinder. - If the message persists, disconnect the grinder left blocked espresso machine from the power mains. Vacuum the coffee beans out of the grinder.
- Page 42 Error messages and malfunctions Display Cause Rectification - The water filter must be replaced. The programmed water quantity has flowed - If you do not have a replacement water through the filter. The control unit has acti- replace waterfilter filter, contact a manufacturer-authorised vated the display message customer service representative.
-
Page 43: Chip Card Error Messages
Error messages and malfunctions 6.2.2 Chip card error messages The following messages indicate handling errors relating to the chip cards. Display Cause Rectification - The data structure on the SAVE DATA chip - Request a new SAVE DATA chip card from card was damaged. -
Page 44: Malfunctions Without Display Messages
Error messages and malfunctions Malfunctions without display messages Note: The following problems may occur without causing the espresso machine to display an error message. Malfunction Cause Rectification Dark display, no mes- Plug at power socket is disconnected or Reconnect plug at power socket or switch sage main switch is OFF. -
Page 45: Appendix
Appendix Table of contents Chapter Text Page Appendix .................... 7-2 Cleaning agent ..........................7-2 7.1.1 Cleaning tablet for the espresso machine ..................7-2 Serial plate of steam generator and instant heater...............7-3 7.2.1 Instant heater (Type SE - HW – 061'164) ..................7-3 7.2.2 Steam generator (Type SO –... -
Page 46: Cleaning Agent
Appendix APPENDIX Cleaning agent 7.1.1 Cleaning tablet for the espresso machine Attention! Before you use the cleaning tablets read the label on the cleaning tablet container and the "HEALTH AND SAFETY DATA SHEET." Should you not be in possession of this safety sheet, please order it from the distributing company. -
Page 47: Serial Plate Of Steam Generator And Instant Heater
20 ...... Serial no................HW....DA ..................) temperature adjustable 7.2.1 Instant heater (Type SE - HW – 061'164) Pos. 6.1 A M. Schaerer AG, CH-3302 Moosseedorf F-Nr. : HW..Baujahr : 20…. pmax 12 bar Tmax 192ºC Vol. -
Page 48: Environmental Aspects
Appendix 7.2.2 Steam generator (Type SO – DA – 063'621) Pos. 6.2 A M. Schaerer AG, CH-3302 Moosseedorf F-Nr. : DA..Baujahr : 20…. pmax 12 bar Tmax 192ºC Vol. 1.0 l : 230 VAC Tmin 10ºC :2x3000W : 50/60 Hz Ausführung und Prüfung nach SVTI und TÜV Vorschriften... -
Page 49: Index
Index Index A C D E G H I L M O P R S V W Text Chapter Page Index Appendix..........................7 ....7 -2 Index Chip card "CUP" ......................... 3.3.2 .... 3 -6 Chip card "CUP" ......................... 4.6.1 .... 4 -7 Chip card "SAVE DATA PLUS".................. - Page 50 Index Text Chapter Page Index General ..........................2.1....2 -2 Index Hygiene..........................2.4....2 -5 Index Important general notes on cleaning .................. 5.1....5 -2 Initial setup of the espresso machine ................. 3.4.1..... 3 -7 Installation layout / Power, Water Supply and Drain Requirements........3.1.4..... 3 -4 Installation of the espresso machine ..................
- Page 51 Index Power supply ........................3.2.2 .... 3 -5 Pre-checks.......................... 4.4.2 .... 4 -3 Preparing - Espresso and hot water................... 4.4.5 .... 4 -5 Preparing - Preparing DECAF products................4.4.4 .... 4 -4 Preparing – Steam ......................4.4.6 .... 4 -5 Prevention of accidents / Operational Safety ..............
- Page 52 Index Page 8-4 BASO-1 SUSA - 02.08 - V02...
Need help?
Do you have a question about the Ambiente 1 SUSA and is the answer not in the manual?
Questions and answers