Advertisement
Quick Links
cnPilot
TM
e435W Indoor
802.11ac Wave2 Dual Band
Wall Plate Wi-Fi Access Point
Quick Start Guide
Model: cnPilot e435W Indoor
JOIN THE CONVERSATION
community.cambiumnetworks.com
Introduction
The guide provides a quick installation process.
Package Contents
Single Gang Wall Bracket
e435W Access Point
Button
Tool Requirements
Torx Screw
Ethernet Jumper Cable
Philips Head Screw
Size: M3 x 6mm
Size: M3.5 x 25mm
Quantity: 1
Quantity: 4
Tools Required
• Philips Head Screwdriver
• Torx Security Screwdriver
Philips Drive Pan Head Screw
Size: M3 x 6mm
Quantity: 1
Dual Gang Mounting
1.
Remove dual-gang box
cover.
2.
Place Cambium
dual-gang wall bracket
on the gang box and
secure with at least two
screws.
3. Slide the plastic cover
over the exposed
portion next to the
mounted e435W.
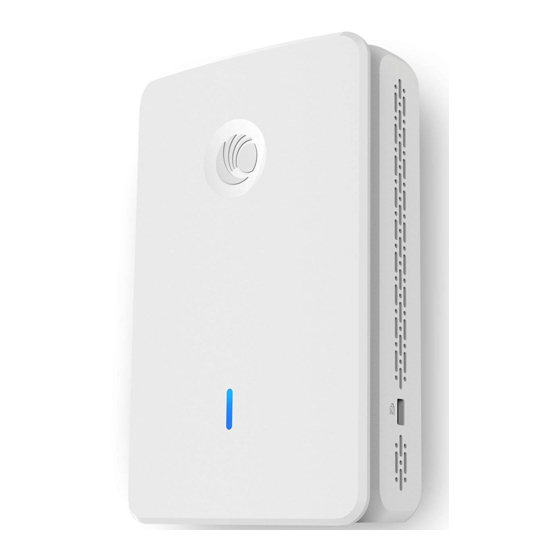
Product Overview
Slots for bracket
mounting
Air vents
Eth1/
PoE IN
PASS
THRU
Kensington
Lock Slot
Reset
48V/ 1A
Multi-color LED
ETH4/
PoE OUT
ETH3
ETH2
PASS THRU
Dual Gang Mounting
4. Connect Ethernet cable
to the upper RJ-45 port
labeled Eth1/PoE at the
rear side of e435W to
provide connectivity. Use
the other RJ-45 port
labeled Pass-thru for any
additional cable that
might need to pass
through e435W.
Align the two slots at
5.
rear side of the e435W
with two hooks on the
bracket.
6.
Secure e435W to the
bracket with a screw at
the bottom edge of
e435W using standard
Philips head or Torx
security screwdriver.
Single Gang Mounting
Remove single-gang
1.
box cover.
Place Cambium
2.
single-gang wall
bracket on the gang
box and secure with at
least 2 screws.
3.
Connect Ethernet cable
to the upper RJ-45 port
labeled Eth1/PoE at the
rear side of e435W to
provide connectivity.
Use the other RJ-45 port
labeled PASS-Through
for any additional cable
that might need to pass
through e435W.
4.
Align the two slots at
rear side of the e435W
with two hooks on the
bracket.
General Wall Mounting
1.
Choose location on the wall to
mount the bracket using the
four mounting screws and
anchors (if needed).
2.
Connect the short Ethernet
jumper cable between the two
RJ-45 connections on the rear
side of e435W.
3.
Mount e435W into the Generic
Wall bracket by aligning the
hooks
4.
Secure e435W to the bracket
using Torx (or standard) screw
on the lower edge of e435W.
5.
Power e435W either with a
48Vdc/1A power adapter or
using the PASS-THRU port at
the bottom edge of the device
using Ethernet power.
Single Gang Mounting
Secure e435W to the bracket with a screw at
5.
the bottom edge of e435W using standard Torx
security screw or standard Philips head screw.
Desktop Mounting
Connect the short Ethernet
1.
jumper cable between the
two RJ-45 connections at
the rear side of e435W.
2.
Insert the e435W into the
desk stand plastic jumper
cable cover.
3.
Secure the e435W and
plastic jumper cable cover
to the metal stand by
aligning the screw holes
and inserting Torx screw.
4.
Power e435W either with a
48Vdc/1A power adapter or using
the PASS-THRU port at the
bottom edge of the device.
Advertisement

Subscribe to Our Youtube Channel
Related Manuals for Cambium Networks cnPilot e435W Indoor


Summary of Contents for Cambium Networks cnPilot e435W Indoor
- Page 1 • Torx Security Screwdriver with two hooks on the Philips Drive Pan Head Screw security screw or standard Philips head screw. Size: M3 x 6mm bracket. Model: cnPilot e435W Indoor Quantity: 1 Dual Gang Mounting Dual Gang Mounting General Wall Mounting Desktop Mounting...
- Page 2 Pour les produits disponibles aux États-Unis / Canada du marché, seul le canal 1 à 11 event shall Cambium Networks be liable for any injury or damage caused during the European Directive 2002/96/EC requires that the equipment bearing this symbol on two conditions.
Need help?
Do you have a question about the cnPilot e435W Indoor and is the answer not in the manual?
Questions and answers