Advertisement
Quick Links
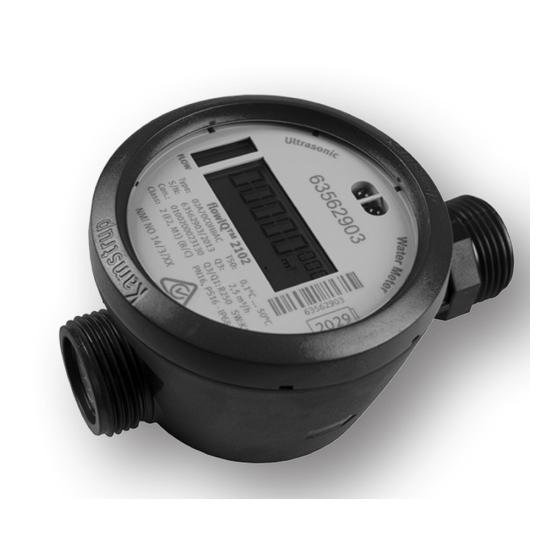
Optical eye for reading and configuration
Type number
(includes information on meter
Configuration
(with information on display resolution
Accuracy class 2 according to OIML R49
Environment class: Electrical E2 and Mechanical M1
Environment class B and C according to OIML R49
The coupling's sealing
surface must be clean
and even.
ALWAYS use new gaskets (PE
or EPDM).
The piping must be parallel and match the meter.
Graphic flow indicator
Serial no. and prod. year
FCC Cautions
Caution: Changes or modifications not expressly approved
by the party responsible for compliance could void the user's
authority to operate the equipment.
RF Exposure compliance statement: This device may be used
with no restrictions, since the source-based time-averaged
output power is ≤ 60/f(GHz) mW.
Torque
If a pipe installation is skew to the effect that the prescribed
tightening torques would be exceeded, a telescopic coup-ling
ought to be installed.
flowIQ® 2102
FCC ID: OUY-FLOW2102
¾"
Max. 15 Nm
1"
Max. 30 Nm
¾": Max. 15 Nm
1": Max. 30 Nm
Optional customer label, e.g. water company logo (15x38 mm)
Bar code with serial number
Expiry year of battery
Temperature class according to OIML R 49
Meter size Q3
Software version and dynamic range
Pressure stage and protection class
FCC identification
flowIQ® 2102
Installation guide
Advertisement

Related Manuals for Kamstrup flowIQ 2102


Summary of Contents for Kamstrup flowIQ 2102
- Page 1 Optical eye for reading and configuration Optional customer label, e.g. water company logo (15x38 mm) Bar code with serial number Graphic flow indicator Expiry year of battery Type number (includes information on meter Temperature class according to OIML R 49 flowIQ®...
-
Page 2: General Information
For sealing you can use the sealing wire holes on the lower side 1.6 Info codes and display of the threaded connections. When flowIQ® 2102 leaves Kamstrup A/S, it has been tested and Mounting the meter you must make sure that the threaded Read this guide before installing the water meter.
Need help?
Do you have a question about the flowIQ 2102 and is the answer not in the manual?
Questions and answers