Perfect Prime IR0018 Instruction Manual
Thermal imaging camera
Hide thumbs
Also See for IR0018:
- Instruction manual (13 pages) ,
- Instruction manual (14 pages) ,
- Instruction manual (34 pages)
Table of Contents
Advertisement
Quick Links
Advertisement
Table of Contents

Related Manuals for Perfect Prime IR0018


Summary of Contents for Perfect Prime IR0018
- Page 1 Thermal Imaging Camera Instruction Manual: IR0018 www.perfectprime.com...
-
Page 2: Table Of Contents
Contents 1. Overview --------------------------------------------------------------------------------------- 3 2. Considerations and Safety Maintenance --------------------------------------------------- 4 3. Performance Index ---------------------------------------------------------------------------- 5 4. Product features ------------------------------------------------------------------------------- 6 5. Initial Operation ------------------------------------------------------------------------------- 8 6. Introduction to “Setting” Sub-menu ------------------------------------------------------- 9 7. Color Palette ---------------------------------------------------------------------------------- 10 8. Application of Color Palette and Image Check ------------------------------------------ 11 9. -
Page 3: Overview
7. Night vision: Measuring the electromagnetic energies given off when objects emit heat, the IR0018 translates those energies into visible light for users to see them in the dark. 8. Building inspection: Check that heat is retained uniformly in a building. -
Page 4: Considerations And Safety Maintenance
2. Considerations and Safety Maintenance Please read the instructions carefully so as to ensure accurate measurement results and safety: Do not use the device in explosive, flammable or corrosive environments. Since the product is a precision electronic and sensitive optical device. Do not drop it or allow impacts to occur to prevent damage ... -
Page 5: Performance Index
Product size (length × width × height) 90 mm×105 mm×223 mm Product Weight 389g 0°C- 50°C Work temperature Storage temperature -40°C- +80°C < 85%RH Relative humidity LWIR: thermal infrared radiation Wavelength coverage of thermal infrared radiation of IR0018... -
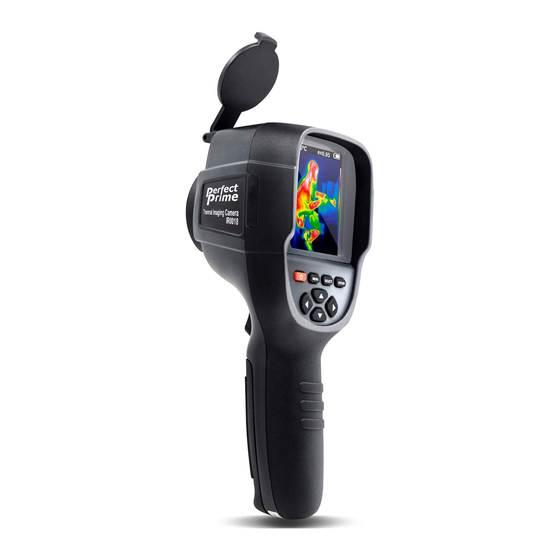
Page 6: Product Features
4. Product Features 4.1. Physical features Visible light camera Infrared imaging sensor Image capture trigger Micro USB... - Page 7 4.2. Screen features Battery power Central point temperature Current emissivity Cold point temperature cursor Color code Temperature cursor central point Hot point temperature cursor Maximum /minimum value Time of field temperature 1. Central point temperature cursor This pointer will always remain at the centre of the screen and allow the user to move the camera to identify the temperature of where they point.
-
Page 8: Initial Operation
” to hide the bottom bar off the screen which shows the maximum /minimum value and time of the field temperature. Press “ ” again to display the bottom bar. 6. Image export: use the Micro USB cable to connect the IR0018 to a computer to transfer the files. -
Page 9: Introduction To "Setting" Sub-Menu
6. Introduction to “Setting” Sub-menu Auto shutdown Display intensity Language Unit Time format Set time Spot... -
Page 10: Color Palette
7. Color Palette The menu of color palette can change the false color on the display screen or capture infrared image. There are five types of color palettes provided: rainbow, iron oxide red, cold color, black & white and white & black. Suitable selection of color palette displays the details of the target objective better: 1. -
Page 11: Application Of Color Palette And Image Check
8. Application of Color Palette and Image Check 8.1. Application of color palette 1. Press “SELECT ” to select; 2. Press “ ” to return. 3. Press “ ”/“ ” to adjust the selected items. 8.2. Check images 1. Press the menu key to select the image menu; press “ ” to enter the image menu. 2. -
Page 12: Time Setting
9. Time Setting 1. Press “ ”/“ ” to select year/month/day/hour/minute. 2. Press “SELECT” to enter edit 3. Press “ ” /“ ” to adjust the selected items. 4. After editing, press “ENTER” again to confirm and return. 5. Press left key or “MENU” key to return and complete the setting. -
Page 13: Measure Objects
11. Measure Objects According to the characteristics of the objects and surfaces to be measured, users may select corresponding measurement modes or enter “advanced” option to adjust the value of emissivity (please refer to the table of “emissivity of common materials”). To do this: 1. -
Page 14: Emissivity
12. Emissivity The emissivity of the surface of a material is its effectiveness in emitting energy as thermal radiation. The emissivity of the product can be adjusted from 0.10 to 1.00 with the default value of 0.95. Many common objects and materials (such as timber, water, skin and textile fabric) will reflect heat energy, so it is easy to obtain high accuracy as a result. -
Page 15: Image Registration
14. Image Registration The location of the visible light camera is above the infrared imaging sensor which is at the centre of the camera. Together they produce an image overlay (in between visible light mode and infrared mode) which would show the visible light image over the infrared image just like the image below.
Need help?
Do you have a question about the IR0018 and is the answer not in the manual?
Questions and answers