Table of Contents
Advertisement
Quick Links
Advertisement
Table of Contents

Related Manuals for Perfect Prime IR0005


Summary of Contents for Perfect Prime IR0005
- Page 1 Thermal Imaging Camera IR0005 New Version Instruction Manual Manual...
-
Page 2: Table Of Contents
Contents 1. Preface ................2 2. Safety Instruction ............2 - 5 3. Preliminary Acquaintance with Infrared ........6 Thermal Imager 4. Overview ................ 6 5. Cleaning of the Products ............. 7 6. Lens Maintenance ............. 7 7. Performance Indices ............. -
Page 3: Preface
1. Preface 2. Safety Instruction 1. Preface Respected users: How are you! Thank you for purchasing our instrument. In order to use it in a better manner, we remind you to read the instruction for use carefully before use and keep it properly so as to look up in the future use. 2. - Page 4 2. Safety Instruction Warning The warning describes the acts that may cause harm to users. Please observe the following operation in order to avoid electric shock or personal injury. If the product case is damaged, don’t use it continuously. Please contact the local distributors or agents of the company under such condition.
- Page 5 2. Safety Instruction Please ensure that the plug of the adapter is inserted into the specified power socket. The adapter plug may be different due to the regions. Please make confirmation whether the specification of the adapter is consist with the specification of electric appliances in your region.
- Page 6 2. Safety Instruction Don’t use abradant, isopropanol or solvent to clean the enclosure of the device. Such operation may cause the product case to be damaged. The product temperature may increase after a long time of charging. You may feel scorching heat when the hands touch the sensors. Problem caused by water condensation.
-
Page 7: Preliminary Acquaintance With Infrared
3. Preliminary Acquaintance with Infrared Thermal Imager 4. Overview 3. Preliminary Acquaintance with Infrared Thermal Imager For a long time, infrared thermal imaging detection technology has become an important means to ensure Industrial safety in developed countries. The application field includes electric power, metallurgy, petro-chemistry, machinery,coal, traffic, fire control and national defense, etc. -
Page 8: Cleaning Of The Products
5. Cleaning of the Products 6. Lens Maintenance 5. Cleaning of the Products Please use damp cloth or weak soap to clean the enclosure of the device. Don’t use abradant, isopropanol or solvent to clean. The lens and screen should be cleaned with use of cleaning agents for professional optical glasses. -
Page 9: Performance Indices
7. Performance Indices Technical parameters Product model IR0005 New Version Detector’s resolution ratio 256x192 Pixel size 12um Response wave band 8-14um NETD <50mk Frame rate 25Hz Lens focal length 3.2mm Minimum imaging distance 0.15m Viewing angle 56°x 42° IFOV 3.75mrad... - Page 10 7. Performance Indices Operating temperature -10°C-50°C Protection level IP54 Fall Hardware functions Lighting LED flash Detector 256x192 Visible light camera 0.3Mp (652x480) Display screen 3.2”LCD 240x320 Capacitive touch screen CTP3.2” 240x320 Buttons 7 functional buttons (Power on/off, up, down, left, right, select, shooting/video recording) Memory eMMC 16GB (space available at13.9G)
-
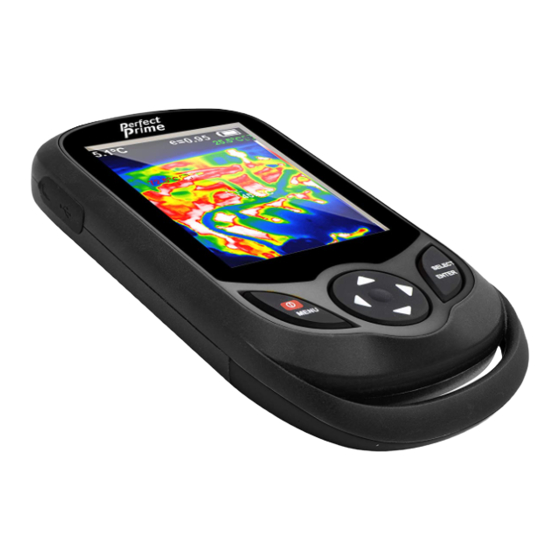
Page 11: Product Structure
8. Product Structure 8.1. Instruction to Structure Infrared imaging sensor LED lighting lamp Visible light camera Type-C USB Image capture key Selection key/Entry key On/off key/Menu key Navigation key: Up, down, left and right P.10... - Page 12 8. Product Structure 8.2. Product Structure Temperature range Current emissivity Central point Battery power temperature Color code The highest temperature cursor Temperature cursor at central point The lowest temperature Maximum value/ cursor minimum value of Time field temperature Color code: used to mark the color corresponding to the relative temperature from low to high in the field of version.
-
Page 13: Key Description/Operation Instruction
8. Key Description 9. Operation Instruction On/off key/Menu key Selection key/Entry key Navigation key: Up, down, left and right 9. Operation Instruction Product boot/shutdown Press and hold the “ /MENU” button for more than 3 seconds to turn the Thermal Imaging on or off. LCD screen display After turning on the power, the screen shows the thermal imaging status. - Page 14 9. Operation Instruction Video recording In the normal startup and running interface, long press the capture button, the screen will display the prompt “record video?” , if you want to select “Yes” at this time, please press the “ /MENU” button or the capture button to start recording.
-
Page 15: An Introduction To The Touch Button Menu
10. An introduction to the touch button menu Press the “ /MENU" button to bring up a menu bar on the left, which includes “Image overlap”, “Image”, “Video”, “Palette”, “Emissivity”, and “Set” sub menu. In which the red box areas on both sides of the menu interface are invalid touch areas, and the effective touch areas of the sub menu are as follows: Design blanks Sub menu... -
Page 16: Image" Sub Menu
10. An introduction to the touch button menu 1.2. Application of image overlap Press the “ /MENU ” button to go to the main menu, from the main menu, by touch, click on the “Image overlap” to go to the sub menu or by the Navigation button, select the image overlap sub menu, and press the “SELECT/ENTER”... -
Page 17: Video" Sub Menu
10. An introduction to the touch button menu As shown in the figure above, click on the “ < ” or “ > ” button in the middle of the screen or press the “◀” or “▶” Navigation button to be able to achieve the previewing of the previous and the next pictures. -
Page 18: Introduction To "Color Palette" Sub-Menu
10. An introduction to the touch button menu 3.2. Deleting videos In viewing videos (in case of playing or not playing), press the “▲” button, and “Delete videos?” dialog box will appear on the screen. Now, if you touch to select “Yes”... -
Page 19: Introduction To "Emissivity" Sub-Menu
10. An introduction to the touch button menu 4.2. Palette application Press the “ /MENU” button to go to the main menu, Color palette from the main menu, by touch, click on the “Palette”to go to the sub menu or by the Navigation button, select the “Palette”sub menu, and press the “SELECT/ENTER”... - Page 20 10. An introduction to the touch button menu 5.2. Emissivity Setting The product is provided with four types of object measurement modes • Coarse object (0.95) • Semi-matte object (0.85) • Semi-shiny object (0.60) • Shiny object (0.30) According to the characteristics of the measured objects, users may set the emissivity value through the “self-define”...
- Page 21 10. An introduction to the touch button menu Touch and click on the corresponding columns on the screen, and then touch and click on the “▲” or “▼” button to set the corresponding values, or by the “▶” or “◀” Navigation button, select the corresponding columns, and then by “▲” or “▼”...
-
Page 22: Set " Sub Menu
10. An introduction to the touch button menu 6.“ Set ” sub menu Press the “ /MENU” button, from the main menu, select “Set”, and then press the “SELECT/ENTER” button to go to the “Set” sub menu. SETTINGS Auto on/off ▶ 5min 20min Brightness ▶... - Page 23 10. An introduction to the touch button menu 6.1. Auto power off setting Auto shutdowm Press the “ /MENU” button to go to the main menu, from the main menu, by touch, click on the “ Set ” to go to the sub menu or by the Navigation button, select the “Set”...
- Page 24 10. An introduction to the touch button menu 6.3. Language setting Press the “ /MENU” button to go to the main menu, Luaguage from the main menu, by touch, click on the “ Set ” to go to the sub menu or by the Navigation button, select the “Set”...
- Page 25 10. An introduction to the touch button menu As shown in the figure above, By touch, select “Celsius” or “Fahrenheit” option, or press the “▲” or “▼” Navigation button to select these 2 options, and then press the “SELECT/ENTER” button for confirmation. After setting is okay, by touch, click on the left upper corner to return or press the “...
- Page 26 10. An introduction to the touch button menu As shown in the figure above, By touch, select the “24-hour system” and “12-hour system” options, or press the “▲” or “▼” Navigation button to select these 2 options, and then press the “SELECT/ENTER” button for confirmation. After setting is okay, by touch, click on the left upper corner to return or press the “...
- Page 27 10. An introduction to the touch button menu 6.7.2. Setting time By touch, click on the “Set time” to go to the setting, or Set time by the “▲” or “▼” Navigation button, select “Set Time”, and then press the “SELECT/ENTER” button to go to the setting, as shown in the figure: As shown in the figure above, there are three columns like “H”, “M”...
- Page 28 10. An introduction to the touch button menu 6.9. WIFI setting First, connect the wifi connection function requiring WIFI support by the A2+ device, and then press the “ MENU ” button to go to the main menu, from the main menu, by touch, click on the “Set”...
-
Page 29: Thermal Imaging Image Analysis Software
11. Thermal Imaging Image Analysis Software Operation Guide Software Installation And Operation Connect the product with a USB cable, and then connect to the computer. Open the removable disk in the computer, find the "INSTALLATION PACKAGE" folder and open it, and click to install the software. - Page 30 11. Thermal Imaging Image Analysis Software Operation Guide Interface Introduction Select the language in the upper right corner of the interface, you can choose Chinese, English, and switch between the two languages. On the right are shown as: fusion rate, color palette, temperature unit, picture information •...
- Page 31 11. Thermal Imaging Image Analysis Software Operation Guide Icon Introduction " " icon, take the temperature of the thermal image. " " icon, select the maximum temperature and minimum temperature of the thermal image in a straight line. " " icon, select the thermal imaging map to select the maximum temperature and minimum temperature.
- Page 32 11. Thermal Imaging Image Analysis Software Operation Guide Troubleshooting If you encounter with any problem when using the thermal image device,please use the following table for repair.If the problems are not solved, please cut off the power supply and contact with the manufacturer. Failure phenomenon Failure cause Solution...
- Page 33 For B2B or project-based application, please send an email: sales@perfectprime.com FOR MORE INFORMATION ABOUT PERFECT PRIME PLEASE VISIT OUR ABOUT US PAGE AND FEEL FREE TO BROWSE. 製品マニュアルページのQRコードをスキャンする (特定の製品で利用可能な多言語) Scan QR Code for the Product Manual page...
- Page 34 Tyche Smart Limited Retailer Email cs@perfectprime.com 2nd Floor, 107 Charterhouse Street, EC1M 6HW, London, Address England UNITED KINGDOM +44 203 7695377 Telephone...
Need help?
Do you have a question about the IR0005 and is the answer not in the manual?
Questions and answers