Table of Contents
Advertisement
Quick Links
Advertisement
Table of Contents

Related Manuals for Craftex B2060V


Summary of Contents for Craftex B2060V
- Page 3 WARNING For Your Own Safety Read Instruction Manual Before Operating Saw a) Wear eye protection. b) Do not remove jammed cutoff pieces until blade has stopped. c) Maintain proper adjustment of blade tension, blade guides, and thrust bearings. d) Adjust upper guide to just clear workpiece. e) Hold workpiece firmly against table.
-
Page 4: General Safety Information
B. Never use a blade finer than required to obtain a General Safety Information satisfactory surface finish or satisfactory flatness. (Too many teeth engaged in the workpiece will Read the Instruction manual before operating the prevent attainment of a satisfactory sawing rate; machine. -
Page 7: Single Phase
Single Phase Refer to the wire drawing inside the electrical box and above for proper motor and transformer connections, lead selection and wiring connections from the motor to the power source for the voltage you are using. Important: Immediately after wiring the machine, remove the drive belt, turn on the power and make sure the motor is running in the right direction (counter-clockwise when looking at the motor shaft.) -
Page 8: Starting And Stopping The Machine
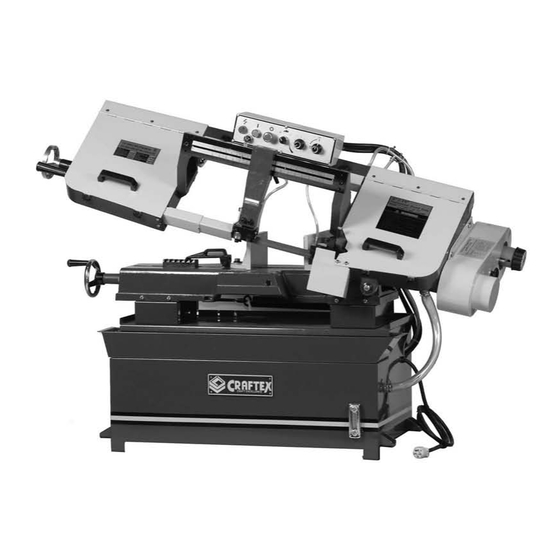
8. Place the blade in place on the wheels (A) and through the upper blade guard. (B) Fig.1. 9. Work the blade all the way up between the blade guide bearings with the back of the blade against the back-up bearing, as shown in Fig.2. Note: If bearings need adjustment, refer to the section adjusting blade guide roller bearings. -
Page 9: Blade Tracking Adjustment
Blade Tracking Adjustment Blade tracking has been set at the factory and should require no adjustment. If a tracking problem occurs, adjust the machine as follows: Since tracking can only be adjusted while machine is running, it is suggested that this adjustment be accomplished by qualified personnel that are familiar with this type of adjustment and the dangers associated with it. -
Page 10: Adjusting Blade Guide Brackets
Adjusting Blade Guide Brackets The blade guides should be set as close to the vise jaws as possible. The right blade guide bracket, is not adjustable and is set at the factory to clear the right hand vise jaw. The left blade guide bracket can be moved to the left or right depending on the position of the left hand vise jaw. -
Page 11: Vise Adjustment
Vise Adjustment To position the moveable vise jaw: 1. Turn vise handwheel (A – Fig.10) 1/2 turn counter-clockwise. 2. Move rack block (B – Fig.10) to desired location by sliding along the bed. Place the rack block onto the rack. 3. -
Page 12: Changing Speeds
Changing Speeds For 916A Your machine is provided with four speeds. To change speeds, proceed as follows: 1. Disconnect the machine from the power source. 2. Loosen wing nut (A), Fig.12 and lift up and swing belt and pulley guard (B) to the side of the machine. -
Page 13: Part List
PART LIST Part Part Description Size No. Q’ty Description Size No. Q’ty Base 29-1 Wire Protector Closed Bearing HK25 15 Power Cord Bushing 30-1 Hex. Cap Bolt Torsion Spring M12×65 Pivot Shaft Washer Washer 32-1 Lock Washer 32-2 Hex. Cap Bolt M12×20 Hex. - Page 14 PART LIST Part Part Description Size No. Q’ty Description Size No. Q’ty Vise Jaw-Left Support Shaft Hex. Cap Bolt C-Ring S-19 102-1 M12×50 Washer Hex. Cap Bolt M12×35 Lock Washer Motor Mount Bracket 66-1 Vise Jaw-Right Washer 104-1 1/2〞 Hex. Cap Bolt 104-2 M12×40 Hex.
- Page 15 PART LIST Part Part Description Size No. Q’ty Description Size No. Q’ty Scale Round Head Screw M5×8 Round Head Screw Wheel Box-Left 135-1 Hex. Socket Cap Screw Lock Plate 171-1 M10×25 Slide Washer 171-2 Blade Bracket-Left Hex. Cap Bolt 171-3 M6×16 Hex.
Need help?
Do you have a question about the B2060V and is the answer not in the manual?
Questions and answers