Table of Contents
Advertisement
Advertisement
Table of Contents

Subscribe to Our Youtube Channel
Related Manuals for Craftex CX212


Summary of Contents for Craftex CX212
- Page 1 MODEL CX212 10” CABINET TABLE SAW USER MANUAL Version 1.0...
-
Page 3: General Safety Instructions
GENERAL SAFETY INSTRUCTIONS Extreme caution should be used when operating all power tools. Know your power tool, be familiar with its operation, read through the owner’s manual and practice safe usage procedures at all times. ALWAYS read and understand the NEVER leave a tool unattended while it user manual before operating the is in operation. - Page 4 CX212 SPECIFIC SAFETY INSTRUCTIONS NEVER use a saw blade that has DO NOT attempt to remove jammed missing carbide teeth, loose teeth, or pieces unless the table saw has come to chipped or broken teeth. a complete stop and the power switch...
- Page 5 MODEL CX212 – 10” CABINET TABLE SAW WITH 30" FENCE As part of the growing line of Craftex woodworking equipment, we are proud to offer CX212 a 10” Cabinet Table Saw. By following the instructions and procedures laid out in this owner’s manual, you will receive years of excellent service and satisfaction.
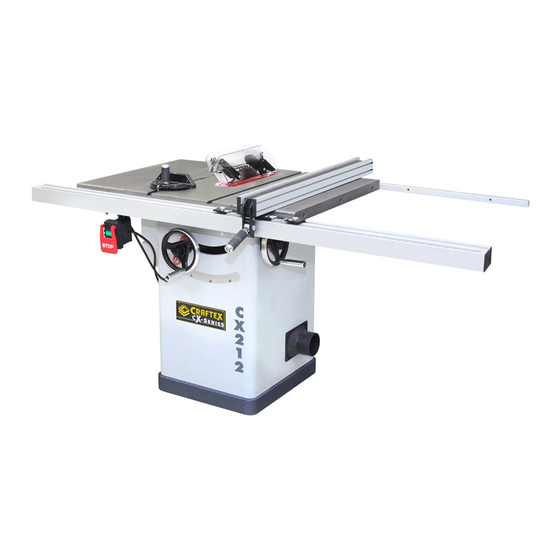
- Page 6 CX212 – 10" CABINET TABLE SAW PHYSICAL FEATURES Blade Front Guard Fence Rail Miter Gauge Fence Rear Fence Rail Left Extension Wing ON/OFF Switch Blade Height Right Lock Extension Wing Blade Height Blade Tilt Hand Wheel Lock Blade Tilt Blade Tilt...
- Page 7 F. Dado Insert ........1 WARNING! G. Saw Blade 10" x 40T ....... 1 CX212 is a very heavy machine, do not over-exert yourself. For safe moving H. Spreader .......... 1 method use fork truck or get the help of an assistant or friend.
-
Page 8: Proper Grounding
CX212 is for use on a normal 110 volt In case if you really find it necessary to use circuit. Make sure that the machine is... - Page 9 ASSEMBLY Follow the instructions given below to assemble your CX212 table saw. Install the hand wheels onto the shafts and make sure the notch in each wheel fits over the pin on each shaft. Secure the knobs. See figure-2. Figure-3 Installing the extension wings Attach motor cover to the saw cabinet using screws provided.
- Page 10 Install the end cap on the left end of the Install the switch onto the hex bolts front fence rail. See figure-6. previously inserted into the fence rail slot. See figure-8. Figure-6 Installing the end cap onto the rail Figure-8 Installing the switch Slide eight hex bolts into the open slot on the fence rail.
- Page 11 Place the fence on the fence rails and press Install the blade guard on the spreader and the handle down to lock the fence in lock it in position by tightening the lock position. See figure-11. lever. Figure-13 Installing the blade guard Figure-11 Installing the fence Install the dust port to the table saw cabinet Loosen the lock lever shown in figure-12.
-
Page 12: Connecting To A Dust Collector
COLLECTOR Once you have assembled your machine completely, it is then time for a test run to CX212 features a 4” diameter dust port to make sure that the machine works properly connect to a dust collector. and is ready for operation. -
Page 13: Blade Guard
If the machine starts, immediately stop the BLADE GUARD machine. The switch disabling feature is not working properly. This needs to be fixed The blade guard assembly on your CX212 before operating the table saw. consists of a clear polycarbonate shield, spreader and anti-kickback pawls. -
Page 14: Riving Knife
RIVING KNIFE WORK-PIECE INSPECTION The riving knife is a metal plate which Before cutting the work-piece, make sure to prevents the newly cut work-piece from inspect it for nails, staples, small pieces of pinching at the backside of the blade and stone or metal and any other object which causing kickback. -
Page 15: Main Table To Blade Parallelism
Once the table Your CX212 will give a better result if the is parallel to the blade, retighten the main table is parallel to the blade. If it is not mounting bolts. -
Page 16: Replacing The V-Belt
Once there is approximately 1/2" deflection REPLACING THE V-BELT in the belts when applying moderate pressure using your finger, re-tighten the Turn the table saw switch “OFF” and hex nuts. remove the cord from the power source. Remove the motor cover from the side of the machine. -
Page 17: Maintenance
MAINTENANCE LUBRICATION During the life of your machine, you will It is important to clean the parts before need to practice some regular maintenance lubricating them. to keep your sander in peak performance condition. Apply a thin layer of grease to the lubricating locations shown in the following WARNING! figures.
Need help?
Do you have a question about the CX212 and is the answer not in the manual?
Questions and answers