Clearaudio Master Innovation Black User Manual
Picture with:
clearaudio tonearm universal and clearaudio cartridge goldfinger statement.
picutre with:
clearaudio tonearm tt1 mi and clearaudio cartridge goldfinge statement.
Hide thumbs
Also See for Master Innovation Black:
- User manual (24 pages) ,
- User manual (24 pages) ,
- User manual (28 pages)
Advertisement
Quick Links
Upgrade Innovation to
Master Innovation
User manual
© clearaudio electronic GmbH, 2018/05
Master Innovation Wood
Picutre with:
Clearaudio tonearm „TT1 MI"
and Clearaudio cartridge
„Goldfinge Statement".
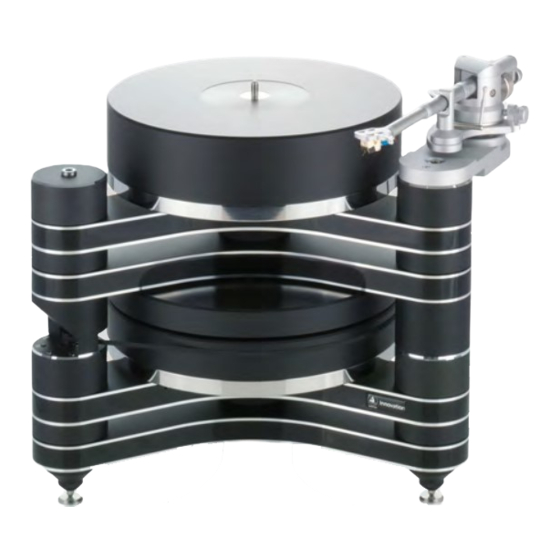
Master Innovation Black
Picture with:
Clearaudio tonearm „Universal"
and clearaudio cartridge
„Goldfinger Statement".
Made in Germany
Advertisement

Related Manuals for Clearaudio Master Innovation Black


Summary of Contents for Clearaudio Master Innovation Black
- Page 1 Upgrade Innovation to Master Innovation User manual Master Innovation Black Picture with: Clearaudio tonearm „Universal“ and clearaudio cartridge „Goldfinger Statement“. Master Innovation Wood Picutre with: Clearaudio tonearm „TT1 MI“ and Clearaudio cartridge „Goldfinge Statement“. © clearaudio electronic GmbH, 2018/05 Made in Germany...
- Page 2 EQUIPMENT MAINS POWER SETTING Your Clearaudio product has been prepared to comply with the household power and safety requirements that exist in your area. This product can be connected to 230 V or 110 V AC (50 Hz and 60 Hz).
-
Page 3: Table Of Contents
User manual Contents 1. Packing overview ..............4 2. List of components ..............5 3. Reconstruction Innovation to Master Innovation ....6 - 16 4. Fine adjustment of the motor ..........16 5. Special notes ................17 6. Technical data ................. 18 Warranty –... -
Page 4: Packing Overview
User manual 1. Packing overview Box 1 of 2: Drive unit, already pre-mounted at factory, accessories Box 2 of 2: Stainless steel platter, drive platter (38 mm) Pic. 1: Packing overview © clearaudio electronic GmbH, 2018/05... -
Page 5: List Of Components
User manual 2. List of components Master Innovation Clearaudio’s special secure packaging for your turntable ensures safe transportation. Please keep this original packaging, in case you need to transport or ship the turntable at any point in the future. Master Innovation... -
Page 6: Reconstruction Innovation To Master Innovation
After the reconstruction the turntable requires a space for setup of at least (in inch): 18.9 x 19.3. 19.29 inches / 490 mm 18.90 inches 480 mm Pic. 3: Required setup space (with Clearaudio tonearm Unify © clearaudio electronic GmbH, 2018/05... - Page 7 User manual Innovation Master Innovation Before you can start to reconstruct the turntable to the please pay Innovation all bases of the turntable have the height of 40 mm! attention that If one of your bases has not the height of 40 mm, please contact the dealer, where you have Innovation purchased your turntable.
- Page 8 Next please remove the bearing of your . For that unscrew carefully the screw on the lower side of the turntable and pull the bearing out of the chassis. Screw on the lower side Pic. 7: Removing the bearing © clearaudio electronic GmbH, 2018/05...
- Page 9 User manual Master Innovation Take out the delivered drive bearing for the Please remove carefully any protective security tape from the bearing. Now you can put the new bearing into the chassis (see pic. 6) and arm the bearing with the delivered screw on the lower side of the turntable.
- Page 10 (Pic. 11 and 12). Please remove the lamination extreme carefully and avoid any soiling and scratches. Pic. 11: Setup of the sub platter Pic. 12: Setupf of the sub platter © clearaudio electronic GmbH, 2018/05...
- Page 11 User manual Take the drive platter with both hands carefully out of the box and remove the protection sheet. Please pay attention that the magnets on the upper surface of the drive platter must be faced upwards. Magnets (face upwards) Pic.
- Page 12 Please pay attention that all center pins must be set very carefully into all threaded holes. Center pin to set into threaded hole Center pin to set into threaded hole Pic. 13: Setup of the turntable unit Pic. 14: Finished setup of the turntable unit © clearaudio electronic GmbH, 2018/05...
- Page 13 User manual 11.) Take the stainless steel sub-platter out of the box 3 and remove only the protection sheet, but keep the protection film of the upper side of the sub-platter. Put the sub-platter very carefully onto the upper part of the bearing (pic. 15a) Now take the main platter out of the box and set it up onto the upper part of the bearing.
- Page 14 You will find suitable adjustment equipment under www.clearaudio.de www.analogshop.de. 12.) To install the tonearm, please follow the user manual of the respective manufacturer. If you purchased your Clearaudio Innovation turntable as a package with tonearm and cartridge, Smart Level Gauge you will find a...
- Page 15 User manual 13.) To mount and adjust a cartridge, please follow the user manual of the respective manufacturer. 14.) The following final adjustment is very important: Please ensure that your turntable rack is in a levelled position. Master Innovation Please check with the bubble level gauge, if your turntable is in a levelled position.
-
Page 16: Fine Adjustment Of The Motor
Clean the sensor and the scale ring with a little isopropyl alcohol and a cotton bud. Be careful and avoid any scratches on the sensor or the scale ring! If the motor has further more speed variations please contact your nearest authorized Clearaudio dealer or directly the Clearaudio factory. -
Page 17: Special Notes
When repackaging the turntable, please follow in reverse the steps indicated in this manual for installation and setup (from section 1). 5.3 Service Any required servicing of Clearaudio products should be carried out by authorized personnel only. Master Innovation In the case of repairs, the... -
Page 18: Technical Data
Warranty: 5 years* * Provided that the warranty card is correctly completed and returned to Clearaudio within 14 days of purchase. Clearaudio electronic is not responsible for typographical errors in descriptions. Technical specifications subject to change or improvement without prior notice. -
Page 19: Warranty - Information
Le reçu ou la facture constituent des preuves suffisantes. DEUTSCH GARANTIE Bei Garantiefragen wenden Sie sich bitte zunächst an Ihren Clearaudio Händler. Heben Sie Ihren Kaufbeleg gut auf. WICHTIG! Die Angaben auf Ihrer Quittung erlauben uns die Identifizierung Ihres Gerätes und belegen mit dem Kaufdatum die Dauer Ihrer Garantie-Ansprüche. - Page 20 ESPAÑOL GARANTIA Para obtener información acerca de la garantia póngase en contacto con su distribuidor Clearaudio. GUARDE SU RECIBO DE COMPRA Su recibo de compra es su prueba permanente de haber adquirido un aparato de valor, Este recibo deberá...
- Page 21 User manual Made in Germany...
- Page 22 User manual © clearaudio electronic GmbH, 2018/05...
- Page 23 User manual Made in Germany...
- Page 24 91054 Erlangen Germany Phone/Tel.: +49 9131 40300 100 Fax: +49 9131 40300 119 www.clearaudio.de www.analogshop.de info@clearaudio.de Handmade in Germany (Technische Änderungen vorbehalten - Technical specification are subject to change without prior notification) 2018 © clearaudio electronic GmbH, 2018/05 Made in Germany...
Need help?
Do you have a question about the Master Innovation Black and is the answer not in the manual?
Questions and answers