Raymarine SeaTalk Owner's Handbook Manual
Remote keypad
Hide thumbs
Also See for SeaTalk:
- User manual (20 pages) ,
- Operation instruction manual (21 pages) ,
- Quick reference manual (2 pages)

Related Manuals for Raymarine SeaTalk


Summary of Contents for Raymarine SeaTalk
- Page 1 81073_6.book Page 1 Thursday, March 2, 2006 2:39 PM SeaTalk Remote Keypad Owner’s Handbook Document number: 81073-6 Date: February 2006...
- Page 2 81073_6.book Page 2 Thursday, March 2, 2006 2:39 PM Raymarine, ST60 and SeaTalk are trademarks of Raymarine UK Ltd. © Handbook contents copyright Raymarine UK Ltd.
-
Page 3: Important Information
Safety notices WARNING: Product installation & operation This equipment must be installed and operated in accordance with the Raymarine instructions provided. Failure to do so could result in personal injury, damage to your boat and/or poor product performance. WARNING: Electrical safety Make sure you have switched off the power supply before you start installing this product. -
Page 4: Emc Conformance
The Waste from Electrical and Electronic Equipment (WEEE) Directive requires the recycling of waste electrical and electronic equipment. Whilst the WEEE Directive does not apply to some of Raymarine’s products, we support its policy and ask you to be aware of how to dispose of this product. -
Page 5: Table Of Contents
81073_6.book Page iii Thursday, March 2, 2006 2:39 PM Contents Important information ..................i Safety notices ....................i WARNING: Product installation & operation ......i WARNING: Electrical safety ............i WARNING: Navigation aid .............i EMC conformance ................... ii Waste from Electrical and Electronic Equipment (WEEE) Directive ....ii Handbook information .................. - Page 6 81073_6.book Page iv Thursday, March 2, 2006 2:39 PM...
-
Page 7: Introduction
81073_6.book Page v Thursday, March 2, 2006 2:39 PM SeaTalk Remote Keypad Owner’s Handbook Introduction The SeaTalk Remote Keypad enables you to remotely operate the following instruments on a SeaTalk system: • Standard (110 mm x 110 mm) ST60 instruments. - Page 8 81073_6.book Page vi Thursday, March 2, 2006 2:39 PM SeaTalk Remote Keypad Owner’s Handbook Port and starboard steering stations on a catamaran Port Starboard steering steering station station SeaTalk link Cabin steering station Flybridge and cabin steering SeaTalk link stations on a power vessel...
-
Page 9: Parts Supplied
81073_6.book Page vii Thursday, March 2, 2006 2:39 PM SeaTalk Remote Keypad Owner’s Handbook Parts supplied Unpack your Seatalk remote keypad and check that the following items are present: Remote keypad SeaTalk cable Fixing studs (x2) Installation template Thumb nuts (x2) Owner’s Handbook... - Page 10 81073_6.book Page viii Thursday, March 2, 2006 2:39 PM viii SeaTalk Remote Keypad Owner’s Handbook...
-
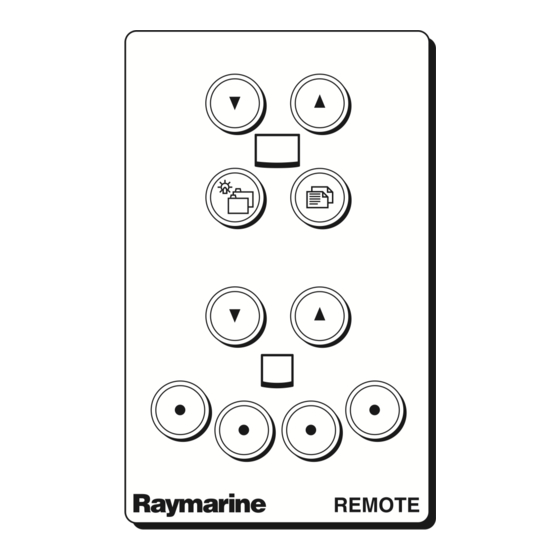
Page 11: Chapter 1: Operation
81073_6.book Page 1 Thursday, March 2, 2006 2:39 PM Chapter 1: Operation Chapter 1: Operation 1.1 Basic operation Key functions The following illustration shows the functions assigned to each key or key sequence. Select required ST80 MaxiView Cycle chapters on selected ST80 MaxiView Cycle pages in selected ST80 MaxiView chapter Select required standard instrument These four keys duplicate the functions... -
Page 12: General Information
81073_6.book Page 2 Thursday, March 2, 2006 2:39 PM SeaTalk Remote Keypad Owner’s Handbook ST80 ST60 Typical remote indications D2354-2 1.2 General information • The Remote Keypad beeps when a key is pressed. • The Remote Keypad is permanently illuminated to facilitate operation in all lighting conditions. -
Page 13: Chapter 2: Maintenance & Fault Finding
Keypad does not operate • Make sure the cable connecting the keypad to SeaTalk is connected properly. • Make sure the cable is not damaged. Replace the cable if it is damaged. Instruments do not operate in a logical sequence •... -
Page 14: All Instruments Operate At The Same Time
81073_6.book Page 2 Thursday, March 2, 2006 2:39 PM SeaTalk Remote Keypad Owner’s Handbook All instruments operate at the same time • Instruments are not grouped. Refer to Chapter 4, Setup chapter for grouping details. Instruments cannot be remotely controlled... -
Page 15: Chapter 3: Installation
Chapter 3: Installation 3.1 Planning your installation Before installing your SeaTalk Remote Keypad, spend some time considering the best position. It should be fitted in a position which gives optimum accessibility while at the same time satisfying the EMC installation guidelines and the other Site requirements, described below. - Page 16 Raymarine equipment. Always use the ferrites supplied by Raymarine. Connections to Other Equipment If your Raymarine equipment is to be connected to other equipment using a cable not supplied by Raymarine, a suppression ferrite MUST always be attached to the cable near the Raymarine unit.
-
Page 17: Procedure
D2756-6 3.2 Procedure Install your SeaTalk Remote Keypad as follows: 1. Using the template at the rear of this handbook, mark the centres for the fix- ing stud clearance holes (2) and the aperture (3) for the rear of the keypad. - Page 18 7. Offer up the assembled keypad, gasket and studs to the bulkhead, and plug the SeaTalk cables (6) into the back of the keypad as shown. 8. Fit the keypad to the bulkhead, by inserting the fixing studs (1) through the drilled holes (2) and securing with the thumb nuts (5).
-
Page 19: Check Before Going To Sea
81073_6.book Page 7 Thursday, March 2, 2006 2:39 PM Chapter 3: Installation Active Compass Masterview Autopilot Keypad 3-Way SeaTalk Connector Block SeaTalk Course Computer Autopilot connections D2423-2 • If you require extension cables, please refer to the display head installation chapter for a list of options. - Page 20 81073_6.book Page 8 Thursday, March 2, 2006 2:39 PM SeaTalk Remote Keypad Owner’s Handbook...
-
Page 21: Chapter 4: Setup
81073_6.book Page 9 Thursday, March 2, 2006 2:39 PM Chapter 4: Setup Chapter 4: Setup 4.1 Introduction to instrument grouping When a Remote Keypad is first installed, all instruments respond simultaneously to the Remote Keypad button presses. Although this simultaneous operation may be suitable for installations with a small number of instruments, in larger installations, it is often more convenient to organize instruments into groups. - Page 22 81073_6.book Page 10 Thursday, March 2, 2006 2:39 PM SeaTalk Remote Keypad Owner’s Handbook Typical ST80 digital Typical ST80 analogue Typical ST60 digital Typical ST60 analogue ST60 Tridata Group setup indications - identifying instruments D2357-3 2. Use the key to select a instrument to be the first in the group.
- Page 23 81073_6.book Page 11 Thursday, March 2, 2006 2:39 PM Chapter 4: Setup 4. Press the key to select another instrument and repeat the procedure in step 3. 5. Repeat the procedure in steps 3 and 4 until all instruments in the group have been identified.
-
Page 24: Grouping St80 Maxiview Instruments
81073_6.book Page 12 Thursday, March 2, 2006 2:39 PM SeaTalk Remote Keypad Owner’s Handbook 8. When all groups have been defined and all Remote Keypads allocated, simul- taneously press the middle two keys of the bottom row for 1 second, to return to group setup mode, then simultaneously press the middle two keys for a further 2 seconds to return to normal operation. - Page 25 81073_6.book Page 13 Thursday, March 2, 2006 2:39 PM Chapter 4: Setup 6. Assign a Remote Keypad to the required group as follows: i. Use the key to select any instrument in the required group. ii. Press the keys together for 1 second. The message PRESS A KEY ON THE KEYPAD FOR THIS GROUP is displayed.
- Page 26 81073_6.book Page 14 Thursday, March 2, 2006 2:39 PM SeaTalk Remote Keypad Owner’s Handbook...
-
Page 27: Chapter 5: Specification
81073_6.book Page 15 Thursday, March 2, 2006 2:39 PM Chapter 5: Specification Chapter 5: Specification Dimensions: 110 mm x 68 mm x 17 mm (4.33 in x 2.67 in x 0.66 in) Power supply: 10 V to 16 V dc Current consumption: 90 mA to 190 mA (illumination full on) Operating temperature:... - Page 28 81073_6.book Page 16 Thursday, March 2, 2006 2:39 PM SeaTalk Remote Keypad Owner’s Handbook...
- Page 29 81073_6.book Page 17 Thursday, March 2, 2006 2:39 PM Chapter 5: Specification Datum Line for Instrument & Keypad alignment Drill 5mm ( ") Machine 45mm (1 ") Drill 5mm ( ") SeaTalk Remote Keypad Fitting Template...
- Page 30 81073_6.book Page 18 Thursday, March 2, 2006 2:39 PM SeaTalk Remote Keypad Owner’s Handbook...
- Page 31 For any Raymarine product or system that (i) has been installed on your vessel by a Raymarine-certified service agent or by a Raymarine OEM, and (ii) has a MSRP equal to or greater than USD $2,500, you are eligible to receive warranty service by a Raymarine certified service agent on-board your vessel (‘On Board Warranty Service’) for a period of 12...
- Page 32 Other conditions This Warranty is fully transferable provided that you furnish the original proof of purchase to Raymarine or, in the case of On Board Warranty Service, to a Raymarine-certified service agent. This Warranty is void if the label bearing the serial number has been removed or defaced.
- Page 33 2 years (24 months), subject to the limits contained in this warranty document. In the case of a product installed, by a Raymarine certified OEM installer, on a new boat prior to the sale of the boat to a customer, the 2-year period will begin on the date of the sale of the boat to the customer.
- Page 34 Raymarine Service Agent) at no further cost and promptly returned to the customer. 3.3 In cases where the customer is making a warranty claim and the product has been installed by a Raymarine certified installer, (boat builder, installer, dealer etc.) i.e. Onboard warranty, the nearest Raymarine approved service agent should be contacted and onboard service requested (which will be subject to the limits referred to in paragraph 4.12 below).
- Page 35 81073_6.book Page V Thursday, March 2, 2006 2:39 PM Raymarine World Wide Warranty 4.10 If repairs are necessary under the warranty, the affected product must be forwarded to a Raymarine facility or a Raymarine approved service agent, at the owner’s expense.
- Page 36 Raymarine Technical Support Raymarine Technical Support +44 (0) 23 9271 4713 1-800-539-5539 or, +1 603-881-5200 Product Repair and Service Product Repair and Service Raymarine Product Repair Center Raymarine plc Anchorage Park 21 Manchester Street, Portsmouth Merrimack, PO3 5TD NH 03054-4801...
Need help?
Do you have a question about the SeaTalk and is the answer not in the manual?
Questions and answers