
Related Manuals for Lumens DC235


Summary of Contents for Lumens DC235
- Page 1 DC235 Visual Presenter User Manual [Important] To download the latest version of quick start guide, multilingual user manual, software, or driver, etc., please visit Lumens http://www.lumens.com.tw/goto.htm English...
-
Page 2: Table Of Contents
EN55022 (CE Radiation) Warning ............... 5 Chapter 2 Package Content................6 Chapter 3 Product Overview ................7 Relative position of the presenter and DC235 ........8 Recommend distance ................. 8 Incorrect use ..................9 Chapter 4 Installation and Connections ............. 10 System Diagram ................ -
Page 3: English
I would like to switch the pre/next screen of the live image (PAN) ... 16 To be used in other applications ............16 Chapter 8 Connecting to Microscope ............22 Chapter 9 Troubleshooting................23 English... -
Page 4: Copyright Information
Inc. Copying, reproducing or transmitting this file is not allowed if a license is not provided by Lumens Digital Optics Inc. unless copying this file is for the purpose of backup after purchasing this product. In order to keep improving the product, Lumens Digital Optics Inc. hereby reserves the right to make changes to product specifications without prior notice. -
Page 5: Chapter 1 Precautions
Chapter 1 Precautions Always follow these safety instructions when setting up and using the visual presenter: Do not place visual presenter in tilted position. Do not place the visual presenter on an unstable trolley, stand or table. Do not use the visual presenter near water or source of heat. Use attachments only as recommended. -
Page 6: Safety Precautions
Safety Precautions Warning: To reduce the risk of fire or electric shock, do not expose this appliance to rain or moisture. This visual presenter has a 3-wire AC line Plug. This is a safety feature to ensure that the plug will fit into the power outlet. -
Page 7: Chapter 2 Package Content
Chapter 2 Package Content DC235 Quick Start Guide User Manual (For download of other language versions, please visit Lumens website) Base Installation Guide Download Card USB Cable Power Cord Microscope Adapter Software Bag Appearance may vary with country/region... -
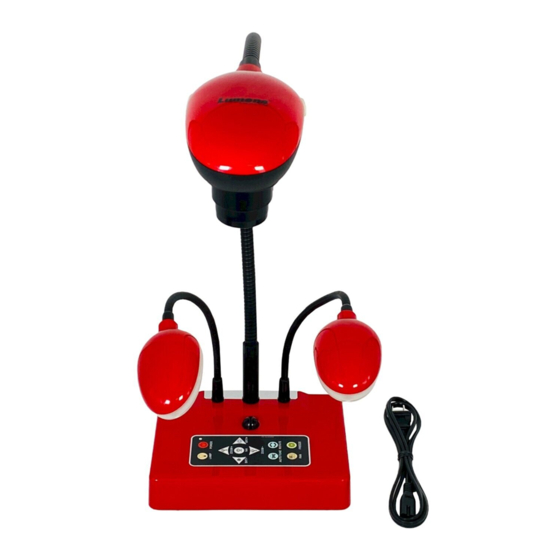
Page 8: Chapter 3 Product Overview
Chapter 3 Product Overview 7. Gooseneck 6. AF button 3. LED indicator 1. Lamp 2. Control Panel 8. Built-in Microphone 4. Lens 5. DIP Switch Settings (Bottom) English... -
Page 9: Relative Position Of The Presenter And Dc235
3.1 Relative position of the presenter and DC235 DC235 Presenter Document 3.2 Recommend distance * About 470 mm distance between camera and the desktop is recommended. English... -
Page 10: Incorrect Use
3.3 Incorrect use English... -
Page 11: Chapter 4 Installation And Connections
Chapter 4 Installation and Connections 4.1 System Diagram 4.2 Mounting the DC235 at Desktop Please set up the DIP Switch settings first. Refer to Chapter 5 DIP Switch Settings in the DC235 user manual. Please refer to the Base Installation Guide for installation instructions for all parts. -
Page 12: Start Using The Dc235
Use a USB cable to connect to a computer and install drivers and applications. 4.4 Start Using the DC235 Once DC235 is turned on, the LED on the control panel will flash a few times and stay lit. Please contact your distributor if the LED is not on. Control Panel... -
Page 13: Installing Application Software
4.5 Installing application software After installing the USB driver and application software, you can use the following functions: Control the DC235. Capture and record images. Annotate the image, highlight important details and save it. Support the full screen function. -
Page 14: Chapter 5 Dip Switch Settings
Chapter 5 DIP Switch Settings <Note>: You must re-start DC235 for DIP switching configuration to take effective. 5.1 SXGA output (default values): 5.2 XGA output: English... -
Page 15: Chapter 6 Introductions To Control Panel Buttons
Chapter 6 Introductions to Control Panel Buttons <Remark> The below functions are listed alphabetically Name Function Descriptions Turn on and off the visual presenter. ,,, Move up, down, left or right to select the needed function. AUTO TUNE Automatically adjust the image to have the best brightness and focusing performance. -
Page 16: Chapter 7 Descriptions Of Major Functions
Chapter 7 Descriptions of major functions 1. To use DC235, it must be connected to a computer. Please complete USB connection and installing drivers first. Please refer to Chapter 4 Installation and Connections of this User Manual. 2. Select [Cisual Presenter V2] to open live screen. -
Page 17: I Would Like To Adjust The Brightness
7.4 I would like to adjust the brightness 1. Press [BRT +] to increase the brightness. 2. Press [BRT -] to decrease the brightness. 7.5 I would like to switch the pre/next screen of the live image (PAN) 1. Press [PAN] to enter the image pan mode. 2. - Page 18 2. Select [Visual Presenter V2] and click [Custom Insert]. 3. Click [Get Picture]. It will capture the photo of live image. 7.6.3 I would like to change the setting of DC235 then capture a photo in MS-Word 1. Click [Insert / Image / From Scanner or Camera] in MS-Word.
- Page 19 2. Select [Visual Presenter V2 TWAIN] and click [Custom Insert]. 3. A window showing a live image (see below) will be displayed: 4. Press [Setting] You are allowed to adjust the live image by exiting the Camera Settings window. 5. Press [Capture] to capture images in MS-Word. 6.
- Page 20 7.6.4 I would like to set the DC235 as a webcam for Skype The DC235 can be used as a webcam for teleconferencing software such as Skype and MSN. The following instructions use Skype as an example: 1. Open Skype and enter [Tools] > [Options].
- Page 21 7.6.5 I would like to connect Interactive Whiteboard 1. System Diagram 2. Using StarBoard 2.1 Install LuLulizer and execute “LuLulizer.exe” <Note> Please download LuLulizer from the website: www.lumens.com.tw/goto.htm 2.2 Press [StarBoard] / [LULU] 2.3 Display the live image English...
- Page 22 2.4 Press [StarBoard] / [Mode] / [TWAIN] Please refer to 7.10.2 I would like to insert a photo in MS-Word for operation 3. Using StarBoard 3.1 Press [Insert] / [Picture From Scanner] 3.2 Please refer to 7.10.2 I would like to insert a photo in MS-Word for operation English...
-
Page 23: Chapter 8 Connecting To Microscope
Ø 28mm, Ø 31mm, Ø 33mm, and Ø 34mm. 2 The lens of DC235 connects with the microscope adaptor. If the eyepiece is Ø 33mm or Ø 34mm, If the eyepiece is Ø 28mm or Ø 31mm, you only one Lumens microscope need two microscope adapters. -
Page 24: Chapter 9 Troubleshooting
Chapter 9 Troubleshooting This chapter describes problems you may encounter while using DC235. If you have questions, please refer to related chapters and follow all the suggested solutions. If the problem still occurred, please contact our distributors or service center.
Need help?
Do you have a question about the DC235 and is the answer not in the manual?
Questions and answers