
Related Manuals for VersaLogic Zebra VL-EPC-2701


Summary of Contents for VersaLogic Zebra VL-EPC-2701
- Page 1 Yocto Linux User Guide REV. April 2018 Zebra (VL-EPC-2701) Arm* i.MX6 Single Board Computer with Gigabit Ethernet, Video, USB, SATA, Serial I/O, Digital I/O, CAN Bus, SPI and I...
- Page 2 Copyright © 2018 VersaLogic Corp. All rights reserved. Notice: Although every effort has been made to ensure this document is error-free, VersaLogic makes no representations or warranties with respect to this product and specifically disclaims any implied warranties of merchantability or fitness for any particular purpose.
- Page 3 Customer Support If you are unable to solve a problem after reading this manual, visiting the product support page, or searching the KnowledgeBase, contact VersaLogic Technical Support at (503) 747-2261. VersaLogic support engineers are also available via e-mail at Support@VersaLogic.com.
-
Page 4: Table Of Contents
Contents Introduction ........................6 Quick Start ........................7 Setting up Zebra for the First Time ..................7 Booting up Zebra for the First Time ................... 8 Basic Zebra Features and Commands ............... 10 USB Support ........................10 Video Support ........................10 MikroBUS Compatible Socket .................. - Page 5 Advanced Features and Commands ................35 Sensors ..........................35 CAN Network ........................37 C Commands ........................38 GPIO ..........................39 References ........................40 Figures Figure 1. Major Components and Connectors ....................7 Figure 2. Booting the System .......................... 8 Figure 3. Login ..............................9 Figure 3.
-
Page 6: Introduction
Introduction The VersaLogic EPC-2701 Zebra is an ARM based Single Board Computer (SBC). It is consists of a NXP i.MX6 ARM Cortex-A9 single or dual core processor and many standard components, which will be described in more detail later. The single core version of Zebra is named “Solo,”... -
Page 7: Quick Start
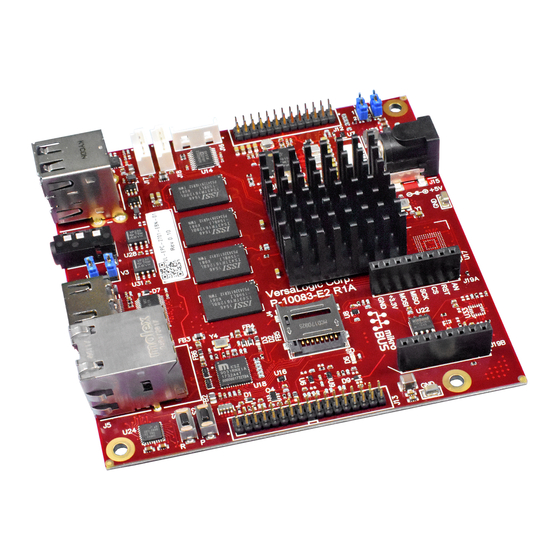
Quick Start Quick Start EPC-2701 Zebra Hardware Introduction Detailed hardware description is available in the Zebra Hardware Reference Manual, but here is some essential information required in order to quickly set up the board. The following diagram shows the major components of a Zebra: Figure 1. -
Page 8: Booting Up Zebra For The First Time
Quick Start J4 – MicroSD socket: install the MicroSD card in this socket. The space is tight so be careful not to bend the pins or cause other damage. J5 – Ethernet: connect network cable to the Ethernet port. J6 – HDMI: connect a HDMI monitor to this port. If an HDMI monitor is not available, then a HDMI to VGA adapter can connect to a VGA monitor. -
Page 9: Figure 3. Login
Quick Start Figure 3. Login If a monitor is connected to the HDMI port, then a basic X11 Desktop as shown below will be displayed on the monitor. Figure 4. X11 Desktop Zebra (VL-EPC-2701) Yocto Linux User Guide... -
Page 10: Basic Zebra Features And Commands
Basic Zebra Features and Commands Assuming the Zebra is up and running with the OS provided by VersaLogic, this section describes some of the built-in features on the Zebra board and Yocto Linux commands to utilize these features. USB Support There are two USB ports on the Zebra that support standard USB 2.0 devices. -
Page 11: Audio Recording
Basic Zebra Features and Commands Figure 5. Opening a Terminal Type the following command in the terminal window: sh-4.3# gplay-1.0 <file name> For MP3 and WAV files, command output should indicate that the sound track is playing. For MP4 and AVI files, a new window will also open displaying the video. If there is no sound when expected, first check the volume level by entering the alsamixer command in the terminal window and adjust the headphone volume in the GUI using up or down arrow keys. - Page 12 Basic Zebra Features and Commands Note: Audio recording and playback are also possible through the J13 – User IO connector, but a break-out cable is required in order to access line-in and line-out. Zebra (VL-EPC-2701) Yocto Linux User Guide...
-
Page 13: Setting Up The Development Host
A host PC or build server is required to setup the Yocto Linux development environment, which will be used to create the Operating System that will run on the VersaLogic Zebra board. There are a few minimum requirements for this system: 1. -
Page 14: Setting Up The Repo Utility
Setting up the Development Host Setting up the Repo Utility Git is a version control system for tracking changes in source code files and coordinating work on those files among multiple developers. Repo is a tool built on top of Git that makes it easier to manage projects that contain multiple repositories, which do not need to be on the same server. -
Page 15: Yocto Project Setup
Some of the files in a layer are called recipes. Yocto Project recipes contain the mechanism to retrieve source code, and to build and package a component. The following list shows some of the layers used to build the Zebra image: VersaLogic release layer • meta-versalogic i.MX release layer... - Page 16 $ git clone git://github.com/versalogic/meta-versalogic.git -b morty The recipes used to build the Zebra image come from VersaLogic, the Yocto community and NXP/Freescale. The Yocto Project layers are downloaded to the sources directory. This sets up the recipes that are used to build the project. Follow the instructions below to download the Freescale Yocto Project Community BSP recipe layers.
-
Page 17: Building The Zebra Image
Building the Zebra Image This section describes the necessary steps to building a Yocto Linux image that will run on the VersaLogic Zebra board. Setting up the Build Configurations Freescale provides a script (fsl-setup-release.sh) that simplifies the build process. To use the script, the name of the target machine needs to be specified, as well as the graphical backend desired. -
Page 18: Patching The Build Configuration
The <build dir>/conf/bblayers.conf file contains all the metalayers used in the Freescale Yocto Project release. Edit this file to tell the build process where to find the VersaLogic layer and how many CPU threads to run for the build. The number of threads depends on the CPU hardware in the host PC. -
Page 19: Creating The Target Image
Building the Zebra Image Creating the Target Image The Yocto Project provides some images available on different layers. Poky provides some images, meta-fsl-arm and meta-fsl-demos provide others, additional image recipes are provided in the meta-fsl-bsp-release layer. The following table lists various key images, their contents, and the layers that provide the image recipes. -
Page 20: Deploying The Image To Zebra
Deploying the Image to Zebra This chapter describes several different methods to deploy the image just created to the Zebra board used to boot up the system. Deploying the MicroSD Card The simplest method to deploy the image is by using a MicroSD card. The MicroSD card image (with the extension .sdcard) contains the Linux image and device trees, and the rootfs for a 4 GB MicroSD card. -
Page 21: Configuring U-Boot Environmental Variables
Deploying the Image to Zebra 3. TFTP and NFS services need to be configured on the host PC. • Edit /etc/xinetd.d/tftp and add the following lines. If the file and/or directory do not exist, then create them first. service tftp protocol = udp port = 69 socket_type = dgram... -
Page 22: Figure 8. Printenv
Deploying the Image to Zebra 2. Now use the printenv command to list all variables that are currently defined: Figure 8. Printenv 3. In order to instruct the system to boot from the network, use the following commands to update the U-Boot environment variables: =>... -
Page 23: Deploying To Emmc
Deploying the Image to Zebra Now Zebra has been configured to boot from the network. Type in the following command to boot it and the output messages should indicate that it is booting from the host PC. => run netboot Figure 9. - Page 24 Deploying the Image to Zebra 2. Copy the SD card image onto the root file system: root@imx6zebra:~# scp <username>@<build machine IP>:<image directory path>/ fsl-image-validation-imx-imx6zebra.sdcard . Alternatively, the image can be copied onto an USB flash drive and then mounted on the Zebra board.
-
Page 25: Creating A Simple Application
5. Create a simple program. Here is a sample helloworld.c program: #include <stdio.h> int main(int argc, char **argv) printf("Hello World!\n"); printf("Thank you for choosing VersaLogic!\n"); return 0; 6. Compile this program: $ $CC helloworld.c -o helloworld Zebra (VL-EPC-2701) Yocto Linux User Guide... -
Page 26: Adding The Application To The Image
./helloworld Hello World! Thank you for choosing VersaLogic! Adding the Application to the Image Instead of creating an application as a standalone executable, it can be added to the Linux image. The primary benefit of including an application in the image is that it is deployed along with the OS, so there will be no need to copy it separately. - Page 27 BBLAYERS = " \ ${BSPDIR}/sources/poky/meta \ ${BSPDIR}/sources/poky/meta-poky \ ${BSPDIR}/sources/meta-openembedded/meta-oe \ ${BSPDIR}/sources/meta-openembedded/meta-multimedia \ ${BSPDIR}/sources/meta-fsl-arm \ ${BSPDIR}/sources/meta-fsl-arm-extra \ ${BSPDIR}/sources/meta-fsl-demos \ ${BSPDIR}/sources/meta-versalogic \ ${BSPDIR}/sources/meta-helloworld \ " ##Freescale Yocto Project Release layer BBLAYERS += " ${BSPDIR}/sources/meta-fsl-bsp-release/imx/meta-bsp " BBLAYERS += " ${BSPDIR}/sources/meta-fsl-bsp-release/imx/meta-sdk " BBLAYERS += " ${BSPDIR}/sources/meta-browser "...
- Page 28 Once the new image is built, deploy it to the Zebra using one of the methods already discussed. On the Zebra, run the application by typing the name of the executable. root@imx6zebra:~# helloworld Hello World! Thank you for choosing VersaLogic! Zebra (VL-EPC-2701) Yocto Linux User Guide...
-
Page 29: Customizing The Image
Customizing the Image This chapter provides an overview on how to customize the Yocto Linux image to suit the user’s particular needs. These tasks require advanced Linux knowledge therefore are included only as a reference. Adding or Removing Packages In the previous section, we have already discussed how to add a new application to the image. Now let us look at another example by adding the Firefox browser to the Linux image. -
Page 30: Modifying Linux Kernel Configuration
Linux kernel. 1. In the build directory, use the following command to bring up the Kernel Configuration GUI: $ bitbake -c menuconfig linux-versalogic Figure 11. Kernel Configuration GUI Zebra (VL-EPC-2701) Yocto Linux User Guide... -
Page 31: Figure 12. Device Drivers
Customizing the Image 2. Look for “Device Drivers” in the list Figure 12. Device Drivers 3. Press <Return> to enter the Device Drivers submenu and find “Sony MemoryStick card support.” Highlight the item and type “y”. Now an “*” is shown to indicate support will be included in the kernel. -
Page 32: Updating U-Boot
$ bitbake fsl-image-validation-imx Updating U-Boot VersaLogic has customized U-boot to specifically support the Zebra board. During the manufacturing process, this customized version is burned onto the SPI flash, which is the default U-boot device. The user can further customize U-boot behavior using the environmental variables, as described in the previous sections. - Page 33 SPI flash during manufacturing. In case the user wants to rebuild the U-Boot image, the correct version can be selected by editing the file sources/meta- versalogic/conf/machine/imx6zebra.conf and comment out the board version that is not used.
- Page 34 Customizing the Image root@imx6zebra:~# scp <username>@<Host PC IP>:<image directory path>/<U-boot file name> . Alternatively, the file can be copied onto an USB flash drive and then mounted on the Zebra board. 3. Determine the device name for the SPI flash. root@imx6zebra:~# mtdinfo -a Count of MTD devices: Present MTD devices:...
-
Page 35: Advanced Features And Commands
Advanced Features and Commands Sensors The Zebra board can be built with optional accelerometer and magnetometer. If present, their values can be read with the i2cget command. Below is a sample script that reads and displays these values in real time. #!/bin/bash # Accelerometer &... - Page 36 Advanced Features and Commands # convert 2's complement if needed if [ "$acc_x" -gt 8192 ]; then acc_x=$(echo "(16384-$acc_x)*(-1)" | bc -l) if [ "$acc_y" -gt 8192 ]; then acc_y=$(echo "(16384-$acc_y)*(-1)" | bc -l) if [ "$acc_z" -gt 8192 ]; then acc_z=$(echo "(16384-$acc_z)*(-1)"...
-
Page 37: Can Network
Advanced Features and Commands Accelerometer and magnetometer real-time measurement Acceleration [mg]: Magnetic Field [uT]: -70 1660Now rebuild the Linux image with Firefox. CAN Network There are two CAN ports on the Zebra, which can be used to connect to other CAN capable devices. -
Page 38: I 2 C Commands
Advanced Features and Commands 00-00-00-00-00-00 UP RUNNING NOARP MTU:16 Metric:1 RX packets:0 errors:0 dropped:0 overruns:0 frame:0 TX packets:0 errors:0 dropped:0 overruns:0 carrier:0 collisions:0 txqueuelen:10 RX bytes:0 (0.0 B) TX bytes:0 (0.0 B) Interrupt:33 4. In one terminal, start candump on can1: sh-4.3# candump can1 5. -
Page 39: Gpio
0, but does not return any error. • More information can be found at https://www.kernel.org/doc/Documentation/gpio/sysfs.txt • Some of the GPIO pins can be repurposed as PWM pins in software. Contact VersaLogic for details. Zebra (VL-EPC-2701) Yocto Linux User Guide... -
Page 40: References
References • The Yocto Project is an open-source collaboration focused on embedded Linux OS development. For more information regarding the Yocto Project, see the Yocto Project homepage: www.yoctoproject.org/. • There are several documents on the Yocto Project homepage that describe in detail how to use the system. - Page 41 Known Issues • At high temperatures, the thermal sensor can sometimes not be read, resulting in the loss of thermal protection. The following command was found to allow completion of our verification testing. echo enabled > /sys/class/thermal/thermal_zone0/mode • The Ethernet controller and UFD intermittently do not show up during power cycle test. This event is caused by systemd being used for initialization instead of the sysvinit method used in the previous Yocto versions.
Need help?
Do you have a question about the Zebra VL-EPC-2701 and is the answer not in the manual?
Questions and answers