
Related Manuals for ICP DAS USA I-8411


Summary of Contents for ICP DAS USA I-8411
- Page 1 ICP DAS I-8000 Series Family (for C Language) User Manual Service and usage information for I-8411/I-8811 I-8431/I-8831 I-8431-80/I-8831-80...
- Page 2 Warranty All products manufactured by ICP DAS are under warranty regarding defective materials for a period of one year, beginning from the date of delivery to the original purchaser. Warning ICP DAS assumes no liability for any damage resulting from the use of this product.ICP DAS reserves the right to change this manual at any time without notice.
-
Page 3: Table Of Contents
Table of Contents Table of Contents ----------------------------------------------------------------- 3 1. I-8000 Family (C Language) -------------------------------------------------- 6 1.1. Introduction ----------------------------------------------------------------------------- 7 1.1.1. I-8411/I-8811 -------------------------------------------------------------------------------------- 8 1.1.2. I-8431/I-8831 -------------------------------------------------------------------------------------- 9 1.1.3. I-8431-80/I-8431-80 ---------------------------------------------------------------------------- 10 1.2. Features -------------------------------------------------------------------------------- 11 1.3. Specification --------------------------------------------------------------------------- 14 1.4. Overview ------------------------------------------------------------------------------- 16 1.5. - Page 4 2.2.3. Installing the VxComm Utility----------------------------------------------------------------- 35 2.3. Configuring the Boot Mode -------------------------------------------------------- 36 2.4. Assigning a New IP Address (for Ethernet Conntroller only) --------------- 38 2.5. Uploading I-8000 Programs -------------------------------------------------------- 41 2.5.1. Establishing a Connection --------------------------------------------------------------------- 42 2.5.1.1. Using RS-232 to Establish a Connection ---------------------------------------------- 43 2.5.1.2.
- Page 5 4.4. API for Flash Memory --------------------------------------------------------------- 97 4.5. API for NVRAM----------------------------------------------------------------------- 100 4.6. API for 5-Digital LED ---------------------------------------------------------------- 103 4.7. API for Timer ------------------------------------------------------------------------- 105 4.8. API for WatchDog Timer (WDT) ------------------------------------------------- 107 5. I-8000 Updates -------------------------------------------------------------- 109 Appendix A. What is MiniOS7? --------------------------------------------- 114 Appendix B.
-
Page 6: I-8000 Family (C Language)
1. I-8000 Family (C Language) The 8000 controller comprises a central processor (CPU), power supply, I/O bus, communication interfaces, front panel control facilities and connectors to plug in various I/O modules. The 8000 can operate either as an intelligent front end, connected to a host machine under control of a SCADA package, or as an autonomous controller running an embedded application. -
Page 7: Introduction
The I-8000 are serial/Ethernet controllers designed for data acquisition, remote measurement, and control applications. Equipped with MiniOS7,an embedded OS, similar to DOS, can boot The I-8000 series family are divided into the following . I/O Slots Ethernet RS-232/RS-485 I-8411 I-8811 40 MHz I-8431 I-8831 1 (10-Base-T) I-8431-80... -
Page 8: I-8411/I-8811
1.1.1. I-8411/I-8811 The I-8411/I-8811 are serial embedded controller with 4/8 I/O slots. Both are equipped with MiniOS7,an embedded OS similar to DOS that is developed by ICPDAS Co., LTD. The MiniOS7 can boot up in a very short time (0.4 ~ 0.8 second).It has built-in hardware diagnostic function, and supports the full functions to access all 8K and 87K series I/O modules, such as DI, DO, DIO, AI, AO, Counter/Frequency, motion modules etc. -
Page 9: I-8431/I-8831
1.1.2. I-8431/I-8831 The I-8431/ I-8831 are ethernet embedded controller with 4/8 I/O slots. Both are equipped with MiniOS7,an embedded OS similar to DOS that is developed by ICPDAS Co., LTD. The MiniOS7 can boot up in a very short time (0.4~0.8 second).It has built-in hardware diagnostic function, and supports the full functions to access all 8K and 87K series I/O modules, such as DI, DO, DIO, AI, AO, Counter/Frequency, motion modules etc. -
Page 10: I-8431-80/I-8431-80
1.1.3. I-8431-80/I-8431-80 The I-8431-80/I-8831-80 are ethernet embedded controller with 4/8 I/O slots. Both are equipped with MiniOS7,an embedded OS similar to DOS that is developed by ICPDAS Co., LTD. The MiniOS7 can boot up in a very short time (0.4~0.8 second).It has built-in hardware diagnostic function, and supports the full functions to access all 8K and 87K series I/O modules, such as DI, DO, DIO, AI, AO, Counter/Frequency, motion modules etc. -
Page 11: Features
The addition of new functions Bug fixes and revision The i-8411/i-8811’s COM1 port can be used to download programs, and update the MiniOS image file. I-8000 Series (C Language Based) User Manual, Version 1.0.1 Page: 11 Copyright © 2012 ICP DAS Co., Ltd. All Rights Reserved. E-mail: service@icpdas.com... - Page 12 “Appendix G. How to avoid illegal software copy”. Innovation design on reliability、flexibility、expansibility and stretch The i-8411/i-8811 is equipped with 4/8 I/O slots and multi-serial ports. It not only supports i-8K and i-87K series I/O modules such as DI, DO, DIO, AI, AO and Counter/Frequency for I/O slots application, but also the I-7K series I/O modules for a wide range of RS-485 network application.
- Page 13 Ventilated housing design to work between -25 °C ~ +75 °C The i-8411/i-8811 is housed in a plastic base box with a column-like ventilator that can help to cool the work environment inside the box and allow the i-8411/i-88111 to operator between -25 °Cand +75 °C.
-
Page 14: Specification
1.3. Specification The table below summarizes the specifications of I-8000, and lists the accessories that I-8000 supports. Specification Product I-8411 I-8811 I-8431 I-8831 I-8431-80 I-8431-80 CPU Module 80188 or compatible 80186 or compatible (8-bit and 40 MHz) (16-bit and 80 MHz) - Page 15 Slot Number 4 slots 8 slots 4 slots 8 slots 4 slots 8 slots Mechanical 230 x 110 x 354 x 110 x 230 x 110 x 354 x 110 x 230 x 110 x 354 x 110 x Dimensions (W x L x H) 75.5 75.5 75.5...
-
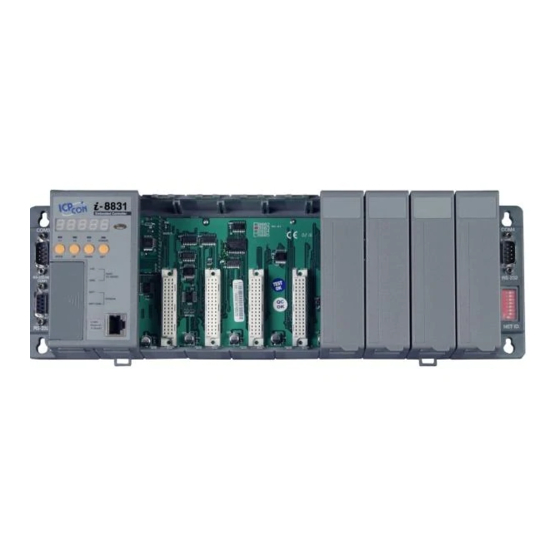
Page 16: Overview
I-8000 consists of several different components that integrate with ICP DAS system. Here is an overview of the components and its descriptions. The following list shows the details of the components: I-8411 I-8811 I-8000 Series (C Language Based) User Manual, Version 1.0.1 Page: 16 Copyright ©... - Page 17 I-8431/I-8431-80 I-8431/I-8431-80 I-8000 Series (C Language Based) User Manual, Version 1.0.1 Page: 17 Copyright © 2012 ICP DAS Co., Ltd. All Rights Reserved. E-mail: service@icpdas.com...
- Page 18 1. Terminial Block The I-8000 has a screw terminal block with 6 screw-downs. The table below describes the terminal block designations and its functions. Screw Terminal Signal Description Power Input INIT* Initial Mode INIT*COM DATA+ COM2 (RS-485) DATA- 2. COM1 (RS-232) Port Type: Female Baud Rate: 115200, 57600, 38400, 19200, 9600, 4800, 2400, 1200 bps...
- Page 19 3. COM3 (RS-232/RS-485) Port Type: Male Baud Rate: 115200, 57600, 38400, 19200, 9600, 4800, 2400, 1200 bps Data Bits: 5, 6, 7, 8 Parity: None, Even, Odd, Mark (Always 1), Space (Always 0) COM3 can be configured as either RS-232 or RS-485, that only can select one at a time and its configuration depends on the pin connections as follows: RS-232 (RXD, TXD, CTS, RTS and GND)
- Page 20 I-8000 are equipped with some extra I/O slots, that can be used to expand capabilities of I-8000. The number of the expansion I/O slot in each type of I-8000: I-8411/I-8431/I-8431-80: 4 I/O slots I-8811/I-8831/I-8831-80: 8 I/O slots 7. SMMI (Small Main-Machine Interface) SMMI consists of 5-digital LED displays, 4 programmable LEDs, and 4 push buttons, 8.
-
Page 21: Dimension
1.5. Dimension The following information provides the dimensions of I-8000 to use in defining your enclosure specifications. Remember to leave room for potential expansion if you are using other components in your system. The height dimension is the same for all I-8000 family. The width depending on your choose of I/O expansion slots. -
Page 22: I-8411/I-8431/I-8431-80
1.5.1. I-8411/I-8431/I-8431-80 Back View Side View Top View Input: 10~30VDC INIT* Initialize INIT*COM DATA+ RS-485 DATA- Front View I-8000 Series (C Language Based) User Manual, Version 1.0.1 Page: 22 Copyright © 2012 ICP DAS Co., Ltd. All Rights Reserved. E-mail: service@icpdas.com... -
Page 23: I-8411/I-8831/I-8831-80
1.5.2. I-8411/I-8831/I-8831-80 Back View Side View Top View Input: 10~30VDC I NI T* I nitialize I NI T*COM DATA+ RS-485 DATA- Front View I-8000 Series (C Language Based) User Manual, Version 1.0.1 Page: 23 Copyright © 2012 ICP DAS Co., Ltd. All Rights Reserved. E-mail: service@icpdas.com... -
Page 24: Companion Cd
1.6. Companion CD This package comes with a CD that provides drivers, software utility, and all of the required documentations…, etc, and the lastest version of the contents of this CD can be download from ICP DAS web site. I-8000 Series (C Language Based) User Manual, Version 1.0.1 Page: 24 Copyright ©... -
Page 25: Getting Started
I-8000. Before starting any task, please check the package contents. If any of the following package contents are missing or damaged, contact your dealer, distributor. I-8000 Series Module I-8411/I-8811 Quick Start Guide I-8431/I-8831 I-8431-80/I-8831-80... -
Page 26: Mounting The Hardware
2.1. Mounting the Hardware Before you work with I-8000, you should have a basic understanding of the hardware specifications, such as the dimensions, the usable input-voltage range of the power supply, and the type of communication interfaces. For more information about the hardware details, see section 1.2., “Specifications.” For more information about the hardware dimensions, see section 1.4., “Dimension.”... - Page 27 There are two ways for mounting the I-8000. 1. To mount the I-8000 on a DIN rail Hook upper tab over upper flange of DIN rail Tilt the module toward DIN rail until it snaps securely to DIN rail Push up retaining clips I-8000 Series (C Language Based) User Manual, Version 1.0.1 Page: 27 Copyright ©...
- Page 28 Tips & Warnings Grounding A good common ground reference (earth ground) is essential for proper operation of the I-8000. One side of all control circuits, power circuits and the ground lead must be properly connected to earth ground by either installing a ground rod in close proximity to the enclosure or by connecting to the incoming power system ground.
-
Page 29: Wiring The I-8000
2.1.2. Wiring the I-8000 The package includes a RS-232 cable for connecting the I-8000 to a PC/Laptop. The I-8000 has the power supply interface for supplying power from the power supply. Step 1: Connect to the power supply The I-8000 requires a 10 to 30 V power supply to operate. - Page 30 If PC/Laptop has no COM port, you can use the I-7560 (USB to RS-232 converter) for connection between I-8000 and PC/Laptop. Before using the I-7560 converter, you must install the USB driver. The USB driver can be obtained from: ftp://ftp.icpdas.com/pub/cd/8000cd/napdos/7000/756x/ After installing the USB driver, please check the “Device Manager to make sure the driver has been installed and the COM port number which is assigned to USB interface.
-
Page 31: Inserting I/O Modules
2.1.3. Inserting I/O Modules I-8000 has 4/8 I/O expansion slots to expand the functions of I-8000, allowing it to communicate with external I/O modules, and before choosing the right I/O modules; you first need to know the I/O expansion capacities in order to choose the best expansion module for achieving maximal efficiency. - Page 32 Step 3: Insert the I/O module into I-8000 Align circuit card with slot and press firmly to seat module into connector and then Pull top and bottom locking tabs toward module face. Click indicates lock is engaged I-8000 Series (C Language Based) User Manual, Version 1.0.1 Page: 32 Copyright ©...
-
Page 33: Installing Software
2.2. Installing Software The Companion CD includes complete sets of APIs, demo programs and other tools for developing your own applications. 2.2.1. Installing the I-8000 header and libraries files The I-8000 header and libraries files can be installed from the CD that was provided with the package or by downloading the latest version from ICP DAS web site. -
Page 34: Installing The Minios7 Utility
2.2.2. Installing the MiniOS7 Utility MiniOS7 Utility is a suite of tool for managing MiniOS7 devices (I-8000, μPAC-5000, iPAC-8000, μPAC-7186,. etc.). It’s comprised of four components – System monitor, communication manager, file manager and OS loader. Step 1: Get the MiniOS7 Utility The MiniOS7 Utility can be found separately on the CD that was provided with the package or by downloading the latest version from ICP DAS web site. -
Page 35: Installing The Vxcomm Utility
2.2.3. Installing the VxComm Utility MiniOS7 Utility is a suite of tool for managing MiniOS7 devices (I-8000, μPAC-5000, iPAC-8000, μPAC-7186,. etc.). It’s comprised of four components – System monitor, communication manager, file manager and OS loader. Step 1: Get the MiniOS7 Utility The MiniOS7 Utility can be found separately on the CD that was provided with the package or by downloading the latest version from ICP DAS web site. -
Page 36: Configuring The Boot Mode
2.3. Configuring the Boot Mode The I-8000 has two modes of operation, normal mode and initialize mdoe. Normal Mode Normal mode is the default mode of operation and the one you will use most of the time. Use this mode for more tasks and configurations. Programs also are executed in this mode. I-8000 Series (C Language Based) User Manual, Version 1.0.1 Page: 36 Copyright ©... - Page 37 Initial Mode Initial mode is used to update the OS image and upgrade the firmware. If dip switch is set as Init mode and reset the power, the I-8000 cannot boot up with autoexec.bat and will enter OS operation mode, in this case there is no program running on the I-8000 and the 5-digital 7-SEG LEDs will count the number as shown below: I-8000 Series (C Language Based) User Manual, Version 1.0.1 Page: 37...
-
Page 38: Assigning A New Ip Address (For Ethernet Conntroller Only)
2.4. Assigning a New IP Address (for Ethernet Conntroller only) The I-8431/I-8831/I-8431-80/I-8831-80 are Ethernet embedded controller, has which comes with a default IP address. If you want to add a I-8000 to your network, you must assign a new IP address, subnet mask, and gateway to your I-8000. The factory default IP settings are as follows: Item Default... - Page 39 Step 2: Click the “Search” from the “Connection” menu you need to wait for the process to be done. See the status tip, waiting for the search to be done. Step 3: Choose the OS image name of I-8000 module (which comes with a default IP address “192.168.255.1”) from the list and then click the “IP setting”...
- Page 40 Step 4: Configure the “IP” settings and then click the “Set” button Step 5: Click “Yes” button I-8000 Series (C Language Based) User Manual, Version 1.0.1 Page: 40 Copyright © 2012 ICP DAS Co., Ltd. All Rights Reserved. E-mail: service@icpdas.com...
-
Page 41: Uploading I-8000 Programs
2.5. Uploading I-8000 Programs MiniOS7 Utility is a suite of tool for managing MiniOS7 devices (I-8000, μPAC-5000, iPAC-8000, μPAC-7186,. etc.). Before uploading programs, make sure that MiniOS7 Utility is installed on your PC. For more information about how to install the MiniOS7 utility, see section 2.2.2., “Installing the MiniOS7 Utility”... -
Page 42: Establishing A Connection
2.5.1. Establishing a Connection Before you use MiniOS7 Utility to upload programs, ensure that iPAC-8000 is connected to PC. For more information on how to connect iPAC-8000 to PC, see section 2.1.2., “Wiring the I-8000.” The connection can be divided into the following three types according to the type of wire: 1. -
Page 43: Using Rs-232 To Establish A Connection
2.5.1.1. Using RS-232 to Establish a Connection Below are step-by-step instructions on how to connect to PC using a RS-232 connection. Step 1: Boot the I-8000 into Initial mode Step 2: Use the RS-232 Cable (CA-0915) to connect to PC I-8000 Series (C Language Based) User Manual, Version 1.0.1 Page: 43 Copyright ©... - Page 44 Step 3: Run the MiniOS7 Utility Step 4: Click the “New connection” function from the “Connection” menu Step 5: On the “Connection” tab of the “Connection” dialog box, select “COM1” from the drop down list, and then click “OK” I-8000 Series (C Language Based) User Manual, Version 1.0.1 Page: 44 Copyright ©...
- Page 45 Step 6: The connection has already established Connection Status I-8000 Series (C Language Based) User Manual, Version 1.0.1 Page: 45 Copyright © 2012 ICP DAS Co., Ltd. All Rights Reserved. E-mail: service@icpdas.com...
-
Page 46: Using Usb To Establish A Connection
2.5.1.2. Using USB to Establish a Connection Below are step-by-step instructions on how to connect to PC using an USB connection. Step 1: Boot the I-8000 into Initial mode Step 2: Use the USB cable to connect to PC Before using the USB connection, ensure the I-7560 driver that you have installed. If they are not installed, please refer to “section 2.1. - Page 47 Step 3: Run the MiniOS7 Utility Step 4: Click the “New connection” function from the “Connection” menu Step 5: On the “Connection” tab of the “Connection” dialog box, select “COM3” from the drop down list, and then click “OK” I-8000 Series (C Language Based) User Manual, Version 1.0.1 Page: 47 Copyright ©...
- Page 48 Step 6: The connection has already established Connection Status I-8000 Series (C Language Based) User Manual, Version 1.0.1 Page: 48 Copyright © 2012 ICP DAS Co., Ltd. All Rights Reserved. E-mail: service@icpdas.com...
-
Page 49: Using Ethernet To Establish A Connection (For Ethernet Series Controller Only)
2.5.1.3. Using Ethernet to Establish a Connection (for Ethernet Series Controller only) Below are step-by-step instructions on how to connect to PC using an Ethernet connection. Step 1: Boot the I-8000 into Initial mode Step 2: Use the Ethernet cable to connect to PC I-8000 Series (C Language Based) User Manual, Version 1.0.1 Page: 49 Copyright ©... - Page 50 Step 3: Run the MiniOS7 Utility Step 4: Click the “New connection” function from the “Connection” menu Step 5: On the “Connection” tab of the “Connection” dialog box, select “UDP” from the drop down list, type the IP address which you are assigned, and then click “OK”...
- Page 51 Step 6: The connection has already established Connection Status I-8000 Series (C Language Based) User Manual, Version 1.0.1 Page: 51 Copyright © 2012 ICP DAS Co., Ltd. All Rights Reserved. E-mail: service@icpdas.com...
-
Page 52: Uploading And Executing Programs
2.5.2. Uploading and Executing Programs Before uploading and executing I-8000 programs, you must firstly establish a connection between PC and I-8000, for more detailed information about this process, please refer to section “2.5.1. Establishing a connection” Step 1: On PC side, right click the file name that you wish to upload and then select the “Upload”... -
Page 53: Making Programs Start Automatically
2.5.3. Making programs start automatically After upload programs to the I-8000, if you need programs to start automatically after the I-8000 start-up, it is easy to achieve it, to create a batch file called autoexec.bat and then upload it to the I-8000, the program will start automatically in the next start-up. For example, to make the program “hello”... - Page 54 Step 2: Upload programs to I-8000 using MiniOS7 Utility For more detailed information about this process, please refer to section “2.5.2. Uploading and Executing programs” One is the “Hello” application file, and the other is the “autoexec.bat” batch file Tips & Warnings Before restaring the module for settings to take effect, you must firstly disconnect the wire of Init and init*com.
-
Page 55: Hello World" - Your First Program
3. “Hello World” - Your First Program When you learn every computer programming language you may realize that the first program to demonstrate is "Hello World", it provides a cursory introduction to the language's syntax and output. 3.1. C Compiler Installation C is prized for its efficiency, and is the most popular programming language for writing applications. - Page 56 We recommend that you use Borland C++ compiler as the libraries have been created on the companion CD. Tips & Warnings Before compiling an application, you need to take care of the following matters. Generate a standard DOS executable program Set the CPU option to 80188/80186 Set the floating point option to EMULATION if floating point computation is required.
-
Page 57: Installing The C Compiler
3.1.1. Installing the C compiler If there is no compiler currently installed on your system, installation of the compiler should be the first step. Step 1: Double click the Turbo C++ executable file to start setup wizard Step 2: Press “Enter” to continue I-8000 Series (C Language Based) User Manual, Version 1.0.1 Page: 57 Copyright ©... - Page 58 Step 3: Enter the letter of the hard drive you wish to install the software Step 4: Enter the path to the directory you wish to install files to I-8000 Series (C Language Based) User Manual, Version 1.0.1 Page: 58 Copyright ©...
- Page 59 Step 5: Select “Start Installation” to begin the install process Step 6: Press any key to continue I-8000 Series (C Language Based) User Manual, Version 1.0.1 Page: 59 Copyright © 2012 ICP DAS Co., Ltd. All Rights Reserved. E-mail: service@icpdas.com...
- Page 60 Step 7: Press any key to continue Step 8: Installation is complete I-8000 Series (C Language Based) User Manual, Version 1.0.1 Page: 60 Copyright © 2012 ICP DAS Co., Ltd. All Rights Reserved. E-mail: service@icpdas.com...
-
Page 61: Setting Up The Environment Variables
3.1.2. Setting up the environment variables After installing the compiler, several compilers will be available from the Windows Command line. You can set the path environment variable so that you can execute this compiler on the command line by entering simple names, rather than by using their full path names. - Page 62 Step 2: On the “System Properties” dialog box, click the “Environment Variables” button located under the “Advanced” sheet Step 3: On the “Environment Variables” dialog box, click the “Edit” button located in the “System variables” option I-8000 Series (C Language Based) User Manual, Version 1.0.1 Page: 62 Copyright ©...
- Page 63 Step 4: Add the target directory to the end of the variable value field A semi-colon is used as the separator between variable values. For example, ”;c:\TC\BIN\;c:\TC\INCLUDE\” Step 5: Restart the computer to allow your changes to take effect I-8000 Series (C Language Based) User Manual, Version 1.0.1 Page: 63 Copyright ©...
-
Page 64: I-8000 Apis
3.2. I-8000 APIs There are several APIs for customizing the standard features and integrating with other applications, devices and services. For more detailed information regarding I-8000 APIs, please refer to CD:\NAPDOS\8000\Common\MiniOS7\demo\LIB\ http://ftp.icpdas.com/pub/cd/8000cd/napdos/8000/common/minios7/demo/lib/ Before creating the application, ensure them that you have installed. If they are not installed, please refer to “section 2.2. -
Page 65: First Program In I-8000
3.3. First Program in I-8000 Here we assume you have installed the Turbo C++ 1.01 (as the section “3.1. C Compiler Installation”) and the I-8000 APIs (as the section “2.2. Installing Software”) under the C driver root folder. Step 1: Open a MS-DOS command prompt i. - Page 66 Step 2: At the command prompt, type “TC” and then press “Enter” Step 3: Select “New” from the “File” menu to create a new source file I-8000 Series (C Language Based) User Manual, Version 1.0.1 Page: 66 Copyright © 2012 ICP DAS Co., Ltd. All Rights Reserved. E-mail: service@icpdas.com...
- Page 67 Step 4: Type the following code. Note that the code is case-sensitive #include <stdio.h> #include “..\..\demo\Lib\8000E.h” /* Include the header file that allows 8000E.lib functions to be used */ void main(void) InitLib(); /* Initiate the 8000E library */ Print(“Hello world!\r\n”); /* Print the message on the screen */ I-8000 Series (C Language Based) User Manual, Version 1.0.1 Page: 67...
- Page 68 Step 5: Save the source file i. Select “Save” from the “File” menu ii. Type the file name “Hello” iii. Select “OK” Tips & Warnings You can write the code as shown below with your familiar text editor or other tools; please note that you must save the source code under a filename that terminates with the extension “C”.
- Page 69 Step 6: Create a project (*.PRJ) i. Select “Open project…” from the “Project” menu ii. Type the project name “HELLO.PRJ” iii. Select “OK” I-8000 Series (C Language Based) User Manual, Version 1.0.1 Page: 69 Copyright © 2012 ICP DAS Co., Ltd. All Rights Reserved. E-mail: service@icpdas.com...
- Page 70 Step 7: Add the necessary function libraries to the project (*.LIB) i. Select "Add item..." from the "Project" menu ii. Select the source file (HELLO.CPP) and then click the "Add" button iii. Select the function library (8000E.LIB) and then click the “Add” button iv.
- Page 71 Step 8: Set the memory model to large i. Select “Compiler” from the “Options” menu and then select “Code generation…” ii. On “Model” option, select “Large” iii. Select “OK” I-8000 Series (C Language Based) User Manual, Version 1.0.1 Page: 71 Copyright ©...
- Page 72 Step 9: Set the Floating Point to Emulation and the Instruction Set to 80186 i. Select “Compiler” from the “Options” menu and then select “Advanced code generation…” ii. On “Floating Point” option, select “Emulation” iii. On “Instruction Set” option, select “80186” iv.
- Page 73 Step 10: Set the TC compiler include and library directories i. Select “Directories…” from the “Options” menu ii. On “Include Directories” option, specify the header file iii. On “Library Directories” option, specify the function library file iv. Select “OK” I-8000 Series (C Language Based) User Manual, Version 1.0.1 Page: 73 Copyright ©...
- Page 74 Step 11: Select “Build all” from the “Compile” menu to build the project I-8000 Series (C Language Based) User Manual, Version 1.0.1 Page: 74 Copyright © 2012 ICP DAS Co., Ltd. All Rights Reserved. E-mail: service@icpdas.com...
- Page 75 Step 12: Configure the operating mode For more detailed information about this process, please refer to section “2.3. Configuring the Boot Mode” Step 13: Create an autoexec.bat file i. Open the “Notepad” ii. Type the “HELLO.exe” iii. Save the file as autoexec.bat Step 14: Upload programs to I-8000 using MiniOS7 Utility For more detailed information about this process, please refer to section “2.5.2.
-
Page 76: Apis And Demo References
4. APIs and Demo References There are several APIs and demo programs that have been designed for I-8000. You can examine the APIs and demo source code, which includes numerous functions and comments, to familiarize yourself with the MiniOS7 APIs and quickly develop your own applications quickly by modifying these demo programs. - Page 77 The following introduces the core API, MiniOS7 API, which is integrated into the I-8000 API set. Functions Library ─ 8000e.lib This file contains the MiniOS7 API (Application Programming Interface) and has hundreds of pre-defined functions related to μPAC-5000 Header File ─ 8000E.h This file contains the forward declarations of subroutines, variables, and other identifiers used for the MiniOS7 API.
- Page 78 For full usage information regarding the description, prototype and the arguments of the functions, please refer to the “MiniOS7 API Functions User Manual” located at: CD:\Napdos\MiniOS7\Document http://ftp.Icpdas.com/pub/cd/8000cd/napdos/minios7/document/ I-8000 Series (C Language Based) User Manual, Version 1.0.1 Page: 78 Copyright © 2012 ICP DAS Co., Ltd. All Rights Reserved. E-mail: service@icpdas.com...
- Page 79 The following table lists the demo programs grouped by functional category. Folder Demo Explanation File Config_1_Basic Reads information from text files(basic). Config_2_Advanced Reads config file (text file)(advanced). Hello Hello_C Reads library version and flash memory size. Hello_C++ Misc Reset Software's reset. Runprog To select item and run it.
- Page 80 COM3 COM2 COM0 I-8k and I-87k I/O series modules for I/O Slot Applications Folder Demo Explanation This demo program is used by 8K series DI modules, 8K_DI such as 8040, 8051., etc. This demo program is used for 8073 General 8073 Functions.
-
Page 81: Api For Com Port
4.1. API for COM Port The I-8000 provides four built-in COM ports, COM1 , COM2, COM3 and COM4. COM4 COM1 COM3 COM2 I-8000 Series (C Language Based) User Manual, Version 1.0.1 Page: 81 Copyright © 2012 ICP DAS Co., Ltd. All Rights Reserved. E-mail: service@icpdas.com... -
Page 82: Types Of Com Port Functions
4.1.1. Types of COM port functions There are two types of functions below for using COM port. 1. MiniOS7 COM port functions 2. (C style) Standard COM port functions Tips & Warnings (C style) Standard COM port functions only can be used with the COM1, if you use the COM1 port, you’ll have the alternative of MiniOS7 COM ports functions or (C style) Standard COM port functions. -
Page 83: Api For Minios7 Com Port
4.1.2. API for MiniOS7 COM port API for using COM ports 1. InstallCom() Before any COM Port can be used, the driver must be installed by calling InstallCom(). 2. RestoreCom() If the program calls InstallCom(), the RestoreCom()must be called to release the COM Port driver. - Page 84 For example, reading and receiving data through the COM1. #include <stdio.h> #include “8000E.h” void main(void) int quit=0, data; InitLib(); /* Initiate the upac5000 library */ InstallCom(1, 115200, 8, 0, 1); /* Install the COM1 driver */ while(!quit) if(IsCom(1)) /* Check if there is any data in the COM port input buffer */ data=ReadCom(1);...
- Page 85 API for showing data from COM ports 6. printCom() Functions such as printfCom() in the C library allow data to be output from COM ports. For example, showing data from the COM1 port. #include <stdio.h> #include “8000E.h” void main(void) int i; /* Initiate the upac5000 library */ InitLib();...
-
Page 86: Api For Standard Com Port
4.1.3. API for standard COM port The standard COM port is used to upload program from PC to the µPAC-5000. Tips & Warnings (C style) Standard COM port functions only can be used with the COM1 port, the following configurations of the COM1 port are fixed: Baudrate = 115200 bps, Data format = 8 bits Parity check = none, Start bit = 1, Stop bit = 1 API for checking if there is any data in the input buffer... - Page 87 API for sending data to standard I/O port 3. Puts() – For sending a string Before sending data to standard I/O port, the Puts() must be called to send data to COM Port.. 4. Putch( ) – For sending one character Before sending data to standard I/O port, the Putch() must be called to send data to COM Port.
- Page 88 For example, reading and receiving data through COM1. #include<stdio.h> #include “8000E.h” void main(void) int quit=0, data; InitLib(); /* Initiate the upac5000 library */ while(!quit) if(Kbhit()) /* Check if any data is in the input buffer */ data=Getch(); /* Read data from COM1 */ Putch(data);...
- Page 89 For example, showing data through COM1. #include <stdio.h> #include “8000E.h” void main(void) int i; /* Initiate the upac5000 library */ InitLib(); for(i=0;i<10;i++) Print(“Test %d\n\r”,i); I-8000 Series (C Language Based) User Manual, Version 1.0.1 Page: 89 Copyright © 2012 ICP DAS Co., Ltd. All Rights Reserved. E-mail: service@icpdas.com...
-
Page 90: Port Functions Comparison
4.1.4. Port functions Comparison For example, learning to show the ASCII code. MiniOS7 COM port functions Standard COM port functions #include<stdio.h> #include<stdio.h> 8000E.h 8000E.h #include “ ” #include “ ” void main(void) void main(void) unsigned char item; unsigned char item; InitLib();... - Page 91 Delay(10); RestoreCom(1); I-8000 Series (C Language Based) User Manual, Version 1.0.1 Page: 91 Copyright © 2012 ICP DAS Co., Ltd. All Rights Reserved. E-mail: service@icpdas.com...
-
Page 92: Request/Response Protocol Define On Com Port
4.1.5. Request/Response protocol define on COM port Request/Response communication is very typical protocol architecture. If you want to design a command set of communication protocol as table below, you can refer to “slave_com” demo. For a request/response application, please refer to “slave_com” demo Response Request Request... -
Page 93: Api For I/O Modules
4.2. API for I/O Modules The I-8000 are equipped with a RS-485 communication interface, COM2, to access I-7K series I/O modules for a wide range of RS-485 network application, as shown below. RS-485 Steps for communicating with i-7K series I/O modules: Step 1: Use Installcom() to install the COM port driver. - Page 94 For example, to send a command ‘$01M’ to I-7K I/O module for getting the module name. #include <stdio.h> #include “8000E.h” void main(void) unsigned char InBuf0[60]; InitLib(); /* Initiate the 8000E library */ InstallCom(1,115200,8,0,1); /* Initiate the COM1 driver */ InstallCom(2,115200,8,0,1); /* Initiate the COM2 driver */ SendCmdTo7000(2,”$01M”,0);...
-
Page 95: Api For Eeprom
4.3. API for EEPROM ● The EEPROM contains 64 blocks (block 0 ~ 63), and each block has 256 bytes (address 0 ~ 255), with a total size of 16,384 bytes (16K) capacity. ● The default mode for EEPROM is write-protected mode. ●... - Page 96 #include <stdio.h> #include “8000E.h” void main(void) int data=0x55, data2; InitLib(); /* Initiate the 8000E library */ EE_WriteEnable(); EE_MultiWrite(1,10,1,&data); EE_WriteProtect(); EE_MultiRead(1,10,1,&data2); /* Now data2=data=0x55 */ I-8000 Series (C Language Based) User Manual, Version 1.0.1 Page: 96 Copyright © 2012 ICP DAS Co., Ltd. All Rights Reserved. E-mail: service@icpdas.com...
-
Page 97: Api For Flash Memory
4.4. API for Flash Memory ● The I-8000 contains 512 Kbytes of Flash memory. ● MiniOS7 uses the last 64K bytes; the other parts of the memory are used to store user programs or data. ● Each bit of the Flash memory only e can be written from 1 to 0 and cannot be written from 0 to 1. - Page 98 API for erasing data from the Flash Memory 1. EraseFlash() The only way to change the data from 0 to 1 is to call the EraseFlash() function to erase a block from the Flash memory. API for writing data to the Flash Memory 2.
- Page 99 For example, to write an integer to segnment 0xD000, offset 0x1234 of the Flash memory. #include <stdio.h> #include “8000E.h” void main(void) int data=0xAA55, data2; char *dataptr; int *dataptr2; InitLib(); /* Initiate the 8000E library */ EraseFlash(0xd000); /* Erase a block from the Flash memory */ dataptr=(char *)&data;...
-
Page 100: Api For Nvram
4.5. API for NVRAM ● The I-8000 is equipped with an RTC (Real Time Clock), 31 bytes of NVRAM can be used to store data. ● NVRAM is SRAM, but it uses battery to keep the data, so the data in NVRAM does not lost its information when the module is power off. - Page 101 #include <stdio.h> #include “8000E.h” void main(void) int data=0x55, data2; InitLib(); /* Initiate the 8000E library */ WriteNVRAM(0,data); data2=ReadNVRAM(0); /* Now data2=data=0x55 */ For example, the following can be used to write an integer (two bytes) to NVRAM. I-8000 Series (C Language Based) User Manual, Version 1.0.1 Page: 101 Copyright ©...
-
Page 102: I-8000 Series (C Language Based) User Manual, Version 1.0.1 Page
#include <stdio.h> #include “8000E.h” void main(void) int data=0xAA55, data2; char *dataptr=(char *)&data; InitLib(); /* Initiate the 8000E library */ WriteNVRAM(0, *dataptr); /* Write the low byte */ WriteNVRAM(1, *dataptr+1); /* Write the high byte */ dataptr=(char *) &data2; *dataptr=ReadNVRAM(0); /* Read the low byte */ (*dataptr+1)=ReadNVRAM(1);... -
Page 103: Api For 5-Digital Led
4.6. API for 5-Digital LED The I-8000 contains a 5-Digit 7-SEG LED with a decimal point on the right-hand side of each digit, which be used to display numbers, IP addresses, time, and so on. API for starting the 5-Digit 7-SEG LED 1. - Page 104 #include <stdio.h> #include “8000E.h” void main(void) InitLib(); /* Initiate the 8000E library */ Init5DigitLed(); Show5DigitLed(1,8); Show5DigitLed(2,0); Show5DigitLed(3,0); Show5DigitLed(4,0); Show5DigitLed(5,14); /* The ASCII code for the letter ‘E’ is 14 */ I-8000 Series (C Language Based) User Manual, Version 1.0.1 Page: 104 Copyright ©...
-
Page 105: Api For Timer
4.7. API for Timer ● The I-8000 can support a single main time tick, 8 stop watch timers and 8 counts down timers. ● The I-8000 uses a single 16-bit timer to perform these timer functions, with a timer accuracy of 1 ms.. ... - Page 106 For example, the following code can be used to read the main time ticks from 0. #include <stdio.h> #include “8000E.h” void main(void) Unsigned long time iTime; InitLib(); /* Initiate the 8000E library */ TimerOpen(); While(!quit) If(Kbhit()) TimerResetValue(); /* Reset the main time ticks to 0 */ iTime=TimerReadValue();...
-
Page 107: Api For Watchdog Timer (Wdt)
4.8. API for WatchDog Timer (WDT) ● The I-8000 equips the MiniOS7, the small-cored operating system. MiniOS7 uses the Timer 2 (A CPU internal timer) as system Timer. It is 16-bits Timer, and generate interrupt every 1 ms. So the accuracy of system is 1 ms. ●... - Page 108 For example, to refresh the Watchdog Timer. #include <stdio.h> #include “8000E.h” void main(void) Unsigned long time iTime; InitLib(); /* Initiate the 8000E library */ Enable WDT(); While(!quit) RefreshWDT(); User_function(); DisableWDT(); I-8000 Series (C Language Based) User Manual, Version 1.0.1 Page: 108 Copyright ©...
-
Page 109: I-8000 Updates
5. I-8000 Updates ICP DAS will continue to add additional features to OS and firmware of iPAC-8000 in the future, so we advise you to periodically check the ICP DAS web site for the latest updates. iPAC-8000 updates services provides a software update service for iPAC-8000. It can be divided into two categories, OS updates and firmware updates. - Page 110 Step 2: Get the I-8000 OS image The I-8000 OS image can be found separately on the CD that was provided with the package or by downloading the latest version from ICP DAS web site. For I-8411/I-8811 serial embedded controller: CD:\NAPDOS\8000\841x881x\OS_image\40M\ http://ftp.Icpdas.com/pub/cd/8000cd/napdos/8000/841x881x/os_image/40m/ ...
- Page 111 For I-8431-80/I-8831-80 ethernet embedded controller: CD:\NAPDOS\8000\843x883x\TCP\Xserver\OS_image\80M\ http://ftp.Icpdas.com/pub/cd/8000cd/napdos/8000/843x883x/tcp/xserver/os_image/80m/ Step 3: Establish a connection For more detailed information about this process, please refer to section “2.4.1. Establishing a connection” Step 4: Click the “Update MiniOS7 Image …” from the “File” menu I-8000 Series (C Language Based) User Manual, Version 1.0.1 Page: 111 Copyright ©...
- Page 112 Step 5: Select the latest version of the MiniOS7 OS image Step 6: Click the “OK” I-8000 Series (C Language Based) User Manual, Version 1.0.1 Page: 112 Copyright © 2012 ICP DAS Co., Ltd. All Rights Reserved. E-mail: service@icpdas.com...
- Page 113 Step 7: Click the “Info” from the “Command” menu to check the version of the OS image I-8000 Series (C Language Based) User Manual, Version 1.0.1 Page: 113 Copyright © 2012 ICP DAS Co., Ltd. All Rights Reserved. E-mail: service@icpdas.com...
-
Page 114: Appendix A. What Is Minios7
Appendix A. What is MiniOS7? MiniOS7 is an embedded operating system design by ICP DAS. It is functionally equivalent to other brands of DOS, and can run programs that are executable under a standard DOS. DOS is a set of commands or code that tells the computer how to process information. -
Page 115: Appendix B. What Is Minios7 Utility
Appendix B. What is MiniOS7 Utility? MiniOS7 Utility is a tool for configuring, uploading files to all products embedded with ICP DAS MiniOS7. Since version 3.1.1, the Utility can allow users remotely access the controllers (7188E, 8000E..., etc) through the Ethernet. Functions Including frequently used tools ... -
Page 116: Appendix C. More C Compiler Settings
Appendix C. More C Compiler Settings This section describes the setting of the following compilers: Turbo C 2.01 Compiler BC++ 3.1 IDE MSC 6.00 Compiler MSVC 1.50 Compiler I-8000 Series (C Language Based) User Manual, Version 1.0.1 Page: 116 Copyright ©... -
Page 117: Turbo C 2.01
C.1. Turbo C 2.01 You have a couple of choices here, you can: 1: Using a command line For more information, please refer to CD:\8000\NAPDOS\8000\841x881x\Demo\hello\Hello_C\gotc.bat tcc -Ic:\tc\include -Lc:\tc\lib hello1.c ..\..\lib\8000e.lib 2: Using the TC Integrated Environment Step 1: Executing the TC 2.01 Step 2: Editing the Project file Adding the necessary library and file to the project I-8000 Series (C Language Based) User Manual, Version 1.0.1... - Page 118 Step 3: Save the project and entering a name, such as LED.prj Step 4: Load the Project Step 5: Change the Memory model (Large for I-8000.lib) and set the Code Generation to 80186/80286 I-8000 Series (C Language Based) User Manual, Version 1.0.1 Page: 118 Copyright ©...
- Page 119 Step 6: Building the project I-8000 Series (C Language Based) User Manual, Version 1.0.1 Page: 119 Copyright © 2012 ICP DAS Co., Ltd. All Rights Reserved. E-mail: service@icpdas.com...
-
Page 120: Bc++ 3.1. Ide
C.2. BC++ 3.1. IDE Step 1: Executing the Borland C++ 3.1 Step 2: Creating a new project file (*.prj) Step 3: Add all the necessary files to the project I-8000 Series (C Language Based) User Manual, Version 1.0.1 Page: 120 Copyright ©... - Page 121 Step 4: Change the Memory model (Large for 8000e.lib) Step 5: Set the Advanced code generation options and Set the Floating Point to Emulation and the Instruction Set to 80186 I-8000 Series (C Language Based) User Manual, Version 1.0.1 Page: 121 Copyright ©...
- Page 122 Step 6: Set the Entry/Exit Code Generation option and setting the DOS standard Step 7: Choosing the Debugger…and set the Source Debugging to None I-8000 Series (C Language Based) User Manual, Version 1.0.1 Page: 122 Copyright © 2012 ICP DAS Co., Ltd. All Rights Reserved. E-mail: service@icpdas.com...
- Page 123 Step 8: Make the project I-8000 Series (C Language Based) User Manual, Version 1.0.1 Page: 123 Copyright © 2012 ICP DAS Co., Ltd. All Rights Reserved. E-mail: service@icpdas.com...
-
Page 124: Msc 6.00
C.3. MSC 6.00 Step 1: In the source file folder, create a batch file called Gomsc.bat using the text editor Tip & Warnings /C: Don't strip comments /GS: No stack checking /Fpa: Calls with altmath /Fm: [map file] /G1: 186 instructions /AL: Large model I-8000 Series (C Language Based) User Manual, Version 1.0.1 Page: 124... - Page 125 Step 2: Run the Gomsc.bat file Step 3: A new executable file will be created if it is successfully compiled I-8000 Series (C Language Based) User Manual, Version 1.0.1 Page: 125 Copyright © 2012 ICP DAS Co., Ltd. All Rights Reserved. E-mail: service@icpdas.com...
-
Page 126: Msvc 1.50
C.4. MSVC 1.50 Step 1: Run MSVC.exe Step 2: Create a new project (*.mak) by entering the name of the project in the Project Name field and then select MS-DOS application (EXE) as the Project type I-8000 Series (C Language Based) User Manual, Version 1.0.1 Page: 126 Copyright ©... -
Page 127: I-8000 Series (C Language Based) User Manual, Version 1.0.1 Page
Step 3: Add the user's program and the necessary library files to the project Step 4: Set the Code Generation on the Compiler. I-8000 Series (C Language Based) User Manual, Version 1.0.1 Page: 127 Copyright © 2012 ICP DAS Co., Ltd. All Rights Reserved. E-mail: service@icpdas.com... - Page 128 Step 5: Change the Memory model (large for 8000e.lib) I-8000 Series (C Language Based) User Manual, Version 1.0.1 Page: 128 Copyright © 2012 ICP DAS Co., Ltd. All Rights Reserved. E-mail: service@icpdas.com...
- Page 129 Step 6: Remove the xcr, afxcr library from the Input Category Step 7: Remove the OLOGO option from the miscellancous Category. I-8000 Series (C Language Based) User Manual, Version 1.0.1 Page: 129 Copyright © 2012 ICP DAS Co., Ltd. All Rights Reserved. E-mail: service@icpdas.com...
- Page 130 Step 8: Rebuild the project I-8000 Series (C Language Based) User Manual, Version 1.0.1 Page: 130 Copyright © 2012 ICP DAS Co., Ltd. All Rights Reserved. E-mail: service@icpdas.com...
Need help?
Do you have a question about the I-8411 and is the answer not in the manual?
Questions and answers