Advertisement
Land Rover Range Rover Evoque Data Interface with SWC & Factory Display Retention
* For models with rear parking sensors
INTERFACE FEATURES
• Provides accessory power
• Designed for non-amplified models
• Provides NAV outputs (parking brake, reverse, speed sense)
• Retains audio controls on the steering wheel
• Retains parking sensor chimes
* Attention! The aftermarket radios backup camera input will be used to display the vehicle settings. If the radio doesn't have a backup camera
Input, then there will be no visualization of the vehicle settings. An externally mounted screen could be substituted in this situation.
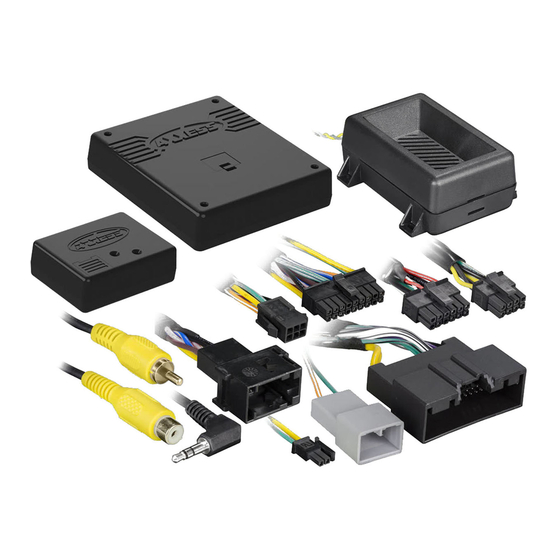
INTERFACE COMPONENTS
• AX-LR902 interface
• ASWC-1 interface
• AX-LR902 harness
• ASWC-1 harness
• Female 3.5mm connector with stripped leads
• Chime speaker
AxxessInterfaces.com
• Retains balance and fade
• Retains factory features: date, time
• Retains most of the vehicle settings that was displayed on the
factory radio *
• Micro "B" USB updatable
© COPYRIGHT 2018 METRA ELECTRONICS CORPORATION
AX-LR902
I N S TA L L AT I O N I N S T R U C T I O N S
2014*
TABLE OF CONTENTS
Connections to be made ....................................2-3
Installing the AX-LR902 interface .........................3
Programming the ASWC-1 interface ................. 3-4
Screen operation ................................................4-6
TOOLS REQUIRED
• Wire cutter • Crimp tool • Solder gun • Tape
• Connectors (example: butt-connectors, bell
caps, etc.) • Zip ties
CAUTION!
All accessories, switches, climate
controls panels, and especially air bag indicator
lights must be connected before cycling the
ignition. Also, do not remove the factory radio
with the key in the on position, or while the
vehicle is running.
REV. 9/25/18 INSTAX-LR902
Advertisement
Table of Contents

Related Manuals for Axxess AX-LR902


Summary of Contents for Axxess AX-LR902
- Page 1 Land Rover Range Rover Evoque Data Interface with SWC & Factory Display Retention 2014* TABLE OF CONTENTS Connections to be made ........2-3 * For models with rear parking sensors Installing the AX-LR902 interface ......3 Programming the ASWC-1 interface ....3-4 Screen operation ..........4-6 INTERFACE FEATURES • Provides accessory power •...
- Page 2 CONNECTIONS TO BE MADE From the aftermarket radio to the AX-LR902 harness: From the aftermarket radio to the ASWC-1 harness: • Connect the Black wire to the ground wire. This harness is only to be used if the vehicle is equipped with steering wheel controls or a backup camera •...
- Page 3 • Connect the chime speaker to the connector on AX-LR902 Interface labeled “To Speaker”. • Connect the AX-LR902 harness to the AX-LR902 interface, and then to the wiring harness in the vehicle. The slightly longer harness with a 12-pin connector will connect at the factory radio display.
- Page 4 PROGRAMMING THE ASWC-1 SCREEN OPERATION INTERFACE (CONT.) L.E.D. feedback Configuration Menu The (18) Red L.E.D. flashes represent what brand radio the ASWC-1 believes it is connected Vehicle Settings to. Each flash represents a different radio manufacturer. For example, if you are installing Interface Settings a JVC radio, the ASWC-1 will flash (5) times.
- Page 5 SCREEN OPERATION (CONT.) Vehicle Settings Interface Settings Screen Size/Position Time/Date Screen Size/Position Horizontal Size < Back Picture Settings Horizontal Position Preferences Vertical Size <Back Vertical Position < Back Vehicle Settings Interface Settings Screen Size/Position • Adjust Time/Date settings such as hours, minutes, •...
- Page 6 SCREEN OPERATION (CONT.) Preferences Picture Settings Brightness Driver Position Right Contrast Park Assist Version Saturation Camera Connected < Back Reverse Priority Park Assist Park Brake Source Speed Restore factory settings < Back Preferences Picture Settings • Driver Position - Select Left or Right depending upon vehicle configuration. •...
- Page 7 REV. 9/25/2018 INSTAX-LR902...
- Page 8 AX-LR902 I N S TA L L AT I O N I N S T R U C T I O N S IMPORTANT If you are having difficulties with the installation of this product, please call our Tech Support line at 1-800-253-TECH. Before doing so, look over the instructions a second time, and make sure the installation was performed exactly as the instructions are stated.
Need help?
Do you have a question about the AX-LR902 and is the answer not in the manual?
Questions and answers