Advertisement
Quick Links
APPLICATIONS
Ford
E Series
2021-Up
Eco Sport
2020-Up
AxxessInterfaces.com
Ford SWC
and Data Interface 2020-Up
INTERFACE FEATURES
• Provides accessory power
(10-amp)
• Provides wires for multimedia
radios (park brake, reverse,
speed sense)
• Retains audio controls on the
steering wheel
• Designed for non-amplified
models only
• Designed to be compatible
with all major radio brands
Note: The AXTC-FD3 does not retain SYNC.
Escape
2020-Up
F250/F350/F450/F550 2020-Up
© COPYRIGHT 2021 METRA ELECTRONICS CORPORATION
(Steering Wheel Control)
• Auto detects vehicle type, radio
connection, and preset controls
• Ability to dual assign steering
wheel control buttons
• Retains memory settings even
after battery disconnection
or interface removal (non
volatile memory)
• Provides illumination output
• Micro-B USB updatable
Transit
2020-Up
Transit Connect
2020-Up
AXTC-FD3
I N S T A L L A T I O N I N S T R U C T I O N S
TABLE OF CONTENTS
Connections ............................................................2
Programming .........................................................3
Troubleshooting .....................................................4
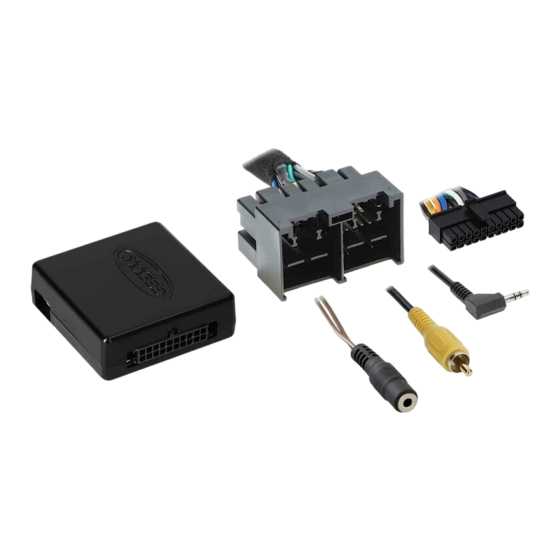
INTERFACE COMPONENTS
• AXTC-FD3 interface
• AXTC-FD3 harness
• 3.5mm adapter
TOOLS & INSTALLATION ACCESSORIES REQUIRED
• Crimping tool and connectors, or solder gun,
solder, and heat shrink • Tape • Wire cutter
• Zip-ties
Product Info
ATTENTION: With the key out of the ignition,
disconnect the negative battery terminal
before installing this product. Ensure that all
installation connections are secure before
cycling the ignition to test this product.
NOTE: Refer also to the instructions included
with the aftermarket radio.
REV. 10/8/21 INSTAXTC-FD3
Advertisement

Related Manuals for Axxess AXTC-FD3


Summary of Contents for Axxess AXTC-FD3
- Page 1 • Tape • Wire cutter • Micro-B USB updatable with all major radio brands • Zip-ties Note: The AXTC-FD3 does not retain SYNC. Product Info ATTENTION: With the key out of the ignition, disconnect the negative battery terminal APPLICATIONS before installing this product.
- Page 2 CONNECTIONS Vehicle Connectors Reset Button Radio Connections LED Light Aftermarket Radio Black - Ground (radio’s features may vary) Yellow - Battery power Red - Accessory power Front Orange/White - Illumination Rear View AUX-IN Rear Blue/Pink - VSS/Speed-Sense Green/Purple - Reverse signal Light Green - Parking brake Gray - Front right speaker + 3.5mm Adapter (for radios with a wire for SWC)
- Page 3 Cycle the ignition on and wait (5) seconds. Green LED Cycle the ignition off, then back on. Connect the AXTC-FD3 harness to the AXTC-FD3 interface, and then to the wiring harness in the vehicle. Test all functions of the installation for proper operation.
- Page 4 AXTC-FD3 I N S T A L L A T I O N I N S T R U C T I O N S Having difficulties? We’re here to help. TROUBLESHOOTING Contact our Tech Support line at: 386-257-1187 If the interface fails to function,...
- Page 5 SWC (Steering Wheel Control) volatile memory) • Provides illumination output and Data Interface • Micro-B USB updatable Ford Select Models Note: The AXTC-FD3 does not retain SYNC. 2012-Up APPLICATIONS Visit for more detailed information about the product and up-to-date vehicle specific applications. AxxessInterfaces.com...
- Page 6 AXTC SERIES ADVANCED PROGRAMMING The AXTC interface can be used in vehicles without steering wheel controls to provide retained accessory power, and also to provide wires for multimedia radios (park brake / reverse / speed-sense). Follow the steps below to program the AXTC-CH5 for just these features. 1.
- Page 7 The AXTC interface has the capability to assign (2) functions to a single button except for Volume Up and Volume Down. This feature can be performed three different ways; through a Windows based computer using the Axxess Updater, through the Axxess Updater app available from the Android/Apple mobile devices app store, or by following the steps below.
- Page 8 The AXTC interface can assign (2) functions to a single button except for Volume Up and Volume Down. This feature can be performed three different ways; through a Windows based computer using the Axxess Updater, through the Axxess Updater app available from the Android/Apple mobile devices app store, or by following the steps below.
- Page 9 AXTC SERIES LED FEEDBACK Overall LED Feedback Radio Programming Section Vehicle Programming Section LED Light Solid Green Pass Pass Slow Red Flash Fail Pass Slow Green Flash Pass Fail Solid Red Fail Fail Radio LED Feedback LED Pattern Radio Keynotes (reference below) Pioneer / Jensen Boss (type 1) / Dual / Sony 3 (Boss)
- Page 10 AXTC SERIES RADIO TROUBLESHOOTING If the AXTC interface’s LED light didn’t go out at the end of the radio programming sequence, or showed the wrong radio installed*, follow the steps below to trace down where the problem may lie. The final LED feedback light will also flash slowly or turn solid Red, instead of turning solid Green.
- Page 11 AXTC SERIES RADIO TROUBLESHOOTING Alpine Radio 1. Unplug the 3.5mm jack from the radio, reset and reprogram the interface, then plug the 3.5mm jack Specific back into the SWC input labeled REM. Troubleshooting 2. Some Alpine radios have a feature that changes SWC* from the back to the front, and vice-versa. If the radio has this feature, make sure SWC is on the rear setting.
- Page 12 AXTC SERIES RADIO TROUBLESHOOTING Radio LED Feedback LED Pattern Radio Keynotes (reference below) Pioneer / Jensen Boss (type 1) / Dual / Sony 3 (Boss) Kenwood Alpine Boss (type 2) Clarion (type 1) Clarion (type 2) Boss (type 3) Insane Audio Magnadyne Visteon / Boss (type 4) 3 (Boss)
Need help?
Do you have a question about the AXTC-FD3 and is the answer not in the manual?
Questions and answers