Table of Contents
Advertisement
Quick Links
Advertisement
Table of Contents

Related Manuals for ATEQ H6000


Summary of Contents for ATEQ H6000
- Page 1 USER MANUAL ATEQ H6000 Portable and Fixed Version 1.11 Reference: UM-30200D-U...
- Page 3 REVISIONS OF THE ATEQ H6000 USER MANUAL Due to continuing improvements, the information contained in this user manual, the features and design of this device are subject to be changed without prior notice. Date Edition/Revision Reference Chapters up dating Week/Year...
- Page 5 1008/CE-30200A-U DECLARATION OF CONFORMITY 00 We the undersigned, ATEQ, manufacturers of the ATEQ H6000 REF : 302.00 declare that it complies with the requirements of : - LOW VOLTAGE Directive 73/23/CEE partially modified by Directive 93/68/CEE. • standard EN 61 010-1 « Safety requirements for electrical equipment for measurement, control and laboratory use »,...
- Page 7 • do not open the instrument when it is powered up, • avoid water spillage near of the instrument, • ATEQ is at your disposal for any further information concerning the use of the instrument under maximum safety conditions. We would like to bring to your attention that ATEQ will not be held responsible for any accident connected to the improper use of the instrument, to the work bench or to the lack of compliance with safety rules.
- Page 9 This may be carried out on site or in our offices. TRAINING COURSES In the framework of partnership with our customers, ATEQ offers two types of training in order to optimise the usage and knowledge of our instruments. They are aimed at different levels of technician: •...
- Page 11 PREFACE Dear Customer, You have just purchased an ATEQ instrument, we thank you for the trust you have placed on our brand. This instrument has been designed to ensure a long and unparalleled life expectancy, and we are convinced that it will give you complete satisfaction during many long years of operation.
-
Page 13: Table Of Contents
Table of contents TABLE OF CONTENTS PREAMBLE 1. DEFINITION OF THE ATEQ H6000 ....................3 1.1. Sniffer ............................3 1.2. Gas...............................3 1.3. Periodic review ..........................3 2. MEASUREMENTS CHARACTERISTICS ...................4 2.1. Gas détection measurement (H )....................4 3. MEASUREMENT PRINCIPLE ......................4 3.1. Continuous detection ........................4... - Page 14 2. ERROR MESSAGES .........................50 3. PROBABLES FAILURES........................52 3.1. Portable version device......................52 3.2. Fixed version device ........................52 Appendices ATEQ H6000 1. TECHNICAL CHARACTERISTICS ....................53 2. DIMENSION DRAWING ........................53 3. SAFETY INFORMATION........................54 4. RECYCLING ............................56 Index UM-30200D-U User manual H6000 Page 2 / 58...
-
Page 15: Preamble
We remind that a calibrated leak is the only component allowing a valid and control for the proper operation of leak detector. The check frequency is to be determined by the user according to the operating conditions of the leak detector. UM-30200D-U User manual H6000 Page 3 / 58... -
Page 16: Measurements Characteristics
To optimize the measurement, the operator should fly over the test part with the sniffer at a speed of 1 cm/s. UM-30200D-U User manual H6000 Page 4 / 58... -
Page 17: Chapter 1 Instrument Installation
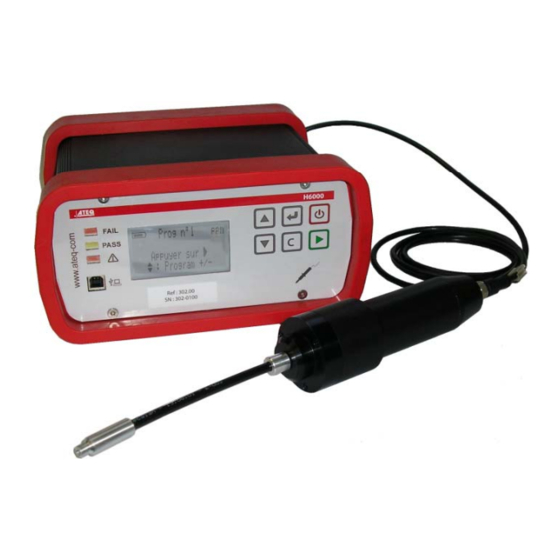
INSTRUMENT INSTALLATION 1. ATEQ H6000 APPEARANCE The ATEQ H6000 case is made with two anodized aluminum parts assuring durability and lightness. The case is surrounded by two rubbers to protects the device from falls and avoid marking the shocked part. -
Page 18: Intrument Installation
Winateq300 software: Configuring (save / restore the parameters in a PC). Duplicate an instrument. Up dating the device. Results recovery for archiving and statistic analysis with spreadsheet software's. See the Winateq300 software manual. UM-30200D-U User manual H6000 Page 6 / 58... -
Page 19: Sniffer Connector "Push-Pull" Type
Warning! Connect the sniffer before starting the instrument. If not, the device will be fault. In any case the sniffer connectors won't be plugged or unplugged when the instrument is turn on. 2.2.1. Portable version (following option) 2.2.2. Fixed version (following option) UM-30200D-U User manual H6000 Page 7 / 58... -
Page 20: Supply / Battery Block
CHARGE indicator (green) is lit. Refer to safety information concerning the batteries in appendices. The ATEQ H6000 is running with a 12 V DC battery. The battery has a LED light for charge state: Red: The battery is charging Green: battery full. - Page 21 Chapter 1 – Instrument installation 2.3.2. Fixed version (following option) 2.3.3. Power supply / ON/Off switch The ATEQ H6000 Fixed operates under a supply of 100 to 240 V AC. I: ON O: OFF 2.3.4. J1 Connector (Binary inputs/outputs) 1 2 3 4 5 6 7 8 9 10 11 12 13 14 15 16...
- Page 22 9 (25) 0 (1) 10 (26) 0 (1) 11 (27) 0 (1) 12 (28) 0 (1) 13 (29) 0 (1) 14 (30) 0 (1) 15 (31) 0 (1) 16 (32) 0 (1) UM-30200D-U User manual H6000 Page 10 / 58...
- Page 23 (Pr 2 + 1) (Pr 4 + 1) Customer (Pr 8 + 1) + 24 V (Pr 16 + 1) Common Pass part INPUTS Fail part NPN MODE Large leak Alarm End of cycle Ground UM-30200D-U User manual H6000 Page 11 / 58...
- Page 24 (Pr 8 + 1) (Pr 16 + 1) Common 0,2 A Pass part 0,3 A Max Fail part with ATEQ 24 V DC Large leak Alarm 0,2 A End of cycle Ground UM-30200D-U User manual H6000 Page 12 / 58...
-
Page 25: Chapter 2 User Interfaces
Push the two buttons at the bottom of the locks. The locks will be released. Lift the two locks to release the cover. Then open the cover to access to the instrument. UM-30200D-U User manual H6000 Page 13 / 58... -
Page 26: Carrying Case Presentation
Accessories Batteries Important note: do not charge the battery when it installed into the carrying case, you must remove it to avoid overheating. See the instructions concerning the battery in the appendices. UM-30200D-U User manual H6000 Page 14 / 58... -
Page 27: Close The Carrying Case
LOSE THE CARRYING CASE Before closing the housing box, open the purge button (left turn). Close the cover and lock the two locks. Then close the purge button (right turn) to complete the sealing. UM-30200D-U User manual H6000 Page 15 / 58... -
Page 28: H6000 Portable Or Fixed Presentation
Low frequency: small leak. High frequency: large leak or near the reject level. If the reject level is over passed, the vibrator runs during one second. UM-30200D-U User manual H6000 Page 16 / 58... -
Page 29: Keyboard Presentation
Long press (3 seconds): Enter in the parameters and configuration menu. "C" for CANCEL Return to the previous function or menu. Escape without parameter's modification. 2.3. S TART CYCLE KEY FUNCTION START key Starting a measurement cycle. UM-30200D-U User manual H6000 Page 17 / 58... -
Page 30: Lcd Display
Empty battery, recharge it (flashing) the instrument will turn off. Note: if the instrument doesn't turn on, before any service on the device, recharge completely the battery or replace it with a full one. UM-30200D-U User manual H6000 Page 18 / 58... -
Page 31: Chapter 3 Starting Up And Adjustments
: Program +/- 1.2. P ORTABLE VERSION ONLY The H6000 device is running with its integrated battery. Check the battery level. Note: if the device doesn't turn on, charge fully the battery or replace it with a charge full one. -
Page 32: Measurement Running
Low frequency: small leak. High frequency: large leak or near the reject level. If the reject level is over passed, the vibrator runs during one second. UM-30200D-U User manual H6000 Page 20 / 58... -
Page 33: Saving Results
Reject : ----- The adjust cycle is starting. The instrument is waiting a leak Measure Master Leak measurement. then press Approach the sniffer on the end of the calibrated leak (near the orifice). UM-30200D-U User manual H6000 Page 21 / 58... -
Page 34: Stop The Measurement
"Fail" when reached. ™™™™™™ 4. STOP THE MEASUREMENT Prog n°1 ml/s The measurement stops by quick press on the Press to measure key. : Program +/- UM-30200D-U User manual H6000 Page 22 / 58... -
Page 35: Menu Structure
Short cycle > Yes / No Surveillance > 0 % to 100 % End of cycle > > Stop Research System settings > Concentration H > 0% to 100% (step 0.1%) UM-30200D-U User manual H6000 Page 23 / 58... -
Page 36: Special Cycles Menu
> Ack cable replaced counter. Ack cable replaced Reset service filter counter. Reject settings Reset sequence These messages appear Tests – TO DO- only in Sequence mode and sequence started. Tests –CANCEL- UM-30200D-U User manual H6000 Page 24 / 58... -
Page 37: Lock / Unlock
(three seconds) to enter into the Mode : Program main menu, select the Param. : Locked function. Program : Pr01 PASSWORD MODE >Unlocked To unlock the parameters access, select the Unlocked function. Erased UM-30200D-U User manual H6000 Page 25 / 58... -
Page 38: Password Erase
The instrument asks the current password, enter the 4 numbers >Password : 0000 by using the several times. Password Erased When the password is entered, validate with the key, the instrument displays Password Erased. UM-30200D-U User manual H6000 Page 26 / 58... -
Page 39: Program Number Choice
3.2. C YCLE MODE To select the program to run in the CYCLE mode, use the Prog n°1 ml/s keys, then run the test program with the Appuyer sur : Program +/- key. UM-30200D-U User manual H6000 Page 27 / 58... -
Page 40: Um-30200D-U
MAIN MENU Program : Pr02 The program is created and the test parameters can be entered. >Name : WING L The test parameters appear after the menu. Rej. Unit : ml/s UM-30200D-U User manual H6000 Page 28 / 58... -
Page 41: Parameters Setting
This function allows personalizing a program, for example to identify it with the part to test name. Enter 7 alphanumeric characters maximum. 5.1.2. Reject unit This is to choose the instrument measurement unit. Choice among: ppm (parts per millions), ml/s, ml/mn. UM-30200D-U User manual H6000 Page 29 / 58... -
Page 42: Automatism With The Fixed Version (Option)
For recoverable parts, the Pass (OK) Fail (NOK) outputs both PASS RECOVERY FAIL PARTS PARTS PARTS activated simultaneously. When "Recovery" function validated, you have to set the recovery reject level in the parameters. UM-30200D-U User manual H6000 Page 30 / 58... - Page 43 At the end of the research, the user stops the cycle by pressing the RESET key. The "Fail part" and "End of cycle" outputs are then activated. The pass part case is the same as the normal mode. UM-30200D-U User manual H6000 Page 31 / 58...
-
Page 44: Sequence Mode Running
Result saved S01 -2/3- Pr04 To skip to the next step, the user must press on the Press to measure key. Run the second step by pressing the key. : Sequence +/- UM-30200D-U User manual H6000 Page 32 / 58... - Page 45 Note: if the user presses again the key, the just cancelled step becomes a "TO DO" step. If the cancelled step had been already carried out, it becomes "TO DO" too. UM-30200D-U User manual H6000 Page 33 / 58...
-
Page 46: System Settings
By using the keys, select the language. French SYSTEM SETTINGS MENU >Language : English Validate with the key to confirm the new displayed Backlight : 100 % language. Auto Off : No UM-30200D-U User manual H6000 Page 34 / 58... -
Page 47: Lighting The Screen
On or Off to SYSTEM SETTINGS MENU Backlight : 60% validate or not the beep ringing and then confirm by using the Auto Off : No >Buzzer : On key. UM-30200D-U User manual H6000 Page 35 / 58... -
Page 48: Programs Deletion
SYSTEM SETTINGS MENU Hour : 10:25 off from No (never turn off) to 30 minutes. Validate with the Backlight : 60% Auto Off : 20 min< key. UM-30200D-U User manual H6000 Page 36 / 58... -
Page 49: Date And Time (Fixed Device Only)
Hour : 15:35 setting. By using the keys, set the year. Backlight : 60% SYSTEM SETTINGS MENU >Date : 10/08/09 To save the date, validate with the key. Hour : 15:35 Backlight : 60% UM-30200D-U User manual H6000 Page 37 / 58... -
Page 50: Calibration (Date, Fixed Device Only)
Make a calibration and set the new date for the : Next next calibration. To change the date, proceed by the same way as the normal date. UM-30200D-U User manual H6000 Page 38 / 58... -
Page 51: Chapter 5 Accessories
1.2. F IXED VERSION ACCESSORIES 1.2.1. Power supply The power supply cable of the H6000 Fixed allows its connection to the mains supply network (from 100 to 240V AC). UM-30200D-U User manual H6000 Page 39 / 58... -
Page 52: Portable Version Accessories
Important note: do not charge the battery when it installed into the carrying case, you must remove it to avoid overheating. See the instructions concerning the battery in the appendices. UM-30200D-U User manual H6000 Page 40 / 58... - Page 53 Strong case with the dimensions: Large 520, Depth 440 and high 230 for the storage of the following components: 1 measurement device H6000, 1 second battery, power supply battery charging, 1 sniffer, 1 sniffer cable, 1 USB cable. UM-30200D-U User manual H6000 Page 41 / 58...
-
Page 54: Option Accessories
It allows the user to isolate the external noises and facilitate the detection of fine leaks. It's connected on the sniffer. This headphone provided by ATEQ, has a knob for volume, adjust the volume according to the preferences of the user. Important note: We draw attention, the ATEQ H6000 device has... -
Page 55: Cdh6000 Calibrator (Option)
It must be used with one or several calibrated leaks. If the pressure displayed on the gauge of CDH6000 can not exceed 1 bar, change the cartridge (maximum pressure: 4 bars) To purchase cartridges filled with gas H2N2 (5% hydrogen) contact ATEQ. Cartouche extracted. Cartridge extraction. - Page 56 Tip: when the operator has finished using the calibrator CDH6000, disconnect the calibrated leak and store in its case and avoid the excessive pollution of the test area. UM-30200D-U User manual H6000 Page 44 / 58...
-
Page 57: Spare Parts
NIFFER NOSE The nose sniffer is a component that can become worn as it is in direct contact with parts to be tested. It's available in spare part and provided by ATEQ. UM-30200D-U User manual H6000 Page 45 / 58... - Page 58 Chapter 5 - Accessories UM-30200D-U User manual H6000 Page 46 / 58...
-
Page 59: Chapter 6 Service
Tip 2: get a second sniffer, to limit the downtime of the instrument due to maintenance of the fan and / or sensor carried by ATEQ in these premises. Important note: do not hesitate to revise your instrument annually in ATEQ... -
Page 60: Changing The Filter
SPECIAL CYCLES >Ack filter replaced Select the "Ack filter replaced" menu with the Reject Settings keys then validate with the key. Replace filter The message "Replace filter acknowledged" confirms the acknowledged counter resetting. UM-30200D-U User manual H6000 Page 48 / 58... -
Page 61: Changing The Cable
SPECIAL CYCLES >Ack cable replaced Select the "Ack cable replaced" menu with the Reject Settings keys then validate with the key. Replace cable The message "Replace cable acknowledged" confirms the acknowledged counter resetting. UM-30200D-U User manual H6000 Page 49 / 58... -
Page 62: Error Messages
Chapter 6 – Service 2. ERROR MESSAGES The ATEQ H6000 can display error messages if there are operational problems. PROBLEM LIGHTS DISPLAYED MESSAGES The sniffer is not detected by the device. DEFAULT CARD SENSOR Action: turn off the device and connect the... - Page 63 ERROR compatible. Action: try to make a reset of the system and restart the instrument, if the problem persists, contact ATEQ after sales services. UM-30200D-U User manual H6000 Page 51 / 58...
-
Page 64: Probables Failures
Chapter 6 – Service 3. PROBABLES FAILURES The ATEQ Company disclaims any responsibility if the instruments calibration and adjustment would not be performed by its services. If a failure with the device appears, see the following list (left column) to identify the fault, make checks or actions steps (right column) in the same order. -
Page 65: Appendices Ateq H6000
Storage (Li-Po -10° C to +50° C (+14° F to +122° F) battery conditions): 2. DIMENSION DRAWING L : 240 mm / H : 120 mm / D : 210 mm UM-30200D-U User manual H6000 Page 53 / 58... -
Page 66: Safety Information
Use a specified charger approved by the ATEQ manufacturer and supplied with the device. Safety for Lithium Polymer battery use NEVER leave the battery unattended during the charging process. - Page 67 The ATEQ Company couldn't control the proper use of the battery for each customer (charge, discharge, storage etc.), It can not be held responsible for damage to persons and property.
-
Page 68: Recycling
This applies to your tool but also to any enhancements marked with this symbol. Do not dispose of these products as unsorted municipal waste. For further information, please contact ATEQ. UM-30200D-U User manual H6000 Page 56 / 58... -
Page 69: Index
Safety precautions ......54 Filters..........45 Save the results ........21 Filters changing ........48 Second sniffer........42 Security..........54 Headphone .........42 Sensor precautions.......3 Hour............38 Sensor saturated ........18 Sequence mode........32 I key............17 Sequences management....33 Inputs / outputs ........9 Service..........47 UM-30200D-U User manual H6000 Page 57 / 58... - Page 70 Used gas ..........3 Stop cycle ...........22 Stop Mode ..........31 Vibrate ..........16 Supply wire .........39 Vibrator ..........20 Surveillance ........31 System settings ........34 Wait time..........30 What to do in case of failure? .....52 Technical characteristics ....53 UM-30200D-U User manual H6000 Page 58 / 58...
- Page 72 This document is the exclusive property of ATEQ. It may not be communicated, reproduced or used without prior consent.
Need help?
Do you have a question about the H6000 and is the answer not in the manual?
Questions and answers