Table of Contents
Advertisement
Quick Links
Advertisement
Table of Contents

Related Manuals for ATEQ CDP60


Summary of Contents for ATEQ CDP60
- Page 1 USER MANUAL ATEQ CDP60 Version 1.03 Reference: UM-24100D-U...
- Page 3 REVISION OF THE CDP60 USER MANUAL Edition/ Date Reference Chapters updated Revision (week/year) First edition UM-24100A-U 25/2007 ----- Modification measurement Second edition UM-24100B-U 11/2008 characteristics in the preamble. Third edition UM-24100C-U 26/2008 Program evolution to the 1.03 version. Preamble, modification of the principle...
- Page 5 • do not open the instrument when it is powered up, • avoid water spillage near of the instrument, • ATEQ is at your disposal for any further information concerning the use of the instrument under maximum safety conditions. We would like to bring to your attention that ATEQ will not be held responsible for any accident connected to the improper use of the instrument, to the work bench or to the lack of compliance with safety rules.
- Page 7 ATEQ is attached to the COFRAC and delivers a certificate following a calibration. TRAINING COURSES In the framework of partnership with our customers, ATEQ offers two types of training in order to optimise the usage and knowledge of our instruments. They are aimed at different levels of technician: •...
- Page 9 PREFACE Dear Customer, You have just purchased an ATEQ instrument, we thank you for the trust you have placed on our brand. This instrument has been designed to ensure a long and unparalleled life expectancy, and we are convinced that it will give you complete satisfaction during many long years of operation.
-
Page 11: Table Of Contents
Table of contents TABLE OF CONTENTS PREAMBLE 1. DEFINITION OF THE ATEQ CDP60 ....................3 2. MEASUREMENTS CHARACTERISTICS ...................4 2.1. Pressure ranges ...........................4 Chapter 1 INTRUMENT INSTALLATION 1. PRESENTATION OF THE ATEQ CDP60 ...................5 2. ATEQ CDP60 INSTALLATION ......................6 2.1. Supply connector 24 V DC......................6 2.2. - Page 12 1. ERROR MESSAGES .........................25 Chapter 7 PC INSTALLATION 1. PROGRAM AND DRIVERS INSTALLATION ...................27 1.1. USB connection..........................27 1.2. RS232 connection........................31 1.3. RS232 cable diagram.........................31 Appendix ATEQ CDP60 1. TECHNICALS CHARACTERISTICS....................33 2. PERSONNAL NOTES ........................34 Index UM-24100D-U User manual ATEQ CDP60 Page 2/36...
-
Page 13: Preamble
Preamble PREAMBLE 1. DEFINITION OF THE ATEQ CDP60 The CDP60 is a master used to adjust or calibrate all kinds of instruments measuring air pressure. ATEQ CDP60 AUTO-ZERO ELECTROVALVE* PRESSURE SENSOR * The auto-zero electrovalve is integrated into instruments with a full scale less than 5 bars. -
Page 14: Measurements Characteristics
It is however advised to realize an auto-zero before a measurement report. Recommendation of use: according to some use's conditions, the instrument can put to two hours of time of heating before complete stabilization. UM-24100D-U User manual ATEQ CDP60 Page 4/36... -
Page 15: Chapter 1 Intrument Installation
USB and RS232 connectors The ATEQ CDP60 is according a portable case. The instrument has a pneumatic quick connector (Staublï kind) for the connection to the pressure to be measured. The instrument has three electrics connectors: 1 connector for the battery charge, the instrument run with lithium-ion batteries under 12 V DC voltages and it supplies with a specific supply transformer to charge the batteries. -
Page 16: Ateq Cdp60 Installation
Allows the connection to the pressure to be measured (quick connector "Staublï" RBE03 female type). 2.5. P NEUMATIC CONNECTOR SECOND INPUT TEST In case of low pressure differential sensor calibration, allows to put all the reference circuit to the same atmospheric pressure. UM-24100D-U User manual ATEQ CDP60 Page 6/36... -
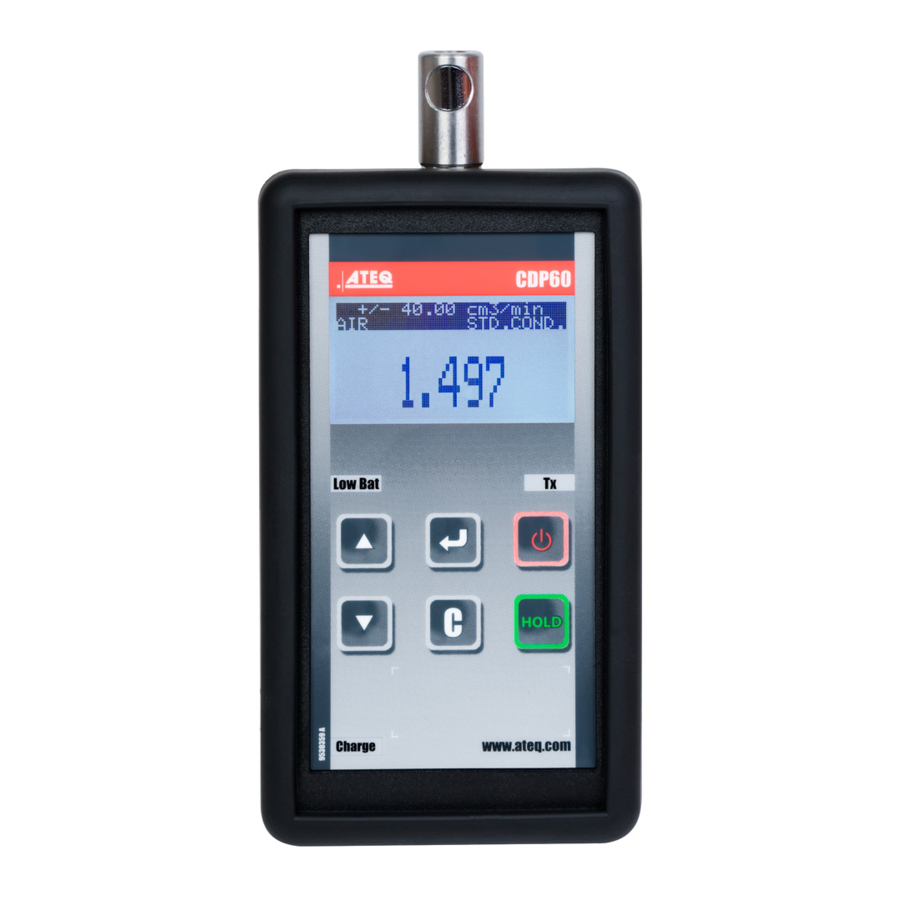
Page 17: Chapter 2 User Interfaces
Press and hold the key to display the battery level. 1.2. "C " ANCEL FUNCTION Cancel he edition or the modification of the parameters. Return to the previous menu. 1.3. “HOLD” FUNCTION To freeze or unfreeze the measurement display. UM-24100D-U User manual ATEQ CDP60 Page 7/36... -
Page 18: Enter" Key
Scroll up or increase numeric values. Swing from the single "Pressure" or extended "Pressure /temperature / Atmospheric pressure" displays. Scroll down or decrease numeric values. Swing from the single "Pressure" or extended "Pressure /temperature / Atmospheric pressure" displays. UM-24100D-U User manual ATEQ CDP60 Page 8/36... -
Page 19: Others Items
Charge light: this light is glowing red while the battery is being Charge charged. When charging is finished, the light turns off. Not used. Note: when the device is connected to a PC USB port, the "Charge" light is on. UM-24100D-U User manual ATEQ CDP60 Page 9/36... - Page 20 Chapter 2 – User Interfaces UM-24100D-U User manual ATEQ CDP60 Page 10/36...
-
Page 21: Chapter 3 Start Up Adjust And Measures
START UP ADJUST AND MEASURES 1. STARTING THE ATEQ CDP60 Before using the CDP60 device, be sure that the battery is correctly charged. Check the pneumatics and electrics connections before the start up of the CDP60. Switches on the instrument. -
Page 22: Parameters Adjust
BACK LIGHT: 100 % PARAMETER >FILTER : 1.0 s Validate with the ENTER key. PRESS.UNIT.: Pa BACK LIGHT: 100 % 500.0 Pa To return to the measurement mode, press CANCEL 000.0 UM-24100D-U User manual ATEQ CDP60 Page 12/36... -
Page 23: Pressure Unit
PARAMETER FILTER : 1.0 s Validate with the ENTER key. >PRESS.UNIT.: Pa BACK LIGHT: 100 % 500.0 Pa To return to the measurement mode, press CANCEL 000.0 UM-24100D-U User manual ATEQ CDP60 Page 13/36... -
Page 24: Back Light
AUTO OFF: 07 min off) and 100 % (maximum). PARAMETER PRESS.UNIT.: Pa Validate with the ENTER key. >BACK LIGHT: 050 % AUTO OFF: 07 min 500.0 Pa To return to the measurement mode, press CANCEL 000.0 UM-24100D-U User manual ATEQ CDP60 Page 14/36... -
Page 25: Automatic Power Off (Auto Off)
DOWN key go the minimum PRESS.UNIT.: Pa BACK LIGHT: 100 % (inferior to 1 minute) then appears "DISABLE" >AUTO OFF: Disable Validate with the ENTER key. The instrument will be power on continuously. UM-24100D-U User manual ATEQ CDP60 Page 15/36... -
Page 26: Rs232
(the character strings are separated by a punctuation mark). Select YES or NO by using the UP RS232 PARITY : NONE DOWN keys and validate with the ENTER HANDSHAKE : NO >EXPORT : YES key. UM-24100D-U User manual ATEQ CDP60 Page 16/36... -
Page 27: Chapter 4 Cdp60 Functions
None Even Handshake > Export > * Only some units are integrated according to the instrument full scale. Simple menu, access by press < 1 second > Auto-zero SPECIAL CYCLE Print Sensor display UM-24100D-U User manual ATEQ CDP60 Page 17/36... -
Page 28: Specials Cycles
Switch off pressure ask to disconnect every pressure source from the connector and validate with the ENTER key. Enter If Ok Note: this cycle allows taking over an offset linked to the temperature, position, etc… UM-24100D-U User manual ATEQ CDP60 Page 18/36... -
Page 29: Measurements Print (Print)
In the EXPORT mode, the frames contains punctuation separators and each measurement result are on the same line (no line feed) this is to easily importing and treating in a spreadsheet software for example. UM-24100D-U User manual ATEQ CDP60 Page 19/36... -
Page 30: Sensors Display
DOWN keys validate with AUTO ZERO PRINT >SENSOR DISPLAY the ENTER key. 051974 PRESS. : 021509 The instrument displays the sensors points. 500.0 Pa To return to the measurement mode, press CANCEL 000.0 UM-24100D-U User manual ATEQ CDP60 Page 20/36... -
Page 31: Chapter 5 Accessories, Security And Recycling
ACCESSORIES, SECURITY AND RECYCLING 1. ACCESSORIES 1.1. P OWER SUPPLY The power supply of the CDP60 converts a network voltage (120 to 240 V AC) into a 24 V DC low voltage supply. It has no power switch and works as soon as it is plugged in. -
Page 32: Test Tube
OPTION This cover in rubber material allows protect the CDP60 and absorb impacts (option). 1.6. H ARD CASE OPTION Hard case to put away the CDP60 instrument and its accessories. 1.7. P RESSURE GENERATOR OPTION Full scale: 1000 Pa. This instrument generates from the 6 bars network a pressure between 0 and 1000 Pa (option). -
Page 33: Recycling
Chapter5 – Accessories, security and recycling 1.7.1. Pressure generator use Use of the pressure generator with a CDP60 : 1) Adjust the pressure to the minimum by turning the knob to the left (watch counter clockwise). 2) Plug the 6 bar network pressure to the generator input. -
Page 34: Safety Informations
CAUTION: This unit contains an internal Lithium Ion battery, it is replaceable only by the competent ATEQ personnel. The battery can burst or explode, releasing hazardous chemicals. To reduce the risk of fire or burns, do not disassemble, crush, puncture, or dispose of the battery or the instrument in fire or water, do not short-circuit or connect the contacts with a metal object. -
Page 35: Chapter 6 Error Messages
Chapter 6 – Error messages Chapter 6 ERROR MESSAGES 1. ERROR MESSAGES The CDP60 can display the following error messages: The applied pressure is too high. PRESSURE OUT OF RANGE Over Pressure..Reduce the pressure and press on the Press [C] to return CANCEL key. - Page 36 Chapter 6 – Error messages UM-24100D-U User manual ATEQ CDP60 Page 26/36...
-
Page 37: Chapter 7 Pc Installation
1) Start installation program: USB_VIRTUAL_232_XP.EXE, the opposite window appears. 2) Click on "Next >". 3) The "Serial emulation port" drivers will be installed, at the end, the opposite window appears. 4) Click on "Finish". UM-24100D-U User manual ATEQ CDP60 Page 27/36... - Page 38 5) Connect the USB wire on the USB port of your PC and on the CDP60 device. 6) Switch on the CDP60 device. 7) When the CDP60 device is detected, its installation begins. The opposite window appears select "No, not this time" and click on "Next >".
- Page 39 11) The drivers are installed. "ATEQ RS232 Emulation" communication port is created; this port will be used for each communication between the CDP60 device and the PC through an USB connector. Click on "Finish". UM-24100D-U User manual ATEQ CDP60 Page 29/36...
- Page 40 6) Click on "Finish". 7) Connect the USB cable on the PC USB port and on the CDP60 device. 8) Switch on the CDP60 device the drivers will automatically installed. 9) The message at the right bottom corner of screen "ATEQ...
-
Page 41: Rs232 Connection
1) To connect the CDP60 to the RS232 port (PC com1 or com2) it needs the RJ45 wire and the SubD adapter. 2) Adjust on the CDP60 and in the PC the same RS parameters on each side. For example: Baud rate: 19200. - Page 42 Chapter 7 – PC installation UM-24100D-U User manual ATEQ CDP60 Page 32/36...
-
Page 43: Appendix Ateq Cdp60
LCD 4 lines 60 mm x 32 mm Weight: About 450 g Temperatures: Use: + 0°C to + 50°C Stock: -10°C to + 70 °C * See the security and recycling instructions about this battery type. UM-24100D-U User manual ATEQ CDP60 Page 33/36... -
Page 44: Personnal Notes
________________________________________________________________________ ________________________________________________________________________ ________________________________________________________________________ ________________________________________________________________________ ________________________________________________________________________ ________________________________________________________________________ ________________________________________________________________________ ________________________________________________________________________ ________________________________________________________________________ ________________________________________________________________________ ________________________________________________________________________ ________________________________________________________________________ ________________________________________________________________________ ________________________________________________________________________ ________________________________________________________________________ ________________________________________________________________________ ________________________________________________________________________ ________________________________________________________________________ ________________________________________________________________________ ________________________________________________________________________ ________________________________________________________________________ ________________________________________________________________________ ________________________________________________________________________ ________________________________________________________________________ ________________________________________________________________________ ________________________________________________________________________ ________________________________________________________________________ ________________________________________________________________________ ________________________________________________________________________ ________________________________________________________________________ ________________________________________________________________________ ________________________________________________________________________ ________________________________________________________________________ UM-24100D-U User manual ATEQ CDP60 Page 34/36... -
Page 45: Index
Charge light ..........9 Charger ..........24 Recycling ..........23 Charging ..........24 Reference ..........6 Crossed-out wheeled dustbin .....23 RJ45 .............6 RS232..........6, 16 Definition of the ATEQ CDP60 .....3 RS232 frame........19 Display..........9, 11 RS232 installation.......31 Electric connector .........6 Screen ..........9 ENTER key...........8 Second pneumatic connector ....6 Environment ........24... - Page 46 Index UM-24100D-U User manual ATEQ CDP60 Page 36/36...
- Page 48 This document is the exclusive property of ATEQ. It may not be communicated, reproduced or used without prior consent.
Need help?
Do you have a question about the CDP60 and is the answer not in the manual?
Questions and answers