Parker AC30P User's Product Manual
Ac30 series variable speed drive
Hide thumbs
Also See for AC30P:
- Hardware installation manual (176 pages) ,
- Product manual (82 pages) ,
- Safety & quickstart booklet (28 pages)
Table of Contents

Subscribe to Our Youtube Channel
Related Manuals for Parker AC30P


Summary of Contents for Parker AC30P
- Page 1 aerospace AC30 series climate control electromechanical Variable Speed Drive filtration fluid & gas handling hydraulics pneumatics process control HA501718U002 Issue 8 Product Manual sealing & shielding ENGINEERING YOUR SUCCESS.
- Page 2 The user must analyze all aspects of the application, follow applicable industry standards, and follow the information concerning the product in the current product catalogue and in any other materials provided from Parker Hannifin Corporation or its subsidiaries or authorized distributors.
- Page 3 Frames D, E, F, G, H, J, K including AC30P & AC30D HA501718U002 Issue 8 Compatible with Firmware Version 1.13 for AC30V, and Versions 2.13 & 3.13 for AC30P / AC30D, onwards 2017 © Parker Hannifin Manufacturing Limited. All rights strictly reserved. No part of this document may be stored in a retrieval system, or transmitted in any form or by any means to persons not employed by a Parker Hannifin Manufacturing Limited company without written permission from Parker Hannifin Manufacturing Ltd.
-
Page 4: Table Of Contents
Contents Contents ..............Page No. Contents ............... Page No. The Default Application ................4-24 Chapter 1: Safety ............. 1-1 Application Description ................4-24 Application 0: Basic Speed Control ............4-26 Chapter 2: Introduction ........... 2-1 Application 1: Auto/Manual Control ............4-28 About this Manual ................ - Page 5 STO State Transition Diagram............6-16 Set Up PMAC Motor Control – Pos Alignment after Power-up .. 9-12 STO Trip Annunciation ..............6-17 Parker Drive Quicktool (PDQ) PC Software ......... 9-13 Safety Warnings and Limitations ..........6-18 Installation ....................9-13 Starting the Wizard .................. 9-15 Example User Wiring ................
- Page 6 CE Marking ....................C-2 EMC Compliance..................C-3 Saving Your Application Data ..............11-2 EMC Standards Comparison ............C-4 Returning the Unit to Parker ..............11-2 Radiated ..................... C-4 Chapter 12: Ethernet............12-1 Conducted Emission ................C-5 Connecting to the Inverter ............. 12-1 EMC Compliance (4kHz) ................
- Page 7 Contents Contents ..............Page No. Contents ............... Page No. Device State ..................... D-51 Raise Lower ................... D-149 DeviceNet Option ..................D-53 Ramp ...................... D-151 Drive info ....................D-54 Real Time Clock ..................D-157 Encoder ....................D-58 Resolver ....................D-158 Encoder Slot 1 ..................D-60 Runtime Statistics .................
- Page 8 Digital Inputs ................... F-26 Digital Outputs ..................F-26 User 24v Supply OUTPUT (X12/05) ............F-27 Auxiliary 24V Input– AC30V and Ac30P only ........F-27 RelayS - AC30V ONLY................F-27 SYSTEM Auxiliary 24V Input – AC30D ONLY ........F-28 DIGITAL INPUTs – AC30D ONLY ............F-28 Encoder Power Supply Output –...
-
Page 9: Chapter 1: Safety
Safety Safety Chapter 1: Safety Information Please read these important Safety notes before installing and operating this equipment CAUTION CAUTION notes in the manual warn of danger to equipment. WARNING NOTES IN THE MANUAL WARN OF DANGER TO PERSONEL Requirements Intended Users This manual is to be made available to all persons who are required to install, configure or service equipment described herein, or any other associated operation. -
Page 10: Chapter 11: Routine Maintenance & Repair
Safety Personnel Installation, operation and maintenance of the equipment should be carried out by competent personnel. A competent person is someone who is technically qualified and familiar with all safety information and established safety practices; with the installation process, operation and maintenance of this equipment;... - Page 11 Safety WARNING! - Ignoring the following may result in injury or damage to equipment SAFETY Where there is conflict between EMC and Safety requirements, personnel safety shall always take precedence. Never perform high voltage resistance checks on the All control and signal terminals are SELV, i.e. protected by double wiring without first disconnecting the inverter from the insulation.
- Page 12 Safety CAUTION! APPLICATION RISK The specifications, processes and circuitry described herein are for guidance only and may need to be adapted to the user’s specific application. We can not guarantee the suitability of the equipment described in this Manual for individual applications. RISK ASSESSMENT Under fault conditions, power loss or unintended operating conditions, the inverter may not operate as intended.
-
Page 13: Chapter 2: Introduction
Information for all AC30 units is included (AC30V frames D, E, F, G, H, J & K, AC30P & AC30D), which are collectively referred to as “the Inverter”... -
Page 14: Chapter 12: Ethernet
Keypad (where supplied) Programming (Parker Drive Quicktool) – pc programming tool Know your application: • Install the Parker Drive Quicktool (PDQ) after downloading it from www.parker.com/ssd/pdq • Connect your pc to your Inverter via Ethernet •... -
Page 15: Packaging And Lifting Details
Introduction Packaging and Lifting Details Caution The packaging is combustible. Igniting it may lead to the generation of lethal toxic fumes. ♦ Save the packaging in case of return. Improper packaging can result in transit damage. ♦ Use a safe and suitable lifting procedure when moving the unit. Never lift the unit by its terminal connections. ♦... -
Page 16: Chapter 3: Product Overview
Product Overview Chapter 3: Product Range AC30V Frame D, E, F, G, H, J, K AC30P & AC30D Removable Fan Cassette (Frames D – J only) Can be removed for cleaning and replacement see Fan Cassette in Chapter 11 Top Terminal Cover... -
Page 17: Control Features
Limited to Switching Frequency divided by 8, with a maximum of 590Hz. e.g. for 4kHz switching frequency it is 4000/8 = 500Hz, for 16kHz switching frequency it is 590Hz. Refer to Parker SSD for higher output frequency. Derating of output current may apply, refer to Appendix F Technical Specifications. Switching Frequency Minimum 2kHz. -
Page 18: Functional Overview
Product Overview Functional Overview These elements are omitted from the DC-fed drive variants LINK – customer accessible MOVs Precharge Control Input rectifier Inverter Filter stage M1/U M2/V M3/W Filter Earth stack DB control temperature LINK – customer accessible POWER CONTROL ISOLATION EEPROM SMPS... - Page 19 Product Overview These elements are omitted from the DC-fed drive variants LINK – customer accessible MOVs Input rectifier Inverter Filter stage Precharge M1/U Control M2/V M3/W Filter Earth stack DB control temperature LINKS customer accessible POWER CONTROL ISOLATION EEPROM SMPS Switched fan supply serviceable Main cooling...
- Page 20 Product Overview pre-charge control Input rectifier Inverter stage M1/U M2/V M3/W MOVs Filter fan TX supply accessible disconnect fan control Power Control SELV SMPS EEPROM CM Interface PCB Block Diagram for Frames K AC30 series Variable Speed Inverter...
-
Page 21: Cubicle Mount
Installation Installation Chapter 4: Read Appendix C: “Compliance” before installing this unit. Cubicle Mount DIMENSIONS FOR CUBICLE MOUNT INSTALLATION Inverters Max. Weight H – AC30V/P H – AC30D D – AC30V/P D – AC30D Fixings 4.5kg (10 lbs) Frame D 286.0 (11.26) 298.0 (11.73) 270.0 (10.6) -
Page 22: Dimensions For Cubicle Mount Installation - Frame K
Installation DIMENSIONS FOR CUBICLE MOUNT INSTALLATION – FRAME K 475 (18.70) for AC30D (15.75) (17.99) (7.87) (15.16) (2.36) Fixings for main cover Figure 4-2 Mechanical Dimensions for Frame K All dimensions are in millimetres (inches) AC30 series Variable Speed Inverter... -
Page 23: Mounting The Inverter
Installation MOUNTING THE INVERTER These units are not suitable for wall mounting. They must be mounted vertically inside an additional enclosure. Depending on required level of EMC compliance refer to Appendix C "Compliance". Note: Frame H, J & K only These models are heavy and will require two people to lift, or the use of a fork lift to install it. -
Page 24: Cubicle Mounting Details
Installation CUBICLE MOUNTING DETAILS Mounting Brackets Rear view showing fixing holes for Frames D, E, F & G cubicle mount The brackets can be moved up/down by using the alternative holes, which are set at 15mm intervals. Frames H, J & K Have a single mounting plate which cannot be moved. -
Page 25: Through Panel Mount Frames D To J Only
Through panel mounting an inverter in a cubicle allows you to use a smaller cubicle because much of the heat generated by the inverter is dissipated outside the cubicle. Figure 4-4 Mechanical Dimensions for Through Panel - Frames D & E Inverters Inverters H3 * Fixings Mounting Kits AC30V/ AC30P 181 (7.1) Frame D 250 (9.8) 262 (10.3) 6 (0.2) 64 (2.51) 79 (3.1) -
Page 26: Frames F, G
Installation FRAMES F, G Through panel mounting an inverter in a cubicle allows you to use a smaller cubicle because much of the heat generated by the inverter is dissipated outside the cubicle. Figure 4-5 Mechanical Dimensions for Through Panel Frames F & G Mounting Inverters Fixings... -
Page 27: Frame H
Installation FRAME H Through panel mounting an inverter in a cubicle allows you to use a smaller cubicle because much of the heat generated by the inverter is dissipated outside the cubicle. 229 (9.02) for AC30D Figure 4-6 Mechanical Dimensions for Through Panel Frame H All dimensions are in millimetres (inches) - Fixings: 8 x 6.5mm holes M6 fixings, refer to panel mounting kit part number LA502472 AC30 series Variable Speed Inverter... -
Page 28: Frame J
Installation FRAME J Through panel mounting an inverter in a cubicle allows you to use a smaller cubicle because much of the heat generated by the inverter is dissipated outside the cubicle. (14.17) (14.96) (11.81) (12.99) (0.49) (10.82) (0.98) (1.67) (14.96) (9.64) 263.1 (10.36) for AC30D... -
Page 29: Mounting The Inverter
Installation MOUNTING THE INVERTER These units are not suitable for wall mounting. They must be mounted vertically inside an additional enclosure. Depending on required level of EMC compliance refer to Appendix C "Compliance". Note: Frame H & J only These models are heavy and will require two people to lift, or the use of a fork lift to install it. The product will stand vertically on flat surfaces, but will need secondary restraining to keep upright when through panel mounting (after the panel mounting foot has been removed). -
Page 30: Through Panel Mounting Detail (Frames D - J Only)
4-10 Installation THROUGH PANEL MOUNTING DETAIL (FRAMES D – J ONLY) To allow mounting; first disassemble the inverter by following instructions 1 to 4 and then instructions 5 to 7 for mounting:- Unscrew and remove mounting bracket(s). Remove Control Module Cover (see page 4-18). Remove Control Module (see page 4-19). - Page 31 4-11 Installation Frames E, F, G, H & J Top Cover: Bottom Cover: To remove insert a screwdriver into the slot and To remove bottom cover insert a screwdriver into the move to the right to release the catch, and then slot and move to the left to release the catch, and slide off cover.
- Page 32 Upper Terminal will be made between the inverter and the Cover panel. Through Panel Kits, can be purchased from Parker using the following part numbers: Frame D – LA502668 Frame E – LA502669 Frame F – LA502670 Frame G – LA502471 Cover Front Frame H –...
-
Page 33: Cabling Bracket For Control & Main Cable
Cabling Bracket for Control & Main Cable With the bottom cover off you can screw the cabling brackets in place, if required. The cabling brackets are standard with C2 filtering products and can also be obtained from Parker using the following part numbers. Frame E Illustrated... -
Page 34: Cabling Bracket For Ac30D System Terminals
4-14 Installation Cabling Bracket for AC30D System Terminals Frame E Illustrated The part number for the AC30D control and system terminal cable brackets kit is: LA501935U007 Control cable wiring bracket AC30 series Variable Speed Inverter... -
Page 35: Electrical Installation
4-15 Installation Electrical Installation Please read the Safety Information in “Chapter :1 Safety” before proceeding. Also refer to Appendix C: Compliance WIRING INSTRUCTIONS IMPORTANT: The control board 0V must be connected to protective earth outside of the product to meet EMC and safety requirements. Power Wiring Connections Protective Earth (PE) Connections The unit must be permanently earthed according to EN 61800-5-1 - see below. -
Page 36: Ac Fed Power Wiring Connections
4-16 Installation FED POWER WIRING CONNECTIONS Feed the power supply and motor cables into the inverter under the cable clamps using the correct cable entries, and connect to the power terminals. Tighten all terminals to the correct tightening torque; refer to the Terminal Tightening Torques table (page 4-39). Earth Earth Earth... -
Page 37: Dc Fed Power Wiring Connections (Frames D - J Only)
4-17 Installation FED POWER WIRING CONNECTIONS (FRAMES D – J ONLY) Feed the power supply and motor cables into the inverter under the cable clamps using the correct cable entries, and connect to the power terminals. Tighten all terminals to the correct tightening torque; refer to the Terminal Tightening Torques table (page 4-39). Earth Earth Earth... -
Page 38: Control Module Cover Removal
4-18 Installation Control Module Cover Removal To gain access to the control wiring and for inserting the SD card first remove the control module cover as follows: First remove the GKP by pulling from the top down, and remove. Undo the screw and slide the control module cover down slightly, then remove. -
Page 39: Control Module Removal
4-19 Installation Control Module Removal WARNING Isolate supply before plugging or unplugging control unit to the power stack. Unscrew captive screw. Slide assembly upwards, as far as possible, to unlatch from unit. Lift lower edge of assembly. Note that there are two screws used to retain the AC30D control module. -
Page 40: Control Module Terminal Cable Specification
W.plastic collar Ferrule DIN462228 Pt4 minimum 0. 25 sqmm (see note 1) W.plastic collar Ferrule DIN462228 Pt4 maximum 0.75 sqmm (see note 2). Note 1: Parker part number CI053612U001 (Davico part No. PET0505) Note 2: Parker part number CI053612U002 (Davico part No. PET7575). -
Page 41: Ac30V Control Wiring Connections
DIGIN 1 X13/03 DIGIN 2 X13/04 DIGIN 3 X13/05 +24V AUX input – AC30V and AC30P only X13/06 0V AUX input – AC30V and AC30P only X14/01 (BOT) Relay 01 (contact A) – AC30V only X14/02 Relay 01 (contact B) – AC30V only X14/03 Relay 02 (contact A) –... -
Page 42: Ac30D-P Control Wiring Connections
X13/03 DIGIN 2 X13/04 DIGIN 3 X13/05 +24V AUX input – AC30V and AC30P only X13/06 0V AUX input – AC30V and AC30P only Ethernet Port 1 – AC30P and AC30D only Ethernet Port 2 – AC30P and AC30D only... -
Page 43: System Board Control Wiring Connections - Ac30D Only
4-23 Installation SYSTEM BOARD CONTROL WIRING CONNECTIONS – AC30D ONLY Terminal ID Function X30/01 DIGIN 1 X30/02 DIGIN 2 X30/03 DIGIN 3 X30/04 DIGIN 0V X30/05 +24V System Aux. Input X30/06 0V System Aux. Input X31/01 Encoder 2 – A input X31/02 Encoder 2 –... -
Page 44: Wiring Diagrams
• Application 3 supplies speed control using preset speeds • Application 4 PID control The AC30P and AC30D inverters are supplied with 2 Applications, Application 0 and Application 5. Each Application recalls a pre- programmed structure of internal links when it is loaded. - Page 45 4-25 Installation Remote Control Wiring If operating in Remote Control you will use your control panel to start and stop the inverter, via a speed potentiometer and switches or push- buttons. Your wiring of the control terminals will be governed by the Application you use: refer to the various Applications you can select and the appropriate control wiring.
-
Page 46: Application 0: Basic Speed Control
4-26 Installation APPLICATION 0: BASIC SPEED CONTROL Application 0: “Basic Speed Control” IDEAL FOR GENERAL PURPOSE APPLICATIONS, NORMAL DUTY AND HEAVY DUTY Ref Max Speed Clamp Acceleration Time 1265 0486 Jog Setpoint 0501 ANIN 01 (X11/01) SPEED SETPOINT REFERENCE SELECT FWD / REV ANIN 02 (X11/02) SPEED TRIM... - Page 47 4-27 Installation Basic Speed Control Wiring AC30 series Variable Speed Inverter...
-
Page 48: Application 1: Auto/Manual Control
4-28 Installation APPLICATION 1: AUTO/MANUAL CONTROL Application 1: “Auto/Manual Control” IDEAL FOR AUTOMATIC CONTROL APPLICATIONS WITH LIMIT SWITCHES OR PROXIMITY TRANSDUCERS Ref Max Speed Clamp Acceleration Time 1265 0486 ANIN 01 (X11/01) MANUAL SETPOINT ANIN 02 (X11/02) AUTO SETPOINT REF SELECT FWD / REV RAMP MIN /MAX SPEED... - Page 49 4-29 Installation Auto/Manual Control Wiring AC30 series Variable Speed Inverter...
-
Page 50: Application 2: Raise / Lower Trim
4-30 Installation APPLICATION 2: RAISE / LOWER TRIM Application 2: “Speed Raise/Lower” IDEAL FOR APPLICATIONS REQUIRING SPEED CONTROL FROM MULTIPLE LOCATIONS Ref Max Speed Clamp Acceleration Time 1265 0486 Not Used ANIN 01 (X11/01) ANIN 02 (X11/02) Not Used RAMP MIN /MAX SPEED Deceleration Time 0487... - Page 51 4-31 Installation Raise/Lower Trim Wiring AC30 series Variable Speed Inverter...
-
Page 52: Application 3: Presets Speeds
4-32 Installation APPLICATION 3: PRESETS SPEEDS Application 3: “Speed Presets” IDEAL FOR GENERAL PURPOSE APPLICATIONS REQUIRING MULTIPLE DISCRETE SPEED LEVELS ANIN 01 (X11/01) Ref Max Speed Clamp Acceleration Time SPEED SETPOINT 1265 0486 ANIN 02 (X11/02) SPEED TRIM Preset Speed 0 1916 Preset Speed 1 1917... - Page 53 4-33 Installation Presets Speeds Wiring AC30 series Variable Speed Inverter...
-
Page 54: Application 4: Pid Control
4-34 Installation APPLICATION 4: PID CONTROL Application 4: “Process PID” EASY TUNING FOR SETPOINT/FEEDBACK CONTROL APPLICATIONS REGULATING VOLUME OR PRESSURE, SUCH AS AIR HANDLING OR PUMPING Acceleration Time Ref Max Speed Clamp 0486 1265 ANIN 01 (X11/01) PROCESS SETPOINT ANIN 02 (X11/02) PROCESS FEEDBACK RAMP MIN /MAX SPEED... - Page 55 4-35 Installation PID Control Wiring AC30 series Variable Speed Inverter...
-
Page 56: Application 5: Active Front-End
4-36 Installation APPLICATION 5: ACTIVE FRONT-END Application 5: “AFE” ACTIVE FRONT END APPLICATION THAT ALLOWS THE DRIVE TO PERFORM REGENERATION OF ENERGY BACK INTO THE GRID, AND EXECUTES CONTROL OF Motor EXTERNAL PRECHARGE SWITCHES AND CONTACTORS Grid AFE Drive Motoring Drive AFE Control Application A simple application that controls external precharge relays and contactors, and ensures that all pre-requisites for regenerative operation of the drive are satisfied. - Page 57 4-37 Installation AFE Control Wiring – Excludes 7004-04-00 Wiring AC30 series Variable Speed Inverter...
-
Page 58: Terminal Block Wire Range
4-38 Installation TERMINAL BLOCK WIRE RANGE Wire sizes for Europe should be chosen with respect to the operating conditions and your local National Electrical Safety Installation Requirements. Local wiring regulations always take precedence. For North American UL wire sizes refer to Appendix C: “Compliance” - Requirements for UL Compliance. -
Page 59: Terminal Tightening Torques
4-39 Installation TERMINAL TIGHTENING TORQUES Frame Size Power Terminals DC Bus Terminals Brake Terminals Ground Stud 0.56-0.8Nm 0.56-0.8Nm 0.56-0.8Nm 1.8Nm Frame D (5-7 lb-in) (5-7 lb-in) (5-7 lb-in) (16 lb-in) 0.56-0.8Nm 0.56-0.8Nm 0.56-0.8Nm 1.8Nm Frame E (5-7 lb-in) (5-7 lb-in) (5-7 lb-in) (16 lb-in) 1.35Nm... -
Page 60: Fitting A Remote Gkp
4-40 Installation Fitting a Remote GKP When fitting the GKP remotely to either a cubicle or panel mount it must be fitted to a flat surface. Maximum cable length < 3 meters. 7001-00-00 – includes the GKP only 7001-00-01 - includes the GKP, 3m connection lead and screws. •... -
Page 61: Getting Started
4-41 Installation Getting Started GKP SETUP WIZARD Purpose of the Setup Wizard The purpose of the setup wizard is to configure the inverter in a clear and concise manner. First familiarize yourself with Chapter 7 Graphical Keypad, for the keypad functions. Starting the Setup Wizard The Setup Wizard is automatically invoked when the inverter is reset to factory default settings. -
Page 62: Ethernet Communications
4-42 Installation ETHERNET COMMUNICATIONS The inverter comes with built-in Ethernet providing communications with the PC programming tools PDQ and PDD, a Modbus TCP server and a web server. See Chapter 12 - Ethernet for recommended cable information. Connecting the Ethernet Cable – AC30V Disconnecting the Ethernet Cable –... - Page 63 4-43 Installation Connecting the Ethernet Cables – AC30P and AC30D DO NOT TOUCH DO NOT touch the board surface via the aperture shown AC30 series Variable Speed Inverter...
- Page 64 4-44 Installation Setting the IP Address The inverter’s Ethernet requires an IP address to participate in communications. The factory default is set so that an IP address is selected automatically depending on the network on which it is connected. It may obtain an IP address using DHCP or Auto-IP. DHCP If the network has a DHCP (Dynamic Host Communications Protocol) server, then the inverter will obtain an address from this.
-
Page 65: Firmware Update
Prepare SD card Copy the new firmware to an SD card, ensure the file is named firmware.30x for the AC30V or firmware.30p for the AC30P and AC30D. New firmware is available at www.parker.com/ssd/pdq or can be copied from the Parker Drive Quicktool “Drive Maintenance” task. -
Page 66: Chapter 5: Associated Equipment
Associated Equipment Associated Equipment Chapter 5: MAIN POINTS Connect the associated equipment to an AC Fed AC30 in the following order: Note: In a different place on Frame D, G, H, J & K Note: In a different place on Frame D, G, H, J &... - Page 67 Associated Equipment Connect the associated equipment to a DC Fed AC30 in the following order: A – Semiconductor fuses, rated to protect the dc supply unit and dc bus installation at maximum power. B – Optional EMC filter. C – AC line choke, see Note 1. D –...
- Page 68 Associated Equipment Frame Size Product Code Internal Capacitance Frame Size Product Code Internal Capacitance 7x0-4D0004 340 µF 7x0-4G0045 1800 µF 7x0-4D0005 340 µF 7x0-4G0060 2800 µF 7x0-4D0006 340 µF 7x0-4G0073 2800 µF 7x0-4D0008 340 µF 7x0-4H0087 3600 µF 7x0-4D0010 340 µF 7x0-4H0105 4200 µF 7x0-4D0012...
-
Page 69: Ac Motor Chokes
An output choke may be fitted in the inverter output to limit parasitic capacitive current to earth. Screened cable has a higher parasitic capacitance to earth and may cause problems in shorter runs. Contact Parker for recommended choke values. -
Page 70: Dynamic Braking Resistors
Associated Equipment Dynamic Braking Resistors We can supply suitable braking resistors, found on the following pages. Alternatively, you can use the calculation on page 5-7 to help you select alternative resistors. We recommend using a thermal overload switch to protect the braking circuit. Refer to page 5-6. ♦... -
Page 71: Dynamic Braking Resistors
The resistor can dissipate 10 x power rating for 5s, but the continuous rating should not be exceeded under repetitive loading. Flying Lead Length 500W 200W Dimensions are in millimetres Parker Part Number Power Rating (W) Resistance (Ω) Continuous Current Rating (A) CZ467717 CZ463068... - Page 72 Associated Equipment Calculation Brake resistor assemblies must be rated to absorb both peak braking power during deceleration and the average power over the complete cycle. × J × − 0 0055 Peak braking power P - total inertia (kgm - initial speed (rpm) Average braking power P - final speed (rpm) - braking time (s)
-
Page 73: Circuit Breakers
When the ac supply is switched on, a pulse of current flows to earth to charge the internal/external ac supply EMC filter’s internal capacitors which are connected between phase and earth. This has been minimised in Parker inverter filters, but may still trip out any circuit breaker in the earth system. -
Page 74: Input Chokes
Input Chokes For further information refer to Appendix F Technical Specifications “Supply Short Circuit Rating”. Gasket Kits Gasket Kits can be purchased from Parker using the following part numbers. Gasket Kit Part Number Frame Size IP20 Through Panel Kit (without IP55 fan) -
Page 75: Option Cards
The AC30 control modules have only been qualified with certain brands and types of SD memory card. Some brands do not support all operating modes of the SD standard. We recommend that SD cards be purchased from Parker by using part number IF502785. -
Page 76: Installation Details
5-11 Associated Equipment INSTALLATION DETAILS Control Terminal Cover Removal First remove the GKP by pulling from the top down and remove. Undo the screw and slide the control terminal cover down, then remove Control Terminal Cover HAZARDOUS VOLTAGES may be present on GPIO module motor thermistor user relays, please refer to the option technical manual or main product manual for safety information AC30 series Variable Speed Inverter... - Page 77 5-12 Associated Equipment Click the Option into place and tighten the retaining screw (as shown below). 3 off General Purpose I/O (GPIO) 1 off Pulse Encoder All other options as listed on page A-1 Squeeze moulding as shown to remove AC30 series Variable Speed Inverter...
-
Page 78: Chapter 6 Safe Torque Off Sil3/Ple
Safe Torque Off Safe Torque Off SIL3/PLe Chapter 6 General Information THIS EQUIPMENT IF USED INCORRECTLY IS POTENTIALLY DANGEROUS. THEREFORE UNDER NO CIRCUMSTANCES SHOULD IT BE USED BEFORE THESE INSTRUCTIONS HAVE BEEN READ AND UNDERSTOOD BY THE END USER WHO SHOULD BE APPROPRIATELY QUALIFIED TO OPERATE THE EQUIPMENT. -
Page 79: Sto Functional Description
Safe Torque Off STO FUNCTIONAL DESCRIPTION STO is a means of preventing an inverter from delivering rotational force to its connected electric motor. Please refer to EN61800-5-2:2007 para 4.2.2.2 for the formal definition. To ensure a high degree of safety, two independent STO control channels are implemented in hardware. The STO circuit in the inverter is designed such that a fault in one control channel will not affect the other channel’s ability to prevent the drive from starting, i.e. -
Page 80: Alignment To European Standards
Safe Torque Off Alignment to European Standards EN ISO13849-1:2008 (Safety of machinery – Safety-related parts of control systems) STO aligns internally to the following aspects of this standard: Architecture according to Category 3: Solid lines represent the STO control paths. Dashed lines represent reasonably practicable fault detection. -
Page 81: En61800-5-2:2007 And En61508
Safe Torque Off Most but not all single component failures will be detected. Diagnostic Coverage (DC) is required to be at least 60% (i.e. the minimum required for ‘low’ diagnostic coverage). Detected component failures will result in the STO function being applied without intervention from the user. The risk associated with the loss of STO safety function caused by multiple failures must be understood and accepted by the user. -
Page 82: Safety Specification
Safe Torque Off Safety Specification As assessed to EN ISO13849-1 and EN61800-5-2 the inverter has the following related safety values:- Criterion Requirement Value achieved For type A subsystems, HFT = 1: SIL3 SFF = 99% SFF ≥ 60% SIL3 ≥ PFH ≥ 10 PFH = 2.3 x 10 SIL Capability Category 3;... -
Page 83: Emc Specification
Safe Torque Off EMC Specification In addition to the mandatory requirements of EN61800, the STO functionality has been subjected to testing for immunity at higher levels. In particular the STO function (only) has been tested for radiated immunity according to EN62061:2005 Annex E up to 2.7GHz which includes frequencies used by mobile telephones and walkie-talkies. -
Page 84: User Connections
Safe Torque Off User Connections The STO terminals are on a 6-way terminal block X10. This is mounted on the inverter control housing. Terminal designations are: Terminal Number Terminal Name Description 0V or not connected = drive will not run, STO is active on channel A. 24V = drive is enabled to run if X10/03 is also 24V. - Page 85 Safe Torque Off Examples of wiring to X10/05 and X10/06. Active high output: Active low output: 24VDC 24VDC LOAD X10/06 X12/05 X10/06 X12/05 INVERTER INVERTER X10/05 X12/06 X12/06 X10/05 LOAD The load is energised and X10/05 is high when The load is energised and X10/06 is low when STO is in STO is in the intended safe STO state.
-
Page 86: Sto Technical Specification
Safe Torque Off STO Technical Specification INPUTS SPECIFICATION STO A Input and STO B Input comply with IEC61131-2. Note: inputs do not have hysteresis. Recommended input voltage for low level: 0V to +5V Recommended input voltage for high level: +21.6V to +26.4V Typical input threshold voltage: +10.5V Indeterminate input range:... -
Page 87: Output Specification
WARNING WIRED CONNECTIONS TO TERMINALS X10/01, X10/03, X10/05 AND X10/06 MUST BE LESS THAN 25 METRES IN LENGTH AND REMAIN WITHIN THE CUBICLE OR DRIVE ENCLOSURE. PARKER IS NOT LIABLE FOR ANY CONSEQUENCES IF EITHER CONDITION IS NOT MET. AC30 series Variable Speed Inverter... -
Page 88: Truth Table
6-11 Safe Torque Off TRUTH TABLE STO Input A STO Input B STO Status Output Overview Drive Function X10/01 X10/03 X10/05, X10/06 Drive cannot start or supply power to its motor. STO trip reported. STO Active This is the intended safe state of the product with correct dual-channel operation. -
Page 89: Sto Input Timing Diagrams
6-12 Safe Torque Off STO Input Timing Diagrams IDEAL OPERATION In ideal operation, both inputs X10/01 and X10/03 should change state simultaneously reflecting true dual-channel operation as intended. Channel A: X10/01 Channel B: X10/03 Output: X10/05, X10/06 STATE States: Both inputs are low. Drive is tripped and STO prevents the drive from starting. User output is ON. This is the “safe torque off” state of the drive. -
Page 90: Typical Operation
6-13 Safe Torque Off TYPICAL OPERATION In typical operation, there can be a small time difference between changes of state on X10/01 and X10/03, due to different delays in the operation of two sets of relay contacts. Channel A: X10/01 Channel B: X10/03 Output: X10/05, X10/06 STATE... -
Page 91: Fault Operation
(all power removed including any auxiliary 24Vdc) and back on. DANGER OPERATION OF THE INVERTER UNIT SHOULD CEASE IMMEDIATELY AND THE UNIT SHOULD BE RETURNED TO A PARKER AUTHORIZED REPAIR CENTRE FOR INVESTIGATION AND REPAIR. -
Page 92: Pulsed Inputs
6-15 Safe Torque Off PULSED INPUTS Some safety equipment, e.g. safety PLCs, regularly pulse the two STO inputs independently in order to detect a short circuit between them. This is commonly known as OSSD (Output Signal Switch Device). The inverter STO inputs are immune to such pulses when they are less than 2ms in width. The product will not react to such pulses and therefore will not inadvertently invoke the STO function. -
Page 93: Sto State Transition Diagram
6-16 Safe Torque Off STO State Transition Diagram The flow chart below shows how the drive responds to STO inputs, start and stop commands. Out-of-box state Normal startup state X10/01 high X10/03 high X10/01 low X10/01 high X10/01 low X10/03 low X10/03 low X10/03 high Drive cannot run **... -
Page 94: Sto Trip Annunciation
6-17 Safe Torque Off STO Trip Annunciation The GKP will display a STO trip message when STO becomes active, i.e. STO prevents the drive from starting, thus: **** TRIPPED **** SAFE TORQUE OFF GKP Display This message is displayed immediately if, on starting the drive or whilst the drive is running: ... -
Page 95: Safety Warnings And Limitations
The inverter STO function is a factory-fitted and factory-tested feature. Repairs to the inver STO featured-product are to be carried out only by Parker authorized repair centres. Any unauthorised attempt to repair or disassemble the product will render any warranty null and void, and STO integrity could be impaired. - Page 96 6-19 Safe Torque Off than the duration of the braking ramp controlled by the inverter with maximum load inertia and from maximum speed. Any external forces must also be considered, e.g. effects due to gravity. When implementing a SS1 function with the inverter, the user is responsible for ensuring the drive’s configuration will allow a controlled braking ramp to be initiated by the external safety device.
-
Page 97: Example User Wiring
THE USER / INSTALLER IS RESPONSIBLE FOR DESIGNING A SUITABLE SYSTEM TO MEET ALL REQUIREMENTS OF THE APPLICATION INCLUDING ASSESSING AND VALIDATING IT. PARKER WILL NOT ACCEPT ANY LIABILITY FOR FAILURE TO DO THIS OR FOR ANY CONSEQUENTIAL LOSS OR DAMAGE. -
Page 98: Minimum Sto Implementation
6-21 Safe Torque Off MINIMUM STO IMPLEMENTATION This example shows the minimum connections required. To reset from STO requires that STO Request contacts are closed to permit normal drive operation. The user must do a risk assessment to ensure that all safety requirements are met. The user must select and assess appropriate equipment. 24VDC To run the drive: Ensure the STO Request contacts are closed. -
Page 99: Sto Implementation With Safety Control Unit
6-22 Safe Torque Off STO IMPLEMENTATION WITH SAFETY CONTROL UNIT This example improves on the previous one by showing the resetting from a STO stop. The example shows wiring and terminal numbering for a Siemens 3TK2827, but similar products are available from other vendors. Use of this Siemens part does not imply it is suitable for the user’s application. The user must select and assess appropriate equipment. - Page 100 THE USER MUST RESOLVE THE DETECTED FAULT BEFORE USING THE STO FEATURE. FAILURE TO DO SO COULD RESULT IN STO NOT BEING ACHIEVABLE, AND THUS THE MOTOR MAY ROTATE UNEXPECTEDLY AND COULD RESULT IN INJURY, DEATH OR DAMAGE. PARKER WILL NOT ACCEPT ANY LIABILITY FOR FAILURE TO DO THIS OR FOR ANY CONSEQUENTIAL LOSS OR DAMAGE.
-
Page 101: Ss1 Implementation Using Safety Control Unit
6-24 Safe Torque Off SS1 IMPLEMENTATION USING SAFETY CONTROL UNIT This Safe Stop 1 (SS1) implementation causes the drive to come to rest in a controlled manner, and STO is actioned after a time delay determined by the safety delay relay. This conforms to SS1 defined in EN61800-5-2:2007 para 4.2.2.3 c). The example shows wiring and terminal numbering for a Siemens 3TK2827, but similar products are available from other vendors. - Page 102 DO SO COULD RESULT IN STO NOT BEING ACHIEVABLE, AND THUS THE MOTOR MAY ROTATE UNEXPECTEDLY AND COULD RESULT IN INJURY, DEATH OR DAMAGE. PARKER WILL NOT ACCEPT ANY LIABILITY FOR FAILURE TO DO THIS OR FOR ANY CONSEQUENTIAL LOSS OR DAMAGE.
-
Page 103: Sto Function Checking
FURTHER OPERATION OF THE INVERTER WITHOUT RESOLVING THIS FAILURE IS ENTIRELY AT THE USER’S OWN RISK. FAILURE TO DO SO COULD RESULT IN INJURY, DEATH OR DAMAGE. PARKER WILL NOT ACCEPT ANY LIABILITY FOR FAILURE TO DO THIS OR FOR ANY CONSEQUENTIAL LOSS OR DAMAGE. -
Page 104: Comprehensive Check
6-27 Safe Torque Off Comprehensive Check A comprehensive check of the STO function ensures the overall integrity of the STO functionality. It proves the independent operation of each channel individually (including during the normal dual channel operation), the STO user feedback operation, and the essential single fault detection. It must always be performed: ... -
Page 105: The Following Test Steps Must Be Performed
6-28 Safe Torque Off THE FOLLOWING TEST STEPS MUST BE PERFORMED: Initial Check: STO test Comprehensive Check, Activity Expected reaction and effect Ensure that no harm can come to personnel or equipment if the motor turns. Apply +24V DC to terminals X10/01 and X10/03. No error must be present in the drive system. - Page 106 6-29 Safe Torque Off Channel A Check: STO test Comprehensive Check, Activity Expected reaction and effect Motor must immediately coast to rest. With drive running and motor turning at SPT1, momentarily disconnect terminal X10/01 (maximum duration of disconnect = 1 second), while retaining +24V at Drive must report STO trip immediately.
- Page 107 6-30 Safe Torque Off Channel A Fault Check: STO test Comprehensive Check, Activity Expected reaction and effect Motor must immediately coast to rest. Ensure the drive is running and the motor is turning at SPT1. Drive must report STO trip immediately. Disconnect terminal X10/01 for approximately 5 seconds (must exceed 3 seconds).
- Page 108 6-31 Safe Torque Off User Output Check: STO test Comprehensive Check, Activity Expected reaction and effect Remove connections to X10/01 and X10/03 within 1 second of each other. X10/05 and /06 must be ON. Drive must not start while run command is given. Try to restart the drive.
-
Page 109: Regular Check
6-32 Safe Torque Off REGULAR CHECK A comprehensive check must take precedence if it coincides with a regular check. A regular check is intended only to demonstrate the STO is functional. It will not always detect the loss of a single channel. It is therefore important for the user and / or machinery builder to determine the frequency of the comprehensive checks based on their knowledge and application of the machine. -
Page 110: Troubleshooting
See the DANGER box below. regular STO test The table above is only a guide. It may not be a comprehensive list of all possible symptoms relating to STO. Parker will not accept responsibility for any consequences arising from its incompleteness or inaccuracy. - Page 111 IF ANY FAULTY OPERATION OF THE STO FUNCTION IS OBSERVED OR SUSPECTED, OPERATION OF THE INVERTER SHOULD CEASE IMMEDIATELY AND THE UNIT SHOULD BE RETURNED TO PARKER FOR INVESTIGATION AND REPAIR. FAILURE TO DO SO COULD RESULT IN INJURY, DEATH OR DAMAGE.
-
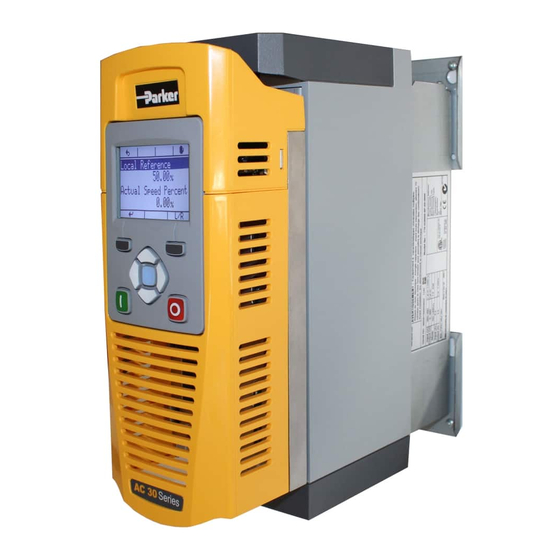
Page 112: Chapter 7: The Graphical Keypad
The Graphical Keypad The Graphical Keypad Chapter 7: The inverter is fitted with a Graphical Keypad referred to throughout as GKP. It provides for local control of the inverter, monitoring, and complete access for application programming. Insert the Keypad into the front of the inverter (replacing the blank cover); or if supplied separately to be used remotely, up to 3 meters away, use the mounting kit with connection lead, see Chapter 4 for full details. -
Page 113: Overview
The Graphical Keypad Overview • The top line of the display is used to show the inverter status • The central region of the display shows the selected parameters or navigation menu • The bottom line of the display indicates the action associated with the soft keys •... -
Page 114: Keypad
The Graphical Keypad Keypad The nine keys of the Graphical Keypad are divided into three groups. These are the Run and Stop keys, the soft keys and the central navigation and editing keys Operation Description Only operates when Local start / stop control mode is active Control Runs the motor Control... -
Page 115: The Display
The Graphical Keypad The Display The display is divided into three areas. The top line shows a summary of the inverter status, the centre region is the main work area and the bottom line is used to indicate the action associated with the soft keys. INVERTER STATUS SUMMARY The top line of the display shows a summary of the inverter status. -
Page 116: Soft Key Action Indication
The Graphical Keypad SOFT KEY ACTION INDICATION The use of Soft Key 1 and Soft Key 2 is indicated on the bottom line of the display by the icon shown above the key. Soft Key 1 Return: Abort Set-up When navigating around the menu tree, the return function navigates to the previous level. In this case the return is the opposite of the OK key. -
Page 117: Leds
The Graphical Keypad LEDS The Graphical Display has two light emitting diodes, one illuminates the green run key, and one illuminates the red stop key. Each LED may be independently off, on or flashing. Run key LED Stop key LED Description Flashing Stopping... -
Page 118: The Menu System
The Graphical Keypad The Menu System Level 1 Level 2 NAVIGATING THE MENU SYSTEM The Menu System can be thought of as a map which is navigated using the direction keys. • Use the left and right keys to navigate through the menu levels. •... -
Page 119: Trips And Other Information Displays
The Graphical Keypad Trips and other information displays An information message will be displayed when the unit is tripped. To clear the message from the display, press Soft key 1. To reset the trip, allowing the inverter to respond to a start command, press the STOP key. See Chapter 10 Trips & Fault Finding. Setting the display language The GKP supports multiple languages. -
Page 120: Chapter 8: Menu Organisation
Menu Organisation Menu Organisation Chapter 8: Menu Map The Menu System consists of a series of menus and sub-menus organised into a “tree” structure. Navigate around the tree on the GKP using the UP, DOWN, LEFT and RIGHT keys. Individual parameters may be present in the menu tree at more than one location. Parameters and/or menus that are not required or are empty are automatically hidden on the GKP and web page. -
Page 121: Menu Descriptions
Menu Organisation Menu Descriptions CONTROL SCREEN In local sequencing mode the Control Screen menu shows the Local Setpoint, the Seed Feedback and configuration of the action of the Run key and direction. When the inverter is not in local sequencing mode this menu shows the operating speed. The contents of the Control Screen can be modified by the configuration. -
Page 122: Parameter Map
Menu Organisation Parameter Map The following table shows the parameters as they appear in order on the Web page and GKP. Also shown is the Parameter Number, PNO. This is a unique reference for each parameter. For more details about each parameter refer to Appendix D. Control Screen PMAC Wiring 1809... - Page 123 Menu Organisation Anin 02 Offset 0959 Encoder Lines 1664 Anin 02 Scale 0960 Encoder Invert 1665 Anout 01 Type 0003 Encoder Type 1666 Anout 01 Scale 0686 High Input Threshold 1667 Anout 01 Offset 1108 Encoder Count Reset 1669 Anout 01 ABS 1441 SB Encoder Slot2 Anout 02 Type...
-
Page 124: Peer To Peer
Menu Organisation Fixed IP Address 0200 Startup Page 0982 Fixed Subnet Mask 0201 Monitor Fixed Gateway Address 0202 Quick Monitor Option Web Enable 0203 Application Web Parameters Enable 0204 Motor and Drive Option FTP Enable 0205 Actual Speed RPM 0393 Option FTP Admin Mode 0206 DC Link Voltage... - Page 125 Menu Organisation Base Ethernet Comms Module Serial 0050 Ethernet State 0919 Comms Diagnostic 0051 MAC Address 0920 Comms Diagnostic Code 0052 IP Address 0926 Comms Exception 0053 Subnet Mask 0927 Comms Net Exception 0054 Gateway Address 0928 Base Modbus PTP State 1689 Open Connections 1241...
-
Page 126: Chapter 9: Setup Wizard
Setup Wizard Setup Wizard Chapter 9: GKP Setup Wizard Purpose of the Setup Wizard The purpose of the setup wizard is to configure the inverter in a clear and concise manner. First familiarize yourself with Chapter 7 Graphical Keypad, for the keypad functions. Starting the Setup Wizard The Setup Wizard is automatically invoked when first powered up. - Page 127 Setup Wizard Setup Wizard Stages The Setup Wizard is divided into sections. With the exception of the first group of parameters, each section may be skipped. The first group of parameters sets the inverter operating environment. Parameter Comment 1141 View Level Select the view level, Operator, Technician or Engineer.
- Page 128 Setup Wizard Application selection Selection of the specific Macro and associated parameters. Parameter Validity Comment Setup Application? Select YES to configure the application parameters, NO to skip this section 1900 Selected Application ● ● ● ● ● 1937 Disable Coast Stop ●...
- Page 129 Setup Wizard Input and Output Option Configuration of the type and settings for the available IO options. Parameter Comment Setup Option IO? Select TRUE to configure the IO Option. Set to FALSE to skip this section Only shown if an IO option is fitted, or if one has been previously configured. 1178 Option IO Required Select the required IO Option type.
- Page 130 Setup Wizard Motor Data Selection of the motor type, control mode and setting the motor control and process control parameters. The Validity column indicates which parameters are shown, dependent on the control mode. Validity Parameter Comment PMAC VECT Setup Motor? Select TRUE to configure the motor parameters, FALSE to skip this section ●...
- Page 131 Setup Wizard Validity Parameter Comment PMAC VECT ● 0478 PMAC SVC Start Cur The current level during the startup procedure. ● 0479 PMAC SVC Start Speed The speed setpoint at which the speed control is switched from an open loop mode to a closed loop mode during the startup procedure ●...
-
Page 132: Devicenet Option
Setup Wizard These parameters are shown when the DeviceNet option is fitted. Parameter Comment 0044 Comms Required DEVICENET Refer to DeviceNet Technical Manual HA501840U001 ● 0219 DeviceNet MAC ID ● 0220 DeviceNet Baud Rate ● 0048 Comms Trip Enable These parameters are shown when the Ethernet IP option is fitted. Parameter Comment 0044... - Page 133 Setup Wizard Parameter Comment ● 0048 Comms Trip Enable On-board Ethernet Configuration of the on board Ethernet. Parameter Comment Setup Base Ethernet? Select TRUE to configure the on board Ethernet port. Select FALSE to skip this section 0929 DHCP 0930 Auto IP 0933 User IP Address...
-
Page 134: Set Up Pmac Motor Control - Sensorless
Setup Wizard Set Up PMAC Motor Control - Sensorless Minimum steps ( and list of parameters ) for setting a PMAC motor control in Sensorless mode are given below : Setup Menu Parameters Menu ( if (1141 View Level = Engineer) ) Parameters /Motor Control/Control &... -
Page 135: Set Up Pmac Motor Control - Encoder Feedback
9-10 Setup Wizard Set Up PMAC Motor Control – Encoder Feedback Minimum steps ( and list of parameters ) for setting a PMAC motor control in Closed Loop mode are given below : Setup Menu Parameters Menu ( if (1141 View Level = Engineer) ) Parameters Setup Type and control Select PMAC... - Page 136 9-11 Setup Wizard Setup speed control /Motor Control/Control & Type /Motor Control / Scale Setpoint 0464 100% Speed in RPM Enter 100% speed setpoint /Motor Control/Control & Type 0486 Acceleration Time /Motor Control /Ramp Set Acceleration – 0487 DecelerationTime Deceleration rate 1257 Seq Stop Method SVC /Motor Control/Control &...
-
Page 137: Set Up Pmac Motor Control - Pos Alignment After Power-Up
9-12 Setup Wizard Set Up PMAC Motor Control – Pos Alignment after Power-up Vector Control of a PMAC motor needs to know the relative position between the rotor and the stator. Pos Alignment sequence allows to synchronise encoder position to Motor Back EMF. This feature is used to automatically calculate any offset between the encoder absolute position and the motor back EMF, as well as selecting the correct wiring of the motor ( U, V, W sequence ) with the encoder position. -
Page 138: Parker Drive Quicktool (Pdq) Pc Software
9-13 Setup Wizard Parker Drive Quicktool (PDQ) PC Software INSTALLATION Launch the installer, setup.exe, from the latest version from www.parker.com/ssd/pdq AC30 series Variable Speed Inverter... - Page 139 9-14 Setup Wizard Figure 9-1 InstallShield Follow the steps of the InstallShield Wizard. AC30 series Variable Speed Inverter...
-
Page 140: Starting The Wizard
9-15 Setup Wizard STARTING THE WIZARD Figure 9-2 Desktop shortcut Once the InstallShield completes, run the PDQ from the “Start” menu as shown or from the desktop shortcut as shown in Figure 9-2 Figure 9-3 Start the Wizard AC30 series Variable Speed Inverter... -
Page 141: Task Selection
9-16 Setup Wizard TASK SELECTION Figure 9-4 Task selection The first page of the PDQ wizard allows you to choose the task you wish to perform. Figure 9-4 shows the default selection, “Setup a New Drive”. To start this wizard task, click on the “Next” button or the “Drive” page in the title bar. Note: No data or settings will be changed in the Drive until the “Commission”... -
Page 142: Find Drive
9-17 Setup Wizard FIND DRIVE Figure 9-5 Automatic Drive detection The wizard will automatically detect all the inverters that are visible to the PC via it’s Ethernet connections. This normally takes 10 seconds, during which time the user interface will go grey and will not respond to you. Once the inverter detection is complete, find your inverter in the list and click on it with the mouse. - Page 143 9-18 Setup Wizard Troubleshooting Drive Detection Problem Possible cause Solution Drive not found Drive not connected to the same physical Ethernet Connect Drive and PC to the same network or directly to network as the PC each other Drive found but no Another person has their PC connected to the Drive Disconnect the other PC information displayed...
-
Page 144: Select Macro
9-19 Setup Wizard SELECT MACRO Figure 9-6 Macro selection Select the desired Application Macro from the drop down list. Adjust any parameters that are needed for your specific application. AC30 series Variable Speed Inverter... -
Page 145: Setup I/O
9-20 Setup Wizard SETUP I/O Figure 9-7 Drive I/O setup On this screen the mode of the programmable I/O can be changed. If an I/O option card is fitted it can be configured in the “I/O Option” drop down. AC30 series Variable Speed Inverter... -
Page 146: Select Motor
9-21 Setup Wizard SELECT MOTOR Figure 9-8 Motor selection from database Motor data may either be selected form the built in motor database or entered by the engineer as a custom motor. The Motor page has two options at the top of the page that need to be selected. Figure 9-9 Motor data selection AC30 series Variable Speed Inverter... - Page 147 9-22 Setup Wizard “Database” is selected by default and the screen will show the motor database selector. Figure 9-10 Motor type selection “Induction Motor” is selected by default. This selection will filter the motor database to the selected type. It also displays only the appropriate “User”...
- Page 148 9-23 Setup Wizard Figure 9-11 Custom Motor configuration Custom Motor Custom motor data is entered in this page. The page is split into two parts. On the top are “Basic” motor parameters and below are more advanced ones. Nominal defaults will have been set, depending on the size of inverter being configured. The Engineer should adjust these default values with data from the motor nameplate or technical specification.
-
Page 149: Setup The Drive Control
9-24 Setup Wizard SETUP THE DRIVE CONTROL Figure 9-12 Drive Control setup The “Control” page allows configuration of the Drive control. The basic control parameters are shown on the left hand side. Expand the “Advanced” dropdown to see more advanced parameters. The exact parameters show will depend on the motor type previously selected. AC30 series Variable Speed Inverter... -
Page 150: Setup Communications
9-25 Setup Wizard SETUP COMMUNICATIONS Figure 9-13 Drive Communications setup The built in web browser can be enabled/disabled from this screen. If required, the built in Modbus can be setup from, the “Built in Modbus” dropdown. If an optional Fieldbus is fitted, it can be configured from the “Option Fieldbus” dropdown. AC30 series Variable Speed Inverter... -
Page 151: Commission The Drive
9-26 Setup Wizard COMMISSION THE DRIVE Figure 9-14 Programming the Drive The “Commission” page is used to commission the Drive with the Selected macro and motor settings chosen during the Wizard. There are two steps that are performed to finalise the Commissioning of the Drive. 1. -
Page 152: Monitor The Drive
9-27 Setup Wizard MONITOR THE DRIVE Figure 9-15 Monitor the Drive and fine tune AC30 series Variable Speed Inverter... - Page 153 9-28 Setup Wizard Figure 9-16 Charting Drive Parameters AC30 series Variable Speed Inverter...
-
Page 154: Chapter 10: Trips & Fault Finding
10-1 Trips & Fault Finding Trips & Fault Finding Chapter 10: Trips and Fault Finding WHAT HAPPENS WHEN A TRIP OCCURS When a trip occurs, the drive’s power stage is immediately disabled causing the motor and load to coast to a stop. The trip is latched until action is taken to reset it. -
Page 155: Using The Keypad To Manage Trips
10-2 Trips & Fault Finding USING THE KEYPAD TO MANAGE TRIPS Trip Messages If the drive trips, then the display immediately shows a message indicating the reason for the trip. The possible trip messages are given in the table below. Trip Name Possible Reason for Trip Criteria for Warning... - Page 156 10-3 Trips & Fault Finding Trip Name Possible Reason for Trip Criteria for Warning MOTOR STALL The motor has stalled (not rotating) Drive in current limit >200 seconds: The stall condition has been detected for more than one tenth • Motor loading too great of the configured Stall Time.
-
Page 157: Feedbacks
10-4 Trips & Fault Finding Trip Name Possible Reason for Trip Criteria for Warning BRAKE RESISTOR External dynamic brake resistor has been overloaded: The power calculation for the external resistor has exceeded • Trying to decelerate a large inertia too quickly or too often one half of the Brake Overrating allowance. -
Page 158: Control Mode
INTERNAL FAN An internal cooling fan has failed. This will reduce the lifetime of the power electronics. Not applicable. FAIL • Return the power stack to a Parker Hannifin repair centre. CURRENT Current feedback phase missing Not applicable. SENSOR •... - Page 159 10-6 Trips & Fault Finding Trip Name Possible Reason for Trip Criteria for Warning Application trip 8 Application warning 8. Difference between actual motor speed and the speed setpoint is greater than a Difference between actual motor SPEED ERROR FAULT threshold for a period of time.
-
Page 160: Hexadecimal Representation Of Trips
10-7 Trips & Fault Finding HEXADECIMAL REPRESENTATION OF TRIPS Each trip has a unique, eight-digit hexadecimal number as shown in the tables below. This number is referred to as the trip mask. The trip masks are used in the Enable, Active and Warnings parameters in the Trips module. Trip Name Mask User... - Page 161 10-8 Trips & Fault Finding AC30 series Variable Speed Inverter...
Need help?
Do you have a question about the AC30P and is the answer not in the manual?
Questions and answers