Advertisement
VC230-BT Installation Guide
• 1 VC230-BT system unit
• 6 Mounting screws for Mini PCIe module
• 1 Quick Installation Guide
• 1 Disk includes:
- Drivers / Manual
Note:
The CD that came with the system contains an autorun screen to install drivers, utilities,
and software applications required to enhance the performance of the system and a user's
manual for your reference. Insert the CD into a CD-ROM drive. The autorun screen will
appear. If after inserting the CD, "Autorun" did not automatically start, please go directly to
the root directory of the CD and double-click "Setup". Please install all required drivers.
DFI reserves the right to change the specifications at any time prior to the product's release. For the latest revision and details of the
installation process, please refer to the user's manual.
Package Contents
www.dfi.com
1
Advertisement
Table of Contents

Related Manuals for DFI VC230-BT


Summary of Contents for DFI VC230-BT
- Page 1 CD and double-click “Setup”. Please install all required drivers. DFI reserves the right to change the specifications at any time prior to the product's release. For the latest revision and details of the installation process, please refer to the user's manual.
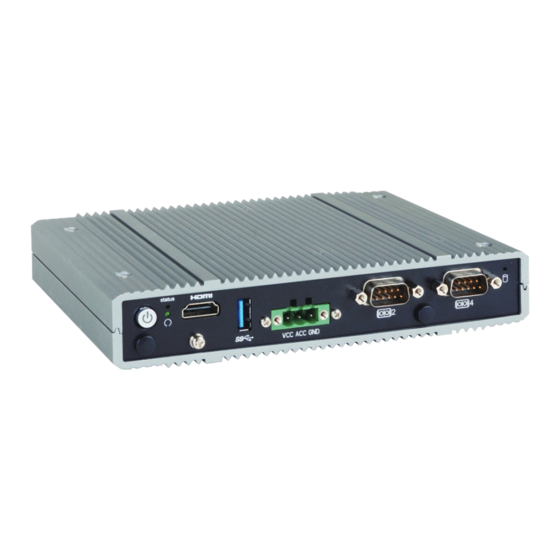
- Page 2 Panel USB 3.0 COM 4/ 8-bit DIO CANbus* Status LED (Blue) COM 2 (RS232/RS422/RS485) Power button (Green LED) HDMI Front View Reset Antenna Antenna VCC/ACC/GND hole hole (Connects to car battery) COM 3 (RS232/RS422/RS485) LAN 1 LAN 2 Antenna hole Rear View USB 2.0 Note:...
- Page 3 Removing the Chassis Cover Please observe the following guidelines and follow the procedure to open the system. 1. Make sure the system and all other peripheral devices connected to it have been powered off. 2. Disconnect all power cords and cables. 3.
- Page 4 Installing a Mini PCIe Card The system board is equipped with 3 Mini PCIe slots: two full-size and one half- size slots. Here we will demonstrate the installation of a full-size Mini PCIe card (mSATA interface) for capacity expansion. 1. Grasp the Mini PCIe card by its edges and align the notch in the connector of the PCIe card with the notch in the connector on the system board.
- Page 5 1-2, 4-5 COM 4 (default) 7-8, 10-11 On GND (default) 1-2 On 2-3, 5-6 +5V or +5V_standby 2-3 On 8-9, 11-12 On Note: You cannot use COM 4 and DIO at the same time. Please adjust JP21 and JP22 together. www.dfi.com...
- Page 6 5 min 10 min 15 min 30 min Note: The OS will start the shut-down procedure after the car ignition switches off. Please make sure that system-off delay time is sufficient to allow the OS to shut down completely. www.dfi.com...
Need help?
Do you have a question about the VC230-BT and is the answer not in the manual?
Questions and answers