FAAC E124 Rapid Manual
Hide thumbs
Also See for E124:
- Original instructions manual (44 pages) ,
- Manual (32 pages) ,
- Quick start manual (12 pages)
Table of Contents

Related Manuals for FAAC E124


Summary of Contents for FAAC E124
- Page 1 E124...
-
Page 2: Ce Declaration Of Conformity
E124 control unit – rapid guide WARNINGS - Important! For the safety of people, it is important that all the instructions be carefully observed. - Incorrect installation or incorrect use of the product could cause serious harm to people. - Carefully read the instructions before beginning to install the product and keep them for future reference. -
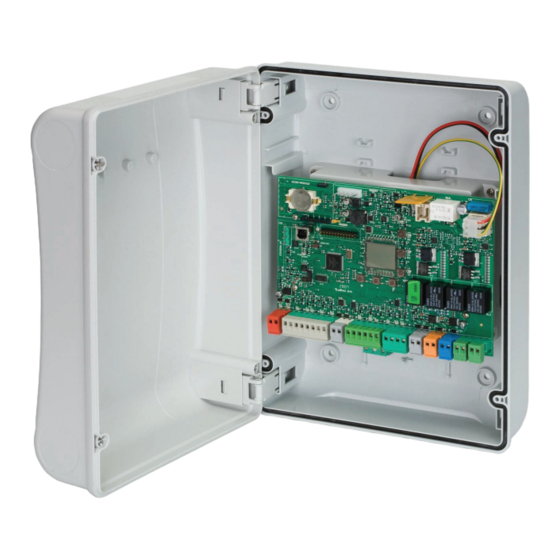
Page 3: Description Of Components
LAYOUT AND COMPONENTS OF E124 BOARD DL15 DL14 DL16 DL17 DL19 DL18 DL20 DL12 DL13 DL10 DL11 DESCRIPTION OF COMPONENTS SIGNALS AND PROGRAMMING DISPLAY DL16 LED FOR “SW1” PUSH-BUTTON (R1 PUSH-BUTTON) DL17 LED FOR “SW2” PUSH-BUTTON (R2 PUSH-BUTTON) “R1” PROGRAMMING PUSH-BUTTON DL18 LED FOR “SW3”... - Page 4 TERMINAL BOARD MOTORS POWER FEED J11 (MOT1): Connection of motor connected to leaf 1, i.e. the leaf J12 (MOT2): Connection of the motor connected to leaf 2, i.e. the leaf which opens second. 115 V ~ 230 V ~ If only one motor is connected, it must be connected to terminal J11 (MOT1).
-
Page 5: Electrical Connections
CONNECTION OF TRADITIONAL SAFETY DEVICES The following table shows the programming operations of the dip-switch inside the transmitter and the BUS 2-EASY photocells receiver. With the E124 control unit, you can use both traditional photocells (N.C. contact with relay) and/or photocells with BUS-2EASY. - Page 6 BUS 2-EASY ENCODER CONNECTION Anta 1 Anta 2 Anta 2 Anta 1 Connect the 2 encoder cables to the BUS-2EASY input (red terminal) on the board. Check that the encoder is connected correctly according to the table. The LEDs must be checked with the leaf stopped Leaf 1 (DL1, DL2 on) Leaf 2 (DL1 on) Absolute encoder...
- Page 7 Connector J13 – XF MODULE rapid connection The control unit has an integrated 2-channel decoding system (DS, SLH, LC/RC) named OMNIDEC. This sy- stem makes it possible to save – through an extra receiver module – XF433 or XF868 radio commands of the same frequency, but of a different type (DS, SLH, LC/RC).
-
Page 8: Basic Programming
Configures the parameters with DEFAULT values corresponding to an installation with non-FAAC operators. (see column Configures the parameters with DEFAULT values corresponding to an installation with operators FAAC 412, 413/415, 770, 390, 770N (see column Configures the parameters with DEFAULT values corresponding... - Page 9 Display Basic Function PAUSE TIME A (visualised only if the selected logic allows automatic reclosing): Pause time following a TOTAL opening command. It has only effect if a logic with pause time was selected. Can be adjusted from 0 to 59 sec. in one-second steps.
- Page 10 Display Basic Function ENCODER USE: You can enable/disable the use of encoders (both BUS and GATECODER encoders): = encoders on both motors = encoders disabled When using configurations it is mandatory to use the encoder, is not selectable LIMIT SWITCH WHEN OPENING: Lets you set or disable use of the opening limit switch on swing-leaves.
- Page 11 Display Basic Function MOTOR 2 dead-man DRIVE mode (visualised only with the function OPENS (visualising ) until the button is held down CLOSES (visualising ) until the button is held down MOTOR 1 dead-man DRIVE mode OPENS (visualising ) until the button is held down CLOSES (visualising ) until the button is held down WORK TIME LEARNING (SETUP):...
-
Page 12: Advanced Programming
ADVANCED PROGRAMMING Display Advanced Function TIME OF MAXIMUM POWER AT STARTING: You can set the starting time. During start the motors work at maximum power for starting the movement. Adjustable from sec, in 1-second steps (ignoring the power level selected with Other more detailed programming possibilities are feasible by programming with a PC (see dedicated instructions). - Page 13 Display Advanced Function LEAF 2 DECELERATION (visualised only with the function You can adjust the deceleration space as a percentage of the total travel of leaf 2. Adjustable from %, in 1% steps. = no deceleration = minimum deceleration space = maximum deceleration space PRE-FLASHING: You can enable/disable the pre-flashing.
- Page 14 Display Advanced Function SOFT TOUCH: (visualised only with the function After touching the travel stop point, the leaves reverse and then rest gently. = active = excluded This function can be useful to respect the impact curve specified by current standards. Other more detailed programming possibilities are feasible by PC programming (see dedicated instructions).
-
Page 15: Cycle Programming
Display Advanced Function MAINTENANCE REQUEST - CYCLE COUNTER (linked to the subse- quent two functions): You can enable the signaling of maintenance request, or the cycle counter. = e n a b l e t h e S I G N A L I N G w h e n t h e p r o g r a m - m e d n u m b e r o f c y c l e s h a s b e e n r e a c h e d ( a s d e - fined in subsequent two functions Signaling consists of a pre-flashing of 8 sec (in addition to the time... - Page 16 AUTOMATED SYSTEM STATUS: You can exit programming, choosing whether or not to save the configuration you just performed. 1. set the choice: to SAVE and EXIT the programming to EXIT the programming WITHOUT SAVING 2. press the button F to confirm; at the end the display returns to visualize the automated system status: = CLOSED = FAIL SAFE in progress = OPEN...
-
Page 17: Time Learning - Setup
Fig. examples of BUS-2EASY status visualization on display. In STAND BY (gate closed and in stand-by) with BUS-2EASY Encoder on leaf 1 and leaf 2 and BUS-2EASY Photocells correctly connected and entered. In case of BUS-2EASY Encoder on leaf1 and leaf 2 and BUS-2EASY Photocells correctly con- nected and entered and with closing photocells engaged:... - Page 18 Perform the SET-UP as follows: 1. Enter BASIC programming and go to the parameter , when F is released will appear. 2. Ensure that the gate leaves are closed. Otherwise, proceed as follows: - Press and hold -/R2 to close leaf 2 - Press and hold +/R1 to close leaf 1 Should pressing +/R1 and/or -/R2 command opening of the corresponding leaf, cut off power and, on terminal board J11 or J12, invert the cables of the corresponding motor.
- Page 19 MEMORISING THE RADIO CODE The control board features an integrated 2-channel decoding system (DS, SLH/SLH LR, RC) called OMNIDEC. This system lets you memorise, using an additional receiver module (on connector) and more radio controls having different technology but the same frequency. You can thus control both total opening (OPEN A) and partial opening (OPEN B).
-
Page 20: Radio Controls
To enable other radio controls with the same system code, you must transfer the system code of the memorised radio control button to the button corresponding to the radio control you wish to add: 1. Simultaneously press and hold P1 and P2 on the memorised radio control. 2. - Page 21 lampeggio · flash · clignotement OPEN B 20” · Blinksignal · destello · knippert · · DL17 OPEN A OPEN B RADIO 2 RC/LC OPEN A > 5” 1” 1” DL16 20” TX... DL16 RADIO 1 RADIO 1 MEMORISING RADIO CONTROLS 1.
- Page 22 SIGNALLING ERRORS AND ALARMS In case of ERRORS (conditions that stop gate operation) or ALARMS (conditions that do not compromise gate operation) it is possible to see the number related to the warning. These warnings will disappear in the following cycle only if the situation causing them is removed. By simultaneously pressing + and - the display will show corresponding error number.
- Page 24 POLAND Saint Priest, Lyon - France FAAC POLSKA SP.ZO.O tel. +33 4 72218700 Warszawa - Poland www.faac.fr tel. +48 22 8141422 FAAC FRANCE - AGENCE PARIS www.faac.pl Massy, Paris - France RUSSIA tel. +33 1 69191620 FAAC RUSSIA LLC www.faac.fr...
Need help?
Do you have a question about the E124 and is the answer not in the manual?
Questions and answers