Table of Contents
Advertisement
Quick Links
Advertisement
Table of Contents

Related Manuals for Batribike TEN S45


Summary of Contents for Batribike TEN S45
- Page 1 Owner Manual ELECTRIC BICYCLES Hand Built in Europe batribike.com...
- Page 2 DATATAG ETCH №:- IMPORTANT PLEASE READ THIS MANUAL FULLY BEFORE USE For your safety and to ensure a long and trouble free life of your Batribike bicycle, check the operation of brakes, lights, bell and gears, and check tyre pressures are correct.
-
Page 3: Table Of Contents
Thank you for purchasing a BATRIBIKE Electric Bicycle With care and correct usage your bicycle will give many years of service. Important PLEASE CHARGE THE BATTERY BEFORE FIRST USING THE BICYCLE Even though the battery indicator will show charge this cannot be relied upon until the battery has had the initial full charge. -
Page 4: Parts Identification
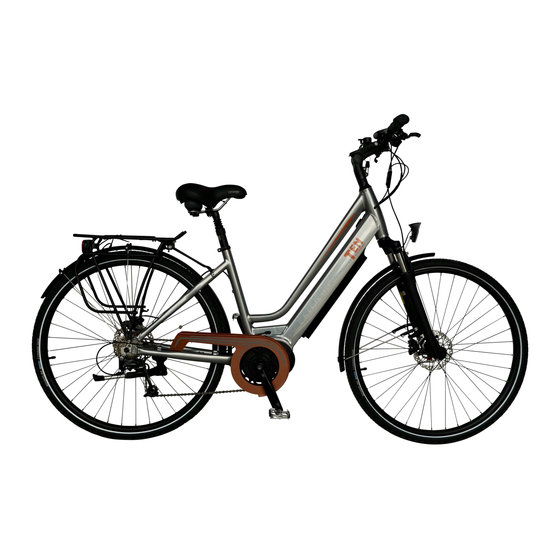
PARTS IDENTIFICATION We continually strive to ensure that we provide you with the best possible products, therefore SPECIFICATIONS ARE SUBJECT TO CHANGE WITHOUT NOTICE Rear Brake Lever Rear Carrier (Max 25kg) Lights ON/OFF Button Seat Adjust (Height) - Clamp Handlebar Adjust Safety Lock Suspension Seat Post Display (Centre LCD) Datatag Label... - Page 5 OTHER SIDE SWITCH UNIT CONNECTION...
-
Page 6: Battery Care & Charging
BATTERY CARE & CHARGING Your Batribike Electric Bicycle uses a Lithium battery for it's power and the following points will directly affect battery life and performance. First time use Your battery will be supplied in a state of sleep from the factory. The first time you use the battery it requires activation by being fully charged. - Page 7 Using the Charger Two types of battery charger are used by BATRIBIKE. (Only one will be supplied). Both have a charge light which will display RED when charging and change to GREEN when the battery is charged. The alternative type charger also has a second light which shows RED when mains power is applied.
- Page 8 Usage Switching On To use under electric power, switch on at the battery if required, (bike model specific), then press and hold the POWER button on the handlebar unit until the display lights. Control Buttons By means of the three buttons, UP, DOWN and MODE, on the handlebar mounted display unit, the various functions of the power controller can be utilised.
- Page 9 15 - 25% SOON AS POSSIBLE Bicycle Lights Your BATRIBIKE Electric Bicycle is supplied with powerful LED lights on the front and rear. These are switched on by pressing and holding the LIGHT button. The LCD backlight will also dim when the lights are on so as not to be too bright at night.
- Page 10 Pedal Assistance RANGE VALUES QUOTED ASSUME THAT THE STANDARD SIZE BATTERY IS FITTED There are 5 levels of pedal assistance available from the motor. Using the UP and DOWN buttons you can select from Level 1 (Lowest), to Level 5 (Highest). The motor will then be activated upon pedalling.
- Page 11 No Assistance - Normal Pedal Bicycle If the assistance level is set to ZERO, then the motor will not be turned on. Your BATRIBIKE will now act and feel like a normal bicycle. This is useful when you are feeling fit at the start of a journey or using your bike for exercise purposes.
- Page 12 CYCLE COMPUTER The BATRIBIKE Centre LCD has useful Cycle Computer functions built in. Initial Display (SPEED and TRIP DISTANCE) When first turned on the display briefly shows the current value of the Wheel Size Setting. (See page 29 for details).
- Page 13 Trip Distance To change the display to show the Total Distance, simply press the MODE button. Repeat to return to the Trip Distance display. Resetting the Trip To reset the Trip Distance at the start of a journey simply press and hold the MODE button until the Trip display resets to zero.
- Page 14 Setting Distance Units (Miles or Km) The display can be changed to show distances and speeds in Miles or Kilometres. To change simply press and hold the UP button for 10 seconds. Repeat to change the units back again. Setting Wheel Size (Circumference) When you change the display the tyre size will need to be set to suit the tyre circumference.
- Page 15 To change the value, press the MODE button once more to set the first digit. Enter Setting Mode Value for TEN with standard tyre is 2180 (Schwalbe 42-622 Tyrago) Set first digit Set second digit Use UP and DOWN buttons to change value Set fourth digit Set third digit Confirm to return...
- Page 16 Measuring the Circumference If you have a non-standard tyre fitment you can determine the value to use by measuring the circumference as follows:- Start with the valve at the bottom. Roll the wheel along the ground and measure the distance when the valve returns to the bottom again.
-
Page 17: Troubleshooting
TROUBLESHOOTING Diagnostic Error Messages If an error occurs the Centre LCD display will show a code as in the example shown. Make a note of the error number and turn off the bicycle power at the handlebar mounted power switch. After 2 minutes turn on the power again. -
Page 18: Standard Bicycle Functions
STANDARD BICYCLE FUNCTIONS Gears Your BATRIBIKE is provided with 9 speed Shimano derailleur gears with twin lever gear changers. To change gear you use the right handlebar levers for the rear 9 speed. Gear number 1 is low for hills and rough terrain and gear 9 is high for normal road use. - Page 19 Braking To stop, cease pedalling and pull the brake levers. Also ensure that the throttle is not operated. Remember that the TEN is equipped with powerful hydraulic brakes and will stop quickly. Braking will be less effective in wet conditions and your riding style should be adjusted accordingly.
- Page 20 The height of the saddle can be adjusted to suit the rider. If you do not feel confident with making these adjustments then your BATRIBIKE Dealer will be able to set up the bike initially. The saddle height is adjusted...
- Page 21 The handlebar rake and rotation angles can be adjusted to suit the rider. Release the safety lock by sliding forwards and then lifting the locking lever. The bars can be adjusted by hand without tools and set to the desired angles. After adjustments are complete, lower the lever and ensure...
-
Page 22: Removing The Battery
Removing the Battery To remove the battery, turn off at the handlebar display, unlock the battery using the key provided. Push the battery locking tab downwards away from the battery and using the finger insert pull the lower part of the Refitting the Battery To refit the battery, simply reverse the above procedure. - Page 23 Your Local Authority should have the necessary facilities in place. If you prefer you may take your original battery to BATRIBIKE for recycling. Never dispose of batteries in a fire or subject to puncture or crushing.
- Page 24 ® The Datatag UV “Stealth” PRO Cycle System is ideal for BATRIBIKE Electric Bicycles and is a Police Preferred Crime Prevention Product. The system protects your bicycle frame and forks, plus the Datadots® are used to mark many of your electric and non-electric cycle components.
-
Page 25: Datatag
Number, found on the label attached to your frame, and the Datatag Stealth Etch Code marked on the frame and forks. (Only visible in UV light). You also need the bike Serial Number. This is a separate registration system to our Batribike Warranty Registration. -
Page 26: Maintenance Schedule
Beyond this manual, it is good to consult your BATRIBIKE dealer for advice if you are at all unsure about any of the procedures described. Normal maintenance is not covered under the warranty and this service may be chargeable. - Page 27 After 3,000 miles (5,000 km) (or YEARLY if sooner) ● General inspection We recommend you arrange to have a thorough inspection of your bicycle by a BATRIBIKE dealer. Tyre Pressures Recommended Tightening Torques Item Torque Item Torque The tyres should be...
-
Page 28: Warranty
Cost incurred by loss of the bicycle’s usage. Brake blocks/pads, tyres, lights and cables etc. are considered as consumables and replacements are available from BATRIBIKE or may be obtained from your local cycle shop. In the event of a Warranty claim ●... - Page 29 5. In the unlikely event of a battery failure, the battery must be returned to Batribike, via your Batribike dealer for testing. If upon testing it is found that the above conditions have not been met then the warranty will not apply and the cost of replacement and carriage will be payable by the Customer.
- Page 32 Batribike Limited Unit 4, Ingleby Grange Ingleby Lincoln BATRIBIKE are LN1 2PQ Members of the Phone: 01427 787774 Bicycle Association of Great Britain E-mail: support@batribike.com ----- USER MANUAL Anniversary TEN - ISSUE 3 - ©2018 Batribike Limited -----...
Need help?
Do you have a question about the TEN S45 and is the answer not in the manual?
Questions and answers