Table of Contents
Advertisement
Quick Links
INET-IOEX-IRCOM
in NET EX
Control Module
®
Installation Guide
Description
The Crestron
INET-IOEX-IRCOM control module
®
provides an IR and RS-232 control interface for video
displays, AV components, small appliances, and other
equipment. The control module includes two discrete IR
ports and one bidirectional RS-232 port.
The control module communicates with a Crestron
3-Series
control system via the in NET EX
®
network, allowing for control and monitoring of remote
devices without running wiring or installing conduit.
NOTE: The INET-IOEX-IRCOM is compatible only
with Crestron 3-Series control systems.
Additional Resources
Visit the product page on the
Crestron website (www.crestron.com)
for additional information and the
latest rmware updates. Use a QR
reader application on your mobile
device to scan the QR image.
Installation
The INET-IOEX-IRCOM may be mounted onto any at
surface using three mounting screws (not included).
For best results, install the device in an location where it
will not receive interference from nearby RF sources,
obstructions, and metal surfaces.
INET-IOEX-IRCOM
wireless
®
Mounting
screws (3)
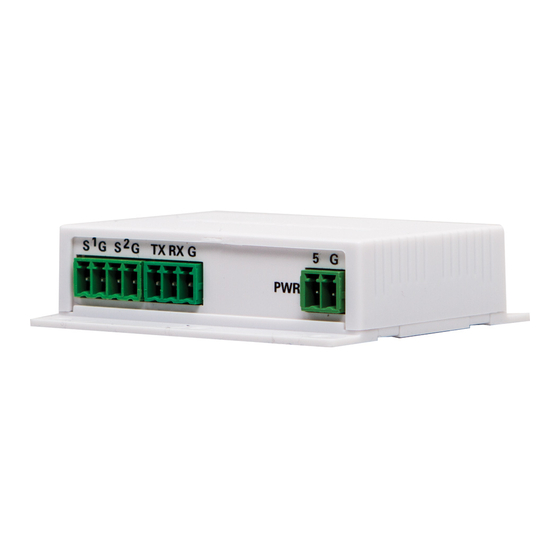
Hardware Hookup
Make the necessary connections as called out in the
following illustration.
When making connections to the INET-IOEX-IRCOM,
use Crestron power supplies for Crestron equipment.
G/TX/RX:
S/G (1–2):
To any
To IR
RS-232 device
devices
Wireless Communications
The INET-IOEX-IRCOM must be acquired by an
in NET EX wireless gateway or by a control system with
a built-in in NET EX gateway (both not included) before
it may be used with a 3-Series control system.
Use the procedures below to join or leave an in NET EX
network and to verify communications between the
device and the control system.
NOTE: The INET-IOEX-IRCOM may be acquired only
by one network.
Join the in NET EX Network
1. Press the ACQUIRE button on the in NET EX
gateway to enter Acquire mode, or enter Acquire
mode from Crestron Toolbox™ software.
NOTE: In an environment where there are
multiple gateways installed, place only one
gateway in Acquire mode at a time.
2. Press the SETUP button three times, and then
press and hold the button down
(press-press-press-press+hold) until the LED on
the device ashes once. This process may take
up to ten seconds to complete.
NOTE: If the INET-IOEX-IRCOM was previously
acquired to another gateway, press the SETUP
button three times, and then press and hold the
button down (press-press-press-press+hold) for
over ten seconds.
3. Release the button to start the acquire process.
The LED ashes slowly to show that the device is
actively scanning the in NET EX network.
PWR:
From power
pack
Advertisement
Table of Contents

Related Manuals for Crestron INET-IOEX-IRCOM


Summary of Contents for Crestron INET-IOEX-IRCOM
- Page 1 Use the procedures below to join or leave an in NET EX Installation network and to verify communications between the device and the control system. The INET-IOEX-IRCOM may be mounted onto any at NOTE: The INET-IOEX-IRCOM may be acquired only surface using three mounting screws (not included). by one network.
- Page 2 • If the INET-IOEX-IRCOM is acquired by the in NET EX network, the LED lights for ve seconds. • If the INET-IOEX-IRCOM is not acquired by the in NET EX network, The LED ashes rapidly for several seconds. Press the SETUP button to cancel the acquire process. Ensure the gateway is in Acquire mode and that the INET-IOEX-IRCOM is in range before attempting the acquire process again.
Need help?
Do you have a question about the INET-IOEX-IRCOM and is the answer not in the manual?
Questions and answers