
Subscribe to Our Youtube Channel
Related Manuals for G&D DVIMUX2-DL-USB


Summary of Contents for G&D DVIMUX2-DL-USB
-
Page 1: Installation And Operation
Guntermann & Drunck GmbH www.gdsys.de G&D DVIMUX2-DL-USB Installation und Bedienung Installation and Operation A9100100-2.00... - Page 2 © Guntermann & Drunck GmbH 2017. Alle Rechte vorbehalten. Version 2.00 – 05.07.2017 Firmware: 1.0.8 Guntermann & Drunck GmbH Obere Leimbach 9 57074 Siegen Germany Telefon +49 (0) 271 23872-0 Telefax +49 (0) 271 23872-120 http://www.gdsys.de sales@gdsys.de i · G&D DVIMUX2-DL-USB...
- Page 3 Operation of this equipment in a residential area is likely to cause harmful interfe- rence in which case the user will be required to correct the interference at his own expense. G&D DVIMUX2-DL-USB · ii...
-
Page 4: Table Of Contents
Inhaltsverzeichnis Inhaltsverzeichnis Sicherheitshinweise ..................1 Der KVM-Switch »DVIMUX2-DL-USB« ............2 Lieferumfang ....................2 Installation ....................... 3 Weiterführende Informationen ................. 7 Inbetriebnahme ....................8 Statusanzeigen ....................8 Umschaltung ..................... 9 KVM-Kanal umschalten ..................9 Umschaltung durch Verwendung der Taster ..........9 Umschaltung mit Tastenkombinationen ............ - Page 5 Änderung des Standard-Modus der Service-Buchse ........36 Änderung der Bitrate der RS232-Buchse ............. 37 Änderung des Betriebsmodus der RS232-Buchse ........38 Auswahl des Typs der USB-Tastatur ............39 USB 2.0-Datenübertragung (de)aktivieren ..........42 USB-Haltefunktion (Pinning) ..............43 Technische Daten ................... 44 G&D DVIMUX2-DL-USB · iv...
-
Page 6: Sicherheitshinweise
Betreiben Sie dieses Gerät nur mit dem mitgelieferten oder in der Bedienungsan- leitung aufgeführten Netzteil. ! Betreiben Sie das Gerät ausschließlich im vorgesehenen Einsatzbereich Die Geräte sind für eine Verwendung im Innenbereich ausgelegt. Vermeiden Sie extreme Kälte, Hitze oder Feuchtigkeit. 1 · G&D DVIMUX2-DL-USB... -
Page 7: Der Kvm-Switch »Dvimux2-Dl-Usb
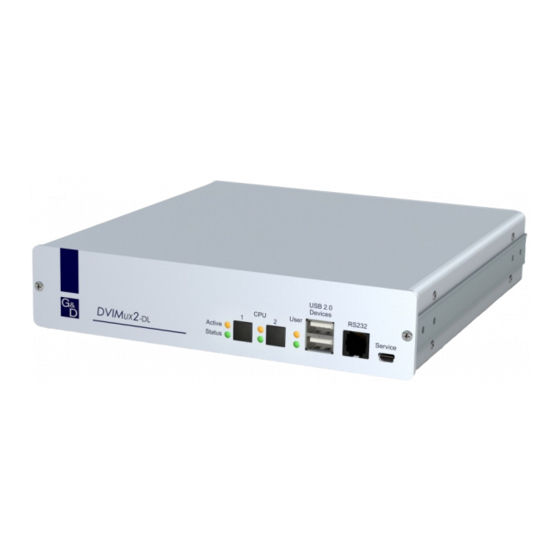
Der KVM-Switch »DVIMUX2-DL-USB« Der KVM-Switch »DVIMUX2-DL-USB« Der KVM-Switch DVIMUX2-DL-USB ermöglicht die Bedienung von bis zu zwei Rechnern über einen Arbeitsplatz. Der Arbeitsplatz wird mit einer USB-Tastatur und USB-Maus sowie einem digita- len und/oder analogen Monitor ausgestattet. Die an den KVM-Switch angeschlos- senen Rechner werden zentral am eingerichteten Arbeitsplatz bedient. -
Page 8: Installation
LEDs (siehe Statusanzeigen auf Seite 8) an der Frontseite platziert. Rückseite des KVM-Switches Auf der Rückseite des KVM-Switches sind die Schnittstellen zum Anschluss der Geräte des Arbeitsplatzes und der Rechner angeordnet. Eine detaillierte Beschrei- bung der Schnittstellen finden Sie auf der folgenden Seite. 3 · G&D DVIMUX2-DL-USB... - Page 9 Rechners an diese Schnittstelle an. Stecken Sie das DVI-Kabel des Monitors in diese Schnittstelle. Monitor 1: HINWEIS: Falls Sie die Multichannel-Variante des KVM-Switches erworben haben, schließen Sie den zweiten Monitore an die Schnittstelle Monitor 2 G&D DVIMUX2-DL-USB · 4...
- Page 10 Line Out: verbinden Sie diese Schnittstelle mit dem Mikrofoneingang des Rechners. Verwenden Sie hierfür eines der Audio-Anschlusskabel (Audio-M/M). USB 2.0: Verbinden Sie eine USB-Schnittstelle des Rechners mit dieser Schnittstelle. Verwenden Sie hierfür eines der USB-Anschlusskabel (USB-AM/BM). 5 · G&D DVIMUX2-DL-USB...
- Page 11 Line In Line In Line Out USB 2.0 Line In Line Out USB 2.0 Abbildung 4: Schnittstelle zum Anschluss der Stromversorgung Power: Verbinden Sie das Stromversorgungskabel (PowerCable-2 Standard) mit einer Netzsteckdose und der Power-Buchse des KVM-Switches. G&D DVIMUX2-DL-USB · 6...
-
Page 12: Weiterführende Informationen
Zeitpunkt Daten auf das Massenspeichergerät schreibt, wird dieser Vorgang abgebrochen. WICHTIG: Um einen Datenverlust zu vermeiden, verwenden Sie die Funktion zum sicheren Entfernen der Hardware des auf dem Rechner eingesetzten Betriebssystems vor der Umschaltung des Kanals. 7 · G&D DVIMUX2-DL-USB... -
Page 13: Inbetriebnahme
Tastatur initialisiert wurde. blinkt Setup-Modus des KVM-Switches aktiv. Status Der KVM-Switch wird mit der erforderlichen elektrischen Spannung versorgt. Der KVM-Switch ist ausgeschaltet oder die erforderliche elektrische Spannung ist nicht verfügbar. Prüfen Sie gegebenenfalls den korrekten Anschluss des Stromversorgungskabels. G&D DVIMUX2-DL-USB · 8... -
Page 14: Umschaltung
WICHTIG: Die Umschaltung des Kanals erfolgt, wenn die betätigte Tasten- kombination losgelassen wird. HINWEIS: Falls eine der Tastenkombinationen mit einer Tastenkombination eines eingesetzten Anwendungsprogramms kollidiert, kann die Tastenkombination des KVM-Switches angepasst werden (s. Seite 23 f.). 9 · G&D DVIMUX2-DL-USB... -
Page 15: Umschaltung Mit Den Tasten F21 Und F22
NUM 1 ... NUM 2 NUM 9 NUM 0 A ... B F1 ... F2 So schalten Sie mit Step-Keys auf einen bestimmten Kanal um: 1. Betätigen Sie auf der Tastatur des Arbeitsplatzes die Tastenkombination Hotkey+Step-Key »zurück« oder Hotkey+Step-Key »vor« G&D DVIMUX2-DL-USB · 10... -
Page 16: Umschaltung Mit Der Maus
Zum Aufbau einer seriellen Verbindung zum KVM-Switch sind die nachfolgend aufgeführten Anschlusseinstellungen durch das serielle Endgerät anzuwenden. Bits pro Sekunde: 115.200 (zur Umschaltung der Bitrate s. Seiten 37) Datenbits: Parität: keine Stoppbits: Flussteuerung: keine 11 · G&D DVIMUX2-DL-USB... - Page 17 Konnte die Umschaltung nicht erfolgen, wird dies durch eine entsprechende Meldung mitgeteilt. Meldung Bedeutung Schaltung auf Kanal erfolgreich ungültige Kanalnummer (out of range) Kanalumschaltung fehlgeschlagen ungültiger Befehl ungültiger Wert (out of range) RS232 mode enabled Switch-Modus (RS232) aktiviert G&D DVIMUX2-DL-USB · 12...
-
Page 18: Usb 2.0-Geräte Permanent Umschalten
Bei aktivierter Hotkey-Verzögerung halten Sie die Tastenkombination sieben Sekunden lang gedrückt. 2. Drücken und halten Sie die Taste Betätigen Sie zusätzlich die Taste HINWEIS: Nach dem Beenden der permanenten Schaltung werden die USB 2-0- Geräte auf den aktuellen KVM-Kanal (s. Seite 9) geschaltet. 13 · G&D DVIMUX2-DL-USB... -
Page 19: Monitoring
Die Monitoring-Informationen können Sie jederzeit durch Senden des Zeichens » « vom KVM-Switch angefordert. Erweiterte Monitoring-Informationen ausgeben Die erweiterte Monitoring-Information können Sie durch Senden des Zeichens » « vom KVM-Switch angefordert. BEISPIEL FÜR ERWEITERTE MONITORING-INFORMATIONEN AM RS232-PORT: 2BAAkhV1.00.008(00067)PsEPsEM G&D DVIMUX2-DL-USB · 14... - Page 20 Der Computer an Schnittstelle »CPU 2« ist betriebsbereit. Es ist kein Computer an die Schnittstelle »CPU 2« angeschlossen oder der Computer ist ausgeschaltet. eingehendes VGA-Signal an Schnittstelle »CPU 2« erkannt kein VGA-Signal an Schnittstelle »CPU 2« erkannt 15 · G&D DVIMUX2-DL-USB...
- Page 21 Bedeutung Die USB-KM-Emulation für CPU 2 wurde vom USB-Host initialisiert Die USB-KM-Emulation für CPU 2 hat den USB-Host erkannt Die USB-KM-Emulation für CPU 2 hat keinen USB-Host erkannt Monitor erkannt kein Monitor an Schnittstelle »Monitor« erkannt G&D DVIMUX2-DL-USB · 16...
-
Page 22: Konfiguration
Änderung der Bitrate der Service-Buchse 115.200 Änderung des Standard-Modus der Service-Buchse Setup-Menü Änderung der Bitrate der RS232-Buchse 115.200 Änderung des Betriebsmodus der RS232-Buchse Switch Auswahl des Typs der USB-Tastatur PC Multimedia USB 2.0-Datenübertragung (de)aktivieren aktiviert USB-Haltefunktion (Pinning) ausgeschaltet 17 · G&D DVIMUX2-DL-USB... -
Page 23: Bedienung Des Setup-Modus
Betätigen Sie nach der Aktivierung des Setup-Modus einen der auf den folgenden Seiten beschriebenen Setup-Keys. So beenden Sie den Setup-Modus ohne Ausführung einer Funktion: Betätigen Sie -Taste der Tastatur um den Setup-Modus zu beenden. G&D DVIMUX2-DL-USB · 18... -
Page 24: Bedienung Des Setup-Menüs
Bits pro Sekunde: 115.200 | (zur Umschaltung der Bitrate s. Seite 35) Datenbits: Parität: Keine Stoppbits: Flusssteuerung: Keine 3. Verwenden Sie das mitgelieferte Datenkabel, um den Rechner mit der Service- Buchse an der Frontseite des KVM-Switches zu verbinden. 19 · G&D DVIMUX2-DL-USB... - Page 25 In der rechten Spalte können Sie sofort die aktive Einstellung einer Funktion ablesen. Eine Ausnahme hiervon bilden Menüeintrage, die verschiedene Einstellungen in einem Untermenü ermöglichen. Dies wird durch drei Punkte (...) in der rechten Spalte dargestellt. G&D DVIMUX2-DL-USB · 20...
- Page 26 Leertaste Haben Sie einen Menüpunkt ausgewählt, der über einen Unterdialog verfügt, betätigen Sie die Eingabetaste , um diesen zu öffnen. HINWEIS: Detaillierte Anweisungen zur Änderung einer bestimmten Funktion lesen Sie auf den folgenden Seiten. 21 · G&D DVIMUX2-DL-USB...
-
Page 27: Konfigurationseinstellungen
4. Nach Auswahl der gewünschten Einstellung betätigen Sie die Taste um diese zu speichern. Nach der Umschaltung wird der aktive Hotkey in einen Doppel-Hotkey (oder umgekehrt) konvertiert: einfacher Hotkey Doppel-Hotkey Strg Strg+Shift Alt+Shift Alt Gr Alt Gr+Strg Win+Strg Shift Shift+Win G&D DVIMUX2-DL-USB · 22... -
Page 28: Änderung Des Einfachen Hotkeys
Aktivierung des Hotkeys Alt Alt Gr Aktivierung des Hotkeys Alt Gr Aktivierung des Hotkeys Win Aktivierung des Hotkeys Shift Shift 4. Nach Auswahl der gewünschten Einstellung betätigen Sie die Taste um diese zu speichern. 23 · G&D DVIMUX2-DL-USB... -
Page 29: Änderung Des Doppel-Hotkeys
Aktivierung des Doppel-Hotkeys Alt Gr + Strg Win+Ctrl Aktivierung des Doppel-Hotkeys Win + Strg Aktivierung des Doppel-Hotkeys Shift + Win Shift+Win 5. Nach Auswahl der gewünschten Einstellung betätigen Sie die Taste um diese zu speichern. G&D DVIMUX2-DL-USB · 24... -
Page 30: Änderung Der Select-Keys
Aktivierung der Select-Keys NUM 1 und NUM 2 A ... B Aktivierung der Select-Keys A und B F1 ... F2 Aktivierung der Select-Keys F1 und F2 4. Nach Auswahl der gewünschten Einstellung betätigen Sie die Taste um diese zu speichern. 25 · G&D DVIMUX2-DL-USB... -
Page 31: Hotkey-Verzögerung Ein- Oder Ausschalten
3. Betätigen Sie (mehrfach) die der Tastatur, um die Hotkey-Ver- Leertaste zögerung an- oder auszuschalten: Aktivierung der Hotkey-Verzögerung Deaktivierung der Hotkey-Verzögerung 4. Nach Auswahl der gewünschten Einstellung betätigen Sie die Taste um diese zu speichern. G&D DVIMUX2-DL-USB · 26... -
Page 32: Standardeinstellungen Wiederherstellen
Pfeil die Zeile Set System Defaults aus. 3. Betätigen Sie die Eingabetaste , um die Standardeinstellungen wiederherzustellen. 4. Bestätigen Sie die erscheinende Sicherheitsabfrage mit der Eingabetaste Ein Abbruch der Funktion ist alternativ mit der Taste möglich. 27 · G&D DVIMUX2-DL-USB... -
Page 33: Automatische Aufschaltung Des Ersten Kanals
Tastatur, um zwischen folgenden Leertaste Optionen zu wählen: Aktivierung des zuletzt aktiven Kanals nach dem Einschalten Aktivierung von Kanal 1 nach dem Einschalten 4. Nach Auswahl der gewünschten Einstellung betätigen Sie die Taste um diese zu speichern. G&D DVIMUX2-DL-USB · 28... -
Page 34: Umschaltung Über Taster An Der Frontseite (De)Aktivieren
Tastatur, um zwischen folgenden Optionen zu wählen: Umschaltung über Taster an der Frontseite deaktiviert Umschaltung über Taster an der Frontseite aktiviert 4. Nach Auswahl der gewünschten Einstellung betätigen Sie die Taste um diese zu speichern. 29 · G&D DVIMUX2-DL-USB... -
Page 35: Umschaltung Über Tastenkombinationen (De)Aktivieren
3. Betätigen Sie (mehrfach) die Leertaste der Tastatur, um zwischen folgenden Optionen zu wählen: Umschaltung über Tastenkombination deaktiviert Umschaltung über Tastenkombination aktiviert 4. Nach Auswahl der gewünschten Einstellung betätigen Sie die Taste um diese zu speichern. G&D DVIMUX2-DL-USB · 30... -
Page 36: Umschaltung Über Step-Keys (De)Aktivieren
3. Betätigen Sie (mehrfach) die der Tastatur, um zwischen folgenden Leertaste Optionen zu wählen: Verwendung von Step-Keys deaktiviert Verwendung der angezeigten Step-Keys aktiviert [Step-Keys] 4. Nach Auswahl der gewünschten Einstellung betätigen Sie die Taste um diese zu speichern. 31 · G&D DVIMUX2-DL-USB... -
Page 37: Umschaltung Mit Der Maus (De)Aktivieren
Select Channel via Mouse 3. Betätigen Sie (mehrfach) die der Tastatur, um zwischen folgenden Leertaste Optionen zu wählen: Single Multiple 4. Nach Auswahl der gewünschten Einstellung betätigen Sie die Taste um diese zu speichern. G&D DVIMUX2-DL-USB · 32... -
Page 38: Kanalumschaltung Mit Den Tasten F21 Und F22
Tastatur, um zwischen folgenden Optionen zu wählen: Kanalumschaltung mit den Tasten F21 und F22 deaktiviert Kanalumschaltung mit den Tasten F21 und F22 aktiviert 4. Nach Auswahl der gewünschten Einstellung betätigen Sie die Taste um diese zu speichern. 33 · G&D DVIMUX2-DL-USB... -
Page 39: Kanalumschaltung Mit Einer Cortron-Spezialtastatur
Tastatur, um zwischen folgenden Leertaste Optionen zu wählen: Kanalumschaltung mit der Tastenkombination MULTIFUNC+A/B deaktiviert Kanalumschaltung mit der Tastenkombination MULTIFUNC+A/B aktiviert 4. Nach Auswahl der gewünschten Einstellung betätigen Sie die Taste um diese zu speichern. G&D DVIMUX2-DL-USB · 34... -
Page 40: Änderung Der Bitrate Der Service-Buchse
19200 38400 57600 115200 (Standard) 230400 5. Nach Auswahl der gewünschten Einstellung betätigen Sie die Taste um den Dialog zu verlassen. 6. Betätigen Sie die Taste , um die Einstellungen zu speichern. 35 · G&D DVIMUX2-DL-USB... -
Page 41: Änderung Des Standard-Modus Der Service-Buchse
Setup Menu Monitoring Service-Buchse zur Ausgabe der Monitoring-Informationen verwenden 5. Nach Auswahl der gewünschten Einstellung betätigen Sie die Taste um den Dialog zu verlassen. 6. Betätigen Sie die Taste , um die Einstellungen zu speichern. G&D DVIMUX2-DL-USB · 36... -
Page 42: Änderung Der Bitrate Der Rs232-Buchse
19200 38400 57600 115200 (Standard) 230400 5. Nach Auswahl der gewünschten Einstellung betätigen Sie die Taste um den Dialog zu verlassen. 6. Betätigen Sie die Taste , um die Einstellungen zu speichern. 37 · G&D DVIMUX2-DL-USB... -
Page 43: Änderung Des Betriebsmodus Der Rs232-Buchse
Konfiguration Änderung des Betriebsmodus der RS232-Buchse WICHTIG: Bei der Variante DVIMUX2-DL-USB ist der Modus Switch der RS232- Buchse voreingestellt. Eine Änderung ist nicht möglich. Die RS232-Buchse können Sie wahlweise zur Umschaltung des aktiven Kanals über ein serielles Gerät (s. Seite 11) oder für die Ausgabe von Monitoring-Informationen (s. -
Page 44: Auswahl Des Typs Der Usb-Tastatur
Verwendung des Controllers zur Bedienung der am KVM-Switch ange- schlossenen Rechner: EINGABEGERÄT EINSTELLUNG Contour ShuttlePRO v2 Contour SP2 An den KVM-Switch können Sie eine LK463-kompatible LK463-kompatible Tastatur: Tastatur anschließen. Die Anordnung der 108 Tasten solcher Tastaturen entspricht dem OpenVMS-Tastaturlayout. 39 · G&D DVIMUX2-DL-USB... - Page 45 Kanals. 6. Nach Auswahl der gewünschten Einstellung betätigen Sie die Taste um diese zu speichern. WICHTIG: Erfolgt die Umschaltung auf die Einstellung SUN German bzw. SUN US ist abschließend ein Reboot des Sun-Rechners erforderlich. G&D DVIMUX2-DL-USB · 40...
- Page 46 »Solaris Shortcut Keys« des Sun Keyboards Strg+Alt+F2 Wiederholen Strg+Alt+F3 Eigenschaften Strg+Alt+F4 Zurücknehmen Strg+Alt+F5 Vordergrund Strg+Alt+F6 Kopieren Strg+Alt+F7 Öffnen Strg+Alt+F8 Einfügen Strg+Alt+F9 Suchen Strg+Alt+F10 Ausschneiden Strg+Alt+F11 Hilfe Strg+Alt+F12 Still Strg+Alt+NUM+ Lauter Strg+Alt+NUM- Leiser Strg+Alt+NUM* Compose Strg+Alt+Pause Shutdown Pause+A Stop 41 · G&D DVIMUX2-DL-USB...
-
Page 47: Usb 2.0-Datenübertragung (De)Aktivieren
3. Betätigen Sie (mehrfach) die der Tastatur, um eine der folgenden Leertaste Tastaturen auszuwählen: USB 2.0-Datenübertragung aktiviert (Standard) enabled disabled USB 2.0-Datenübertragung deaktiviert 4. Nach Auswahl der gewünschten Einstellung betätigen Sie die Taste um diese zu speichern. G&D DVIMUX2-DL-USB · 42... -
Page 48: Usb-Haltefunktion (Pinning)
3. Betätigen Sie (mehrfach) die der Tastatur, um eine der folgenden Leertaste Tastaturen auszuwählen: USB-Haltefunktion deaktiviert (Standard) disabled USB-Haltefunktion aktiviert enabled 4. Nach Auswahl der gewünschten Einstellung betätigen Sie die Taste um diese zu speichern. 43 · G&D DVIMUX2-DL-USB... -
Page 49: Technische Daten
130mA@240VAC; 220mA@100VAC Gehäuse Material: Aluminium eloxiert Maße (B × H × T): 210 × 44 × 210 mm Gewicht: ca. 1,2 kg Einsatzumgebung Temperatur: +5 bis +45 °C Luftfeuchte: < 80%, nicht kondensierend Konformität CE, RoHs G&D DVIMUX2-DL-USB · 44... - Page 50 Schnittstellen Video: 2 × 2 DVI-I-Buchsen für Rechner Stromversorgung Stromaufnahme: 150mA@240VAC; 290mA@100VAC Leistungsaufnahme Standby: 5,8W@240VAC; 5,1W@100VAC Betrieb: 19,0W@240VAC; 18,0W@100VAC Gehäuse Maße (B × H × T): 210 × 66 × 210 mm Gewicht: ca. 1,4 kg 45 · G&D DVIMUX2-DL-USB...
-
Page 52: About This Manual
© Guntermann & Drunck GmbH 2017. All rights reserved. Version 2.00 – 05/07/2017 Firmware: 1.0.8 Guntermann & Drunck GmbH Obere Leimbach 9 57074 Siegen Germany Phone +49 271 23872-0 +49 271 23872-120 http://www.gdsys.de sales@gdsys.de i · G&D DVIMUX2-DL-USB... - Page 53 Operation of this equipment in a residential area is likely to cause harmful inter- ference in which case the user will be required to correct the interference at his own expense. G&D DVIMUX2-DL-USB · ii...
- Page 54 Table of contents Contents Safety instructions .................... 3 The »DVIMUX2-DL-USB« KVM switch ............4 Package Contents ..................... 4 Installation ....................... 5 Further information ..................9 Start-up ......................10 Status displays ....................10 Switching ......................11 Switching KVM channels ................. 11 Switching via buttons .................
- Page 55 Changing the bitrate of the RS232 port ............37 Changing the operating mode of the RS232 port ......... 38 Selecting the USB keyboard type ..............39 Enabling/Disabling USB 2.0 data transmission .......... 42 USB pinning ....................43 Technical data ....................44 G&D DVIMUX2-DL-USB · 2...
-
Page 56: Safety Instructions
Operate this device with the provided G&D power pack or with the power pack listed in the manual. ! Operate the device only in designated areas. The devices are designed for indoor use. Avoid exposure to extreme cold, heat or humidity. 3 · G&D DVIMUX2-DL-USB... -
Page 57: The »Dvimux2-Dl-Usb« Kvm Switch
The »DVIMUX2-DL-USB« KVM switch The »DVIMUX2-DL-USB« KVM switch The DVIMUX2-DL-USB KVM switch enables you to operate up to two computers via one console. The console is provided with a USB keyboard, a USB mouse and a digital and/or analog monitor. The computers connected to the KVM switch are operated from the installed console. -
Page 58: Installation
The front panel also provides several LEDs (see Status displays on page 10). The back panel of the KVM switch The back panel of the KVM switch provides interfaces to connect the console devices and the computers. The following page contains a detailed description of these inter- faces. 5 · G&D DVIMUX2-DL-USB... -
Page 59: Setting Up The Device
Connect the speakers to this interface for output of audio signals at the active computer. Monitor 1: Plug the monitor’s DVI-I cable to this interface. NOTE: If you purchased the multi-channel variant of the KVM switch, connect the additional monitors to the interface. Monitor 2 G&D DVIMUX2-DL-USB · 6... -
Page 60: Connecting The Computers
If you want to use a microphone or a headset at the console, use one of the audio connection cables (Audio-M/M) to connect this interface to the computer’s microphone input. USB 2.0: Use one of the USB connection cables (USB-AM/BM) to connect one of the computer‘s USB interfaces to this interface. 7 · G&D DVIMUX2-DL-USB... -
Page 61: Connecting The Power Supply
Line Out USB 2.0 Line In Line Out USB 2.0 Figure 4: Interface to connect the power supply Power: Connect the power cable (PowerCable-2 Standard) to a power outlet and the Power socket of the KVM switch. G&D DVIMUX2-DL-USB · 8... -
Page 62: Further Information
If the computer is writing data on the mass storage device at this point in time, this process is going to be cancelled. IMPORTANT: To avoid data loss, use the Safely Remove Hardware function of the applied operating system before switching the channel. 9 · G&D DVIMUX2-DL-USB... -
Page 63: Start-Up
The setup mode of the KVM switch is active. Status The KVM switch is supplied with the necessary voltage. The KVM switch is turned off or is not supplied with the necessary voltage. If necessary, check the proper connection of the power supply cable. G&D DVIMUX2-DL-USB · 10... -
Page 64: Switching
Switching between the channels takes place if the pressed key combi- nation is released. NOTE: If one of these key combinations interferes with a key combination of an installed application program, the key combination of the KVM switch can be adjusted (see page 24). 11 · G&D DVIMUX2-DL-USB... -
Page 65: Switching Via Keys F21 And F22
NUM 1 ... 2 NUM 9 NUM 0 A ... B F1 ... F2 How to use step keys to switch to a certain channel: 1. Press Hotkey+»Back« step key Hotkey+»Forward« step key on the console keyboard. G&D DVIMUX2-DL-USB · 12... -
Page 66: Switching By Mouse
Use the following connection settings for the serial end device to establish a serial connection to the KVM switch. Bits per second: 115.200 (to switch the bitrate, see pages 37) Data bits: Parity: none Stop bits: Flow control: none 13 · G&D DVIMUX2-DL-USB... -
Page 67: Switching Commands
The KVM switch confirms the successful execution of a command and otherwise sends a meassage. Message Meaning switching to channel successful invalid channel number (out of range) channel switching failed invalid command invalid value (out of range) RS232 mode enabled switch mode (RS232) enabled G&D DVIMUX2-DL-USB · 14... -
Page 68: Permanent Switching Of Usb 2.0 Devices
If the hotkey delay is enabled, press and hold the key combination for seven seconds. 2. Press and hold the key. 3. Additionally, press the key NOTE: After disabling the permanent switching of USB 2.0 devices, the devices are switched to the active KVM channel (see page 11). 15 · G&D DVIMUX2-DL-USB... -
Page 69: Monitoring
You can always request monitoring information from the KVM switch by sending the character » «. Issuing extended monitoring information Request extended monitoring information from the KVM switch by sending the character » «. EXAMPLE FOR EXTENDED MONITORING INFORMATION AT RS232 PORT: 2BAAkhV1.00.008(00067)PsEPsEM G&D DVIMUX2-DL-USB · 16... - Page 70 The computer connected to interface »CPU 2« is ready for operation. No computer is connected to interface »CPU 2« or the computer is turned off. Incoming VGA signal detected at interface »CPU 2« No incoming VGA signal detected at interface »CPU 2« 17 · G&D DVIMUX2-DL-USB...
- Page 71 The USB KM emulation for CPU 2has been initialised by USB host. The USB KM emulation for CPU 2has detected the USB host. The USB KM emulation for CPU 2has not detected a USB host. Screen is connected Screen is not connected G&D DVIMUX2-DL-USB · 18...
-
Page 72: Configuration
Changing the standard mode of the Service port Setup Menu Changing the bitrate of the RS232 port 115.200 Changing the operating mode of the RS232 port Switch Selecting the USB keyboard type PC Multimedia Enabling/Disabling USB 2.0 data transmission enabled USB pinning disabled 19 · G&D DVIMUX2-DL-USB... -
Page 73: Operating The Setup Mode
How to perform a setup function: After enabling the setup mode, press one of the setup keys described on the fol- lowing pages. How to end the setup mode without performing a function: Press to end the setup mode. G&D DVIMUX2-DL-USB · 20... -
Page 74: Operating The Setup Menu
(see figure on page 22). NOTE: If the KVM switch is started while the connection is established, the G&D Firmware Update Utility is displayed briefly before the setup menu opens. This special utility is solely used by the support team. 21 · G&D DVIMUX2-DL-USB... - Page 75 (repeatedly). Space A menu item that has a sub-dialogue available can be opened by pressing Enter NOTE: The following pages provide detailed information on how to change a cer- tain function. G&D DVIMUX2-DL-USB · 22...
-
Page 76: Configuration Settings
4. Press the key to save your settings. Depending on your settings, the active hotkey is converted into a double hotkey (or vice versa): Single Hotkey Double Hotkey Ctrl Ctrl+Shift Alt+Shift Alt Gr Alt Gr+Ctrl Win+Ctrl Shift Shift+Win 23 · G&D DVIMUX2-DL-USB... -
Page 77: Changing The Single Hotkey
(repeatedly) to enable a certain hotkey: Ctrl enables Ctrl hotkey enables Alt hotkey enables Alt Gr hotkey Alt Gr enables Win hotkey enables Shift hotkey Shift 4. Press the key to save your settings. G&D DVIMUX2-DL-USB · 24... -
Page 78: Changing The Double Hotkey
enables Ctrl+Shift double hotkey Ctrl+Shift enables Alt+Shift double hotkey Alt+Shift enables Alt Gr+Ctrl double hotkey Alt Gr+Ctrl Win+Ctrl enables Win+Ctrl double hotkey Shift+Win enables Shift+Win double hotkey 5. Press the key to save your settings. 25 · G&D DVIMUX2-DL-USB... -
Page 79: Changing The Select Keys
enables select keys NUM 1 and NUM 2 A ... B enables select keys A and B enables select keys F1 and F2 F1 ... F2 4. Press the key to save your settings. G&D DVIMUX2-DL-USB · 26... -
Page 80: Enabling/Disabling The Hotkey Delay
Arrow Arrow Hotkey Delay 3. Press the key (repeatedly) to enable/disable the hotkey delay: Space enables hotkey delay disables hotkey delay 4. Press the key to save your settings. 27 · G&D DVIMUX2-DL-USB... -
Page 81: Resetting The Defaults
2. Use the Arrow Arrow keys to select the Set System Defaults entry. 3. Press Enter to reset the default settings. 4. Confirm the pop up security query with Enter Pressing the key cancels the function. G&D DVIMUX2-DL-USB · 28... -
Page 82: Auto-Accessing The First Channel
Select Channel via Front Button 3. Press the key (repeatedly) to choose one of the following options: Space disables the switching via front button enables the switching via front button 4. Press the key to save your settings. 29 · G&D DVIMUX2-DL-USB... -
Page 83: (De)Activating The Switching Via Hotkeys
Select Channel via Hotkey entry. 3. Press the key (repeatedly) to choose one of the following options: Space disables the switching via hotkeys enables the switching via hotkeys 4. Press the key to save your settings. G&D DVIMUX2-DL-USB · 30... -
Page 84: (De)Activating The Switching Via Step Keys
Select Channel via Step Key entry. 3. Press the key (repeatedly) to choose between the following options: Space step keys disabled step keys enabled [Step-Keys] 4. Press the key to save your settings. 31 · G&D DVIMUX2-DL-USB... -
Page 85: Enabling/Disabling Switching By Mouse
2. Use the Arrow Arrow keys to select Select Channel via Mouse 3. Press the Space key (repeatedly) to choose between the following options: Single Multiple 4. Press the key to save your settings. G&D DVIMUX2-DL-USB · 32... -
Page 86: Switching Channels Via Keys F21 And F22
(repeatedly) to choose between the following options: disables switching of channels by pressing F21 and F22 enables switching of channels by pressing F21 and F22 4. Press the key to save your settings. 33 · G&D DVIMUX2-DL-USB... -
Page 87: Switching Between Channels Using A Cortron Special Keyboard
(repeatedly) to choose between the following options: Space switching between channels using the key combination MULTIUNC+A/B disabled witching between channels using the key combination enabled MULTIUNC+A/B 4. Press the key to save your settings. G&D DVIMUX2-DL-USB · 34... -
Page 88: Changing The Bitrate Of The Service Port
(repeatedly) to select between the following bitrates: 9600 19200 38400 57600 115200 (default) 230400 5. After having selected your desired settings, press to leave the dialog. 6. Press the key to save your settings. 35 · G&D DVIMUX2-DL-USB... -
Page 89: Changing The Standard Mode Of The Service Port
use the service port to operate the setup menu Setup Menu use the service port to issue monitoring information Monitoring 5. After having selected your desired settings, press to leave the dialog. 6. Press the key to save your settings. G&D DVIMUX2-DL-USB · 36... -
Page 90: Changing The Bitrate Of The Rs232 Port
(repeatedly) to select between the following bitrates: Space 9600 19200 38400 57600 115200 (default) 230400 5. After having selected your desired settings, press to leave the dialog. 6. Press the key to save your settings. 37 · G&D DVIMUX2-DL-USB... -
Page 91: Changing The Operating Mode Of The Rs232 Port
use the RS232 port to switch the active channel using a serial device use the RS232 port to issue monitoring information Monitoring 5. After having selected your desired settings, press to leave the dialog. 6. Press the key to save your settings. G&D DVIMUX2-DL-USB · 38... -
Page 92: Selecting The Usb Keyboard Type
Contour ShuttlePRO v2 Contour SP2 You can connect an LK463 compatible keyboard to the LK463 compatible keyboard: KVM switch. The order of the 108 keys of these keyboards corresponds to the Open- VMS keyboard layout. 39 · G&D DVIMUX2-DL-USB... - Page 93 5. Repeat steps 3 and 4 to change this setting for another channel. 6. Press the key to save your settings. IMPORTANT: Changing to the SUN German SUN US keymode requires a reboot of the Sun computer. G&D DVIMUX2-DL-USB · 40...
- Page 94 »Solaris Shortcut Key« of the Sun keyboard Ctrl+Alt+F2 Again Ctrl+Alt+F3 Props Ctrl+Alt+F4 Undo Ctrl+Alt+F5 Front Ctrl+Alt+F6 Copy Ctrl+Alt+F7 Open Ctrl+Alt+F8 Paste Ctrl+Alt+F9 Find Ctrl+Alt+F10 Ctrl+Alt+F11 Help Ctrl+Alt+F12 Mute Ctrl+Alt+NUM+ Loud Ctrl+Alt+NUM- Quiet Ctrl+Alt+NUM* Compose Ctrl+Alt+Pause Shutdown Pause+A Stop 41 · G&D DVIMUX2-DL-USB...
-
Page 95: Enabling/Disabling Usb 2.0 Data Transmission
3. Press the Space key (repeatedly) to choose between the following key- boards: USB 2.0 data transmission enabled (default) enabled USB 2.0 data transmission disabled disabled 4. Press the key to save your settings. G&D DVIMUX2-DL-USB · 42... -
Page 96: Usb Pinning
Enter 3. Press the Space key (repeatedly) to choose between the following key- boards: disabled USB pinning disabled (default) enabled USB pinning ensabled 4. Press the key to save your settings. 43 · G&D DVIMUX2-DL-USB... -
Page 97: Technical Data
130mA@240VAC; 220mA@100VAC Casing Material: anodised aluminium Dimensions (W × H × D): 210 × 44 × 210 mm Weight: approx. 1,2 kg Operational Temperature: +5 to +45 °C environment Humidity: < 80%, non-condensing Conformity CE, RoHs G&D DVIMUX2-DL-USB · 44... - Page 98 2 × 2 DVI-I jacks for computer Power supply Power input: 150mA@240VAC; 290mA@100VAC Power input Standby: 5,8W@240VAC; 5,1W@100VAC Operation: 19,0@240VAC; 18,0W@100VAC Casing Dimensions (W × H × D): 210 × 66 × 210 mm Weight: approx. 1,4 kg 45 · G&D DVIMUX2-DL-USB...
- Page 100 Das Handbuch wird fortlaufend aktualisiert und im Internet veröffentlicht. The manual is constantly updated and available on our website. http://gdsys.de/A9100100 Guntermann & Drunck GmbH Obere Leimbach 9 57074 Siegen Germany http://www.gdsys.de sales@gdsys.de...
Need help?
Do you have a question about the DVIMUX2-DL-USB and is the answer not in the manual?
Questions and answers