Advertisement
Quick Links
In the box
Note: Memory card and batteries are sold separately.
Quick start guide
Cellular trail
camera
Models:
Mini-LIVE
* Mini-LIVE and Mini-LIVE-4G only
Mini-LIVE-4G
Included for United States, Canada and United Kingdom only
Mini-LIVE-4GV
Components
Mini-LIVE-CV
support.spypoint.com
1-888-779-7646
tech@spypoint.com
v1.4
Mounting
Camera
Quick start
bracket
guide
9
SIM card*
Installation
USB
strap
cable
1
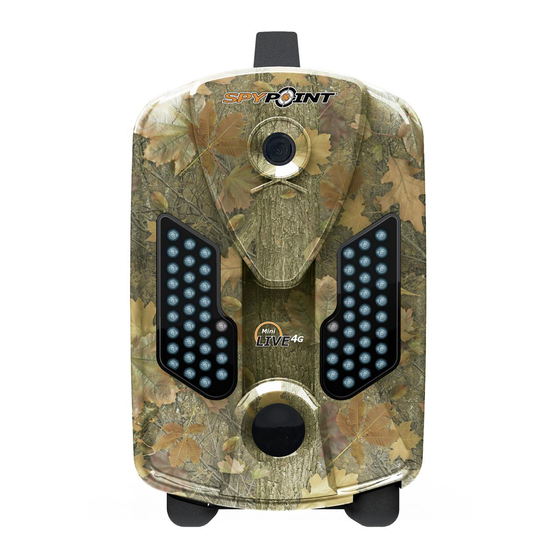
Photo lens
6
2
Invisible LEDs
1
3
Test light
4
Battery case
7
2
Detection lens
5
Mounting bracket
6
8
3
Slot for installation strap
7
4
Tripod mount
8
Cable lock hole
5
9
BUSY LED
10
Viewing screen
11
Getting started
1.
REMOVE CAMERA FROM THE
MOUNTING BRACKET
A. Push the tab to release the camera from
the mounting bracket.
B. Remove the camera.
2.
CHOOSE A POWER SOURCE
10
11
12
13 14
• 12V power source
18
15
16
17
19
In order to get best results and longer battery life, we recommend
Navigation buttons
12
the use of an external 12V source. For easier access to the 12V jack,
13
Microphone
(Mini-LIVE-4G,
remove the camera from the mounting bracket before plugging a 12V
Mini-LIVE-4GV and Mini-LIVE-
cable. Then, the camera can be reinstalled in the mounting bracket.
CV)
Rechargeable AA batteries are not recommended.
Power button
14
12V/Solar panel jack
15
USB port
16
SIM card slot
(Mini-LIVE and
17
Mini-LIVE-4G)
SD card slot
18
Built-in speaker
(Mini-LIVE-4G,
19
Mini-LIVE-4GV and Mini-LIVE-
CV)
3.
INSERT THE MEMORY CARD
A.
B.
4.
INSERT THE SIM CARD
• Lithium battery pack
• 6 alkaline AA
LIT-09/LIT-C-8
batteries
5.
INSTALL THE CAMERA WITH THE SUPPLIED STRAP
Using your fingers, push down on each side of
the battery compartment's tab to open it.
1
The battery compartment adapts to
Recommended installation height: about 3 feet above the ground.
SPYPOINT LIT-09 lithium battery pack or
2
Do not place the camera facing the sun.
6 AA alkaline batteries. Therefore, it is important
to be careful while inserting AA batteries.
Insert an SD/SDHC memory card (up to 32
GB capacity) in the card slot, gold contacts
facing up. The card is inserted correctly
when a click is heard.
Before inserting or removing a memory
card, always turn off the camera to
prevent loss or damage of the photos already
recorded.
(MINI-LIVE AND MINI-LIVE-4G)
A SIM card is required to use cellular
functions. Carefully insert a SIM card in the
card slot, gold contact area facing down.
The card is inserted correctly when a click
is heard.
Before inserting or removing a SIM
card, always turn off the camera.
1. Insérez l'extrémité de la courroie dans la fente
2. Insérez la courroie dans la fente sous le levier
3. Créer une tension sur la courroie en la tirant vers
qui se trouve au dos du mécanisme.
et faites-la ressortir en arrière.
la droite, puis rabattez vers la gauche le levier pour
maintenir la position.
Advertisement

Related Manuals for Spypoint Mini-LIVE


Summary of Contents for Spypoint Mini-LIVE
-
Page 1: Quick Start Guide
The card is inserted correctly when a click Models: strap cable is heard. Mini-LIVE * Mini-LIVE and Mini-LIVE-4G only Mini-LIVE-4G Included for United States, Canada and United Kingdom only Before inserting or removing a SIM card, always turn off the camera. Mini-LIVE-4GV... - Page 2 PERFORM THE STEPS 4 TO 6 DURING THE FINAL E. Set the Transmission mode option (Mini-LIVE only) Settings CONFIGURE THE SETTINGS OF THE 3 OPERATING MODES Power source LIT-09 charger option INSTALLATION OF THE CAMERA. • MySPYPOINT: camera communicates with mySPYPOINT server to update its status or to send photos •...
Need help?
Do you have a question about the Mini-LIVE and is the answer not in the manual?
Questions and answers