
Related Manuals for Spypoint MMS


Summary of Contents for Spypoint MMS
- Page 1 USER GUIDE CEllUlaR tRaIl CaMERa Models: & comparable support.spypoint.com 1-888-779-7646 tech@spypoint.com v1.1...
- Page 2 This manual will guide you through all the features of your device shipped all over the world and the market never stops growing. so that you will get optimal use out of your SPYPOINT product. Our Prosperous and respected, GG Telecom is a company that constantly priority is to provide outstanding customer service.
-
Page 3: Table Of Contents
Table of contents Components ................. 4 Specifications MMS ....................6 Power ................... 7 Memory card, SIM card & Busy lED ..........8 Settings ..................9 Installation & Mounting bracket ..........13 file transfer to a computer ............14 available accessories ..............15 troubleshooting ................16 Warranty &... -
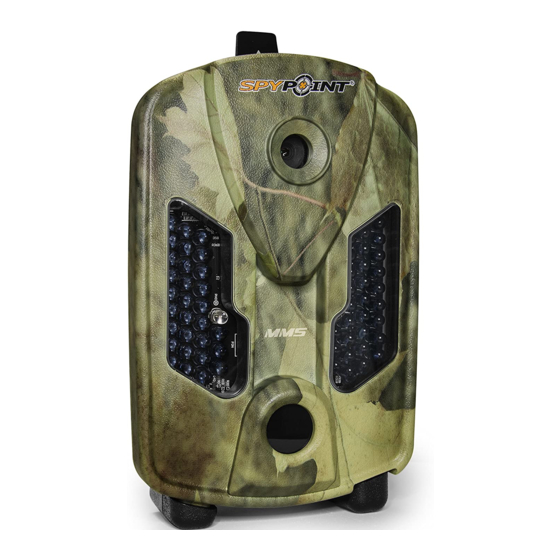
Page 4: Components
Components Photo lens Mounting bracket Cable lock hole 12V/Solar panel jack Invisibles LEDs BUSY LED USB port Slot for installation strap Test light Viewing screen SD card slot Tripod mount Light sensor Navigation buttons MicroSIM card slot Battery case Power button Fresnel lens... - Page 5 Components Photo lens Image sensor and infrared filter. BUSY LED Lights up when TEST mode is activated. Invisible LEDs Night lighting to obtain black and white photos Viewing screen Allows the user to access the main menu and and videos. view photos/videos.
-
Page 6: Specifications Mms
Get a Micro SIM card from a cellular (LIT-09/LIT-C-8) provider supported by the camera. External (12V jack) battery (KIT6V-12V, KIT-12V, Activate the Micro SIM & get a MMS BATT-12V) or 12V adapter (AD-12V) plan. Solar panel Solar panel (SP-12V) combined with re- Recommendations chargeable battery pack (LIT-09/LIT-C-8) Operating temperature (-30 °C to + 50 °C) (-22 °F to +122 °F) -
Page 7: Power
BattERy PaCk SolaR PanEl This SPYPOINT camera can be powered by a re- This camera also offers the possibility to connect a solar panel (SP-12V sold chargeable lithium battery pack LIT-09/LIT-C-8 separately) to maintain the charge of the lithium battery pack (sold sepa- (sold separately). -
Page 8: Memory Card, Sim Card & Busy Led
Many photo Note that the micro SIM card need to contain the nano SIM card in order and video resolutions are noted, see those corresponding to the camera. for it to work. note: This SPYPOINT camera equiped with continuous file recording. -
Page 9: Settings
Settings Use the and buttons to navigate in the interface and modify the selection, Selected photo / total number of photos the OK button to select and the button to return to the previous menu. The play icon indicates that this element is a video StaRt CaMERa The white outline indicates which photo is selected Allows the user to start the camera in either, PHOTO,... - Page 10 Settings TIME LAPSE SETTINGS PHOTO SETTINGS Sets the options of the TIME LAPSE mode. Sets the options of the PHOTO mode. Interval: Recommended settings (30s/1m/3m/5m/15m/30m/1h) The camera can be configured for usage in trails. This situation usually Allows the camera to take photos at regular preset intervals. For example, presents low activity level, fast subjects and a small number of photos is if the option "5m"...
- Page 11 Allows the user to set the date Phone #: time: Allows the user to add up to 4 other phone numbers that will receive the pictures by MMS Allows the user to set the time first sync time: Sentitivity: Allows the user to choose at what time of the day the camera...
- Page 12 Settings Schedule night mode: illumination modes comparison* (Night modes) Allows the user to set the operation period of the camera for each day Allows the user to set the best option for photos. of the week. The start and stop time programmed hours are the hours during which the camera is in action and records photos or videos.
-
Page 13: Installation & Mounting Bracket
Installation & Mounting bracket MoUntInG BRaCkEt InStallatIon To remove the camera from the mounting bracket: Recommended installation height: The camera should be installed at the same height as the animal’s mid-body. 1. Push the tab to release the camera from the mounting bracket. 2. -
Page 14: File Transfer To A Computer
File transfer to a computer To transfer photos/videos to a computer: • Turn OFF the camera. • Remove the SD card from the camera. • Insert the SD card into the computer slot, or use a memory card adaptor. • The computer will detect the card and install the driver automatically. for a Mac for a PC Click the Finder icon in the Dock. -
Page 15: Available Accessories
Fits all SPY- a 12V battery to a camera. bears or other animals. Fits all 62 can rotate 360° and tilt approx +/- POINT cameras. LED SPYPOINT cameras. 90°. Also available in black. ULTRA HIGH SPEED/ULTRA HAUTE VITESSE 16 GB Memory Card Carte Mémoire... -
Page 16: Troubleshooting
Troubleshooting Problem Possible solutions Impossible to • Verify if there are batteries in the camera. No person/animal • Sunrise or sunset can trigger the sensor. Camera turn on the • Verify if the batteries are correctly installed. on photos must be re-orientated. camera •... - Page 17 Error: SIM locked Your SIM card is locked. • Turn off the camera and turn it on again • USA: Contact the SPYPOINT customer service. • International: Contact your cellular provider to have the SIM card unlocked.
-
Page 18: Warranty & Repair
WaRRanty InStRUCtIonS foR REPaIR SERVICE This SPYPOINT product designed by GG Telecom, is covered by a one (1) GG Telecom will repair the product or replace it at its discretion with an year warranty on material and workmanship starting from the original date equivalent product without charge if covered by the warranty described of purchase. -
Page 19: Regulation
Regulations fCC REGUlatIonS FCC Part l5 This equipment has been tested and found to comply with the limits for a Class B digital device, pursuant to Part 15 of the Federal Communications Commission (FCC) rules. These limits are designed to provide reasonable protection against harmful interference in a residential installation.
Need help?
Do you have a question about the MMS and is the answer not in the manual?
Questions and answers