NewLine TRUTOUCH VN series User Manual
Hide thumbs
Also See for TRUTOUCH VN series:
- Service manual (20 pages) ,
- Service manual (19 pages) ,
- User manual (74 pages)
Table of Contents
Advertisement
Advertisement
Table of Contents

Related Manuals for NewLine TRUTOUCH VN series


Summary of Contents for NewLine TRUTOUCH VN series
- Page 1 Interactive Display Quick Start Manual -V2.0-...
- Page 2 Welcome to the world of TRUTOUCH. Thank you for choosing the TRUTOUCH VN Series interactive display. Please use this document to get the most out of your display. This device complies with part 15 of the FCC Rules. Operation is subject to the following two conditions:(1) This device may not cause harmful interference, and (2) this device must accept any interference received, including interference that may cause undesired operation.
-
Page 3: Symbol Conventions
Symbol Conventions Symbols are used in this document to indicate operations that need particular attention. The symbols are defined as follows: Provides additional information to supplement operation in the main NOTE text. Indicates a potentially hazardous situation that, if not avoided, could result in equipment damage, data loss, performance deterioration, or CAUTION unanticipated results. -
Page 4: Safety Instruction
The voltage/current of the rear power output port is 5V/2A (maximum). Purchase the power code/AC adapter according to customer needs. The port can be used for Newline Android box X10D. Please do not connect any products with different power requirement. Otherwise, it may cause damage to products or fire. - Page 5 WARNING Do not put items on the top of the product. Do not put items, such as a container for liquid (a vase, flowerpot, cosmetics ● or liquid medicine) on the top of the product. If any water or liquid is spilled on the product, a short circuit may occur and ●...
- Page 6 CAUTION Do not install the product on a carpet or cloth. ● Do not use a cloth such as table cloth to cover the product. ● Keep away from the product when you use a radio. The product complies with the international EMI standard to pervent radio interference.
-
Page 7: Parts And Functions
Parts and Functions Parts Front View ◆ Rear View ◆ ● TT-8618VN/TT-7518VN... - Page 8 ● TT-6518VN Speakers Front Buttons Button Cover Front Ports Pen/Eraser Tray Pen/Eraser Tray Cover Power Switch...
-
Page 9: Front Ports
The voltage/current of the rear power output port is 5V/2A (maximum). Purchase the power code/AC adapter according to customer needs. The port can be used for Newline Android box X10D. Please do not connect any products with different power requirement. Otherwise it may... - Page 10 ● TT-8618VN/TT-7518VN ● TT-6518VN Tip: You are advised to connect X10D to HDMI rear 2.
-
Page 11: Front Buttons
Front Buttons ◆ Buttons Operations Functions Power on/off Indicator LED status: Power Short press Steady on red: shut down mode ● Steady on green: working state ● Home Short press Go to the home page Return Short press Return to the last menu/Exit Menu Short press Open the menu... - Page 12 Buttons Functions Buttons Functions Switch Source to HDMI Power On/Off. Rear 3. Switch Source to Internal Toggle Display Backlight Mode (including Auto, Standard and EnergyStar mode). Mute Audio. Switch Source to DisplayPort. Freeze the Current Screen, Click Again to Exit Freeze Open the Display Menu or Function.
-
Page 13: Safety Precautions
Installation Guide Safety Precautions Installation Environment ◆ Keep Temperature Below 120 F ( ≤50 c) Keep Away From Do Not Use Combustible Vapors Outdoors (gas leaks, etc.) Installation Direction ◆ Hang the Product Horizontally No Vertical Installation Do Not Lay Flat... -
Page 14: Installation Precautions
Installation Precautions Weight Loading ◆ Weight of the product: 87.1 lb/39.5 kg (TT-6518VN), 111.3 lb/50.5 kg (TT-7518VN), 143.3 lb/65 kg (TT-8618VN) When using a mobile stand, please ensure the weight of the product is less than the ● loading capacity of the mobile stand. When using the wall-mount bracket, please ensure the wall can support the weight of ●... -
Page 15: Installation
Installation The dimensions of the 4 bracket mounting holes on the back panel are VESA MIS- Fcompliant (TT-8618VN or TT-7518VN: 800 x 400 mm/31.50 x 15.75 in; TT-6518VN: 600 x 400 mm/23.62 x 15.75 in). Please use metric M8 screws with length of 10 to 15 mm (0.40 to 0.59 in) to secure the touch display with the mounting system. -
Page 16: Installing The Internal Pc (Optional)
Installing the Internal PC (Optional) CAUTION The internal PC does not support hot plugging. Therefore, you must insert or remove it when the display is powered off. Otherwise, the display or internal PC may be damaged. The internal PC is not configured by default. You will need to purchase the internal PC separately. -
Page 17: Turning On/Off
Turning On/Off Power On Step 1: Plug the power supply into the power outlet fully and plug the power connector into the side of the product. Ensure the power is in the range of 100V to 240V with frequency at 50 Hz/60 Hz ± 5%. The power current must be grounded. Note The power outlet should be installed near the equipment and should be easily accessible. -
Page 18: Power Off
Power Off Step 1: Power off the screen in the following situations: If there is no whiteboard data or screenshot(s), press the power button on the ● front panel or the power button on the remote control to power off the display. Go to Step 4. - Page 19 Step 3: In the Warning dialog box, click Cancel. You can save files if desired. After files are saved, return to Step 2. Click Confirm, and the power indicator will turn to red. Step 4: If you are not going to use the product for an extended period of time, we recommend you to switch the power switch to “Off”.
-
Page 20: Operating The Touch Screen
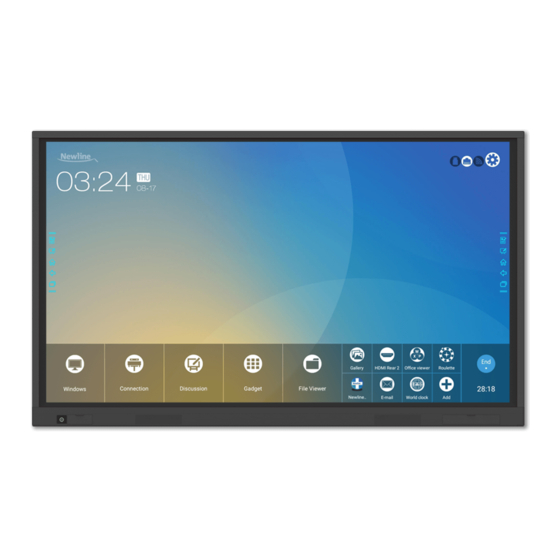
Operating the Touch Screen Start Screen When the product is turned on, the product will show the start screen page. As shown in the following figure. Home Touch the screen to start a meeting, and the product will go to the Home page. As shown in the following figure. -
Page 21: Main Toolbar
The first time you turn the display on, only the cable connections appear in Connection. ● Wireless connection can be added in the Newline Extension setting. In this case, the name and icon of the HDMI Rear on the left cabled channel change as the Trucast application is enabled or an external product is connected. - Page 22 Side Toolbar ◆ The Annotation Mode/Discussion Mode/Home/Return/Windows icons are displayed by default in the toolbar at two sides of the screen. The bottom side toolbar can be customized as your choice (The default icon is Windows). You may also hide the side tool bar at the setting or move it up and down, shrink or expand by gestures.
- Page 23 Status Bar and Settings ◆ The upper right corner of the home page displays three working status icons (including USB flash memory(s), Ethernet, and Wi-Fi), and system setting shortcut. Icon Functions If USB flash memory(s) is connected to the USB port, this icon will be turned If the product is connected to Ethernet, the icon will be turned on.
-
Page 24: Add Shortcuts To Home Page
Step 2: Click the icons on top to switch the list between Windows programs, external signal sources, and pre-installed gadgets. Click to view the Windows programs that the Newline Assistant uploads to the ● Smart system. For details,see "Add Quick Start Windows Programs in Smart System". - Page 25 Introduction ◆ Newline Assistant is the tool used as a bridge between smart system and Internal PC (OPS). It helps to add windows software to smart system as well as to protect USB data/ camera USB data/camera when switching between sources.
-
Page 26: Add Quick Start Windows Programs In Smart System
Add Quick Start Windows Programs in Smart System ◆ Step 1: In Windows, run the Newline Assistant program and drag the software icons or folder shortcut icons that you want to add from desktop or menu to the Newline Assistant window. The applications added or deleted through the Windows system will be automatically updated to the smart system until the upload progress reaches 100%. - Page 27 Note By default, the Newline Assistant application is added on the tab. Step 4: Tap the icon and add the shortcut at the Home page. Tap again and remove it. Step 5: Return to Home page. Click the icon of an added Windows application to start...
-
Page 28: Quick Setting Menu
Quick Setting Menu Using two fingers to swipe up from the bottom of the screen, the quick setting menu will then show up, as shown in the following figure. Icon Functions Drag the slider to adjust the brightness. Drag the slider to adjust the volume. Click the icon to mute/unmute. -
Page 29: More Information
More Information For more information Please visit our website (www.newline-interactive.com) for detailed instruction manual. Contact Us for Support Please email us at support@newline-interactive.com. Our company is devoted to product innovation and technology enhancement. Therefore, we may change product specs and...
Need help?
Do you have a question about the TRUTOUCH VN series and is the answer not in the manual?
Questions and answers