
Related Manuals for Infineon Technologies TLE9879QX


Summary of Contents for Infineon Technologies TLE9879QX
-
Page 1: Evaluation Board
Evaluation Board Getting Started Toolchain Setup for: TLE9879_EVALKIT • TLE9869_EVALKIT • TLE987x_EVALB_JLINK • TLE986x_EVALB_JLINK •... - Page 2 Content Evaluation Kit Overview Product Information links Toolchain installation Getting Started 2017-02-10 Copyright © Infineon Technologies AG 2017. All rights reserved.
- Page 3 Content Evaluation Kit Overview Product Information links Toolchain installation Getting Started 2017-02-10 Copyright © Infineon Technologies AG 2017. All rights reserved.
-
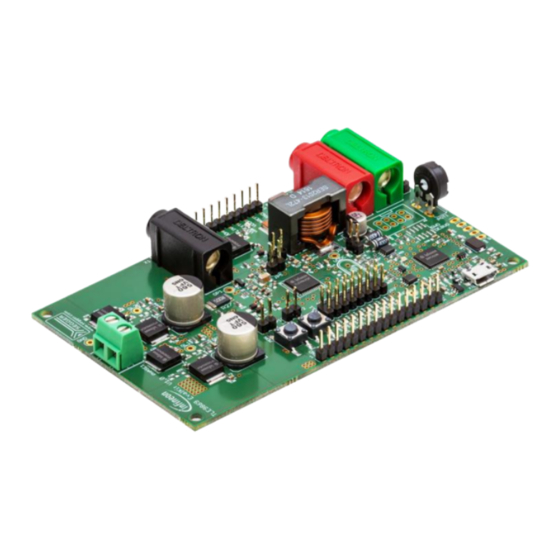
Page 4: Evaluation Board Overview
TLE987x – 3-Phase Board with Socket 3-Phase N-MOS Bridge › integrated LIN › external LIN Trx › RS232 › Debug LEDs › Debug Connector SWD › J_link Lite debugger › TLE987x EVALB_JLINK :SP001253680 2017-02-10 Copyright © Infineon Technologies AG 2017. All rights reserved. - Page 5 TLE986x – 2-Phase Board with Socket H-Bridge N-MOS Bridge › integrated LIN › external LIN Trx › RS232 › Debug LEDs › Debug Connector SWD › J_link Lite debugger › TLE986x EVALB_JLINK :SP001253678 2017-02-10 Copyright © Infineon Technologies AG 2017. All rights reserved.
- Page 6 Content Evaluation Kit Overview Product Information links Toolchain installation Getting Started 2017-02-10 Copyright © Infineon Technologies AG 2017. All rights reserved.
- Page 7 Datasheets and User Manuals for TLE986xQX_Documents all TLE987x and TLE986x ICs Development Tools: Kits and www.infineon.com/ePower_Tools Boards for all Infineon ® Embedded Power ICs Information about TLE9879_Evalkit TLE9879_Evalkit Information about TLE986X EVALB_JLINK TLE9869_Evalkit 2017-02-10 Copyright © Infineon Technologies AG 2017. All rights reserved.
- Page 8 Content Evaluation Kit Overview Product Information links Toolchain installation Getting Started 2017-02-10 Copyright © Infineon Technologies AG 2017. All rights reserved.
-
Page 9: Main Window
Toolchain installation: 1/4 Keil µVision5 › › Code Editor & Online Download from: https://www.keil.com/download Debugger › Evaluation version can handle up to 32K Text Main Window Pack Installer 2017-02-10 Copyright © Infineon Technologies AG 2017. All rights reserved. - Page 10 Toolchain installation: 2/4 Infineon IFXConfigWizard Configuration of chip modules Infineon homepage: IFXConfigWizard Text Latest version: V1.8.6 Device description for TLE986x/TLE987x included TLE984x supported with Keil µVision 5 2017-02-10 Copyright © Infineon Technologies AG 2017. All rights reserved.
- Page 11 Toolchain installation: 3/4 Segger JLINK-Lite driver: › Driver for “on-board” or “stand-alone” debugger › Install driver from: https://www.segger.com/jlink- software.html › TLE984x support is included from V5.10 upwards 2017-02-10 Copyright © Infineon Technologies AG 2017. All rights reserved.
- Page 12 TLE98xx ICs › Device support for flashing/erasing › SFR description for register debugging › Device description for IFX Config Wizard (XML) › Includes SDK (Software Development Kit) › Code examples included 2017-02-10 Copyright © Infineon Technologies AG 2017. All rights reserved.
- Page 13 Content Evaluation Kit Overview Product Information links Toolchain installation Getting Started 2017-02-10 Copyright © Infineon Technologies AG 2017. All rights reserved.
- Page 14 Creating new project with Infineon SDK › Writing code Infineon Config Wizard › Initialize modules › Timers › GPIOs J-Link Configuration › Connect device › Program flash › Using debug window 2017-02-10 Copyright © Infineon Technologies AG 2017. All rights reserved.
- Page 15 Getting Started: Infineon ePower SDK Keil µVision5 Template 1) Create new Project › Open Keil mdk › Go to ->Project ->new µVision Project › Name project: (“TIMER2_BLINK”) › Select Device › i.e. TLE9879QXA40 2017-02-10 Copyright © Infineon Technologies AG 2017. All rights reserved.
- Page 16 2) Configuration of Run-Time Environment › Expand: “Device” › Check: ConfigWizard › Check: Startup › “Sel.” window background is orange › Press: “Resolve” › “Sel.” window background is now green › Continue with “OK” 2017-02-10 Copyright © Infineon Technologies AG 2017. All rights reserved.
- Page 17 “Source Group 1” › Choose “Add New Item to Group ‘Source Group 1’” › Choose “User Code Template” › Expand “Device” › Choose: “Startup with full SDK” › Continue with “Add” 2017-02-10 Copyright © Infineon Technologies AG 2017. All rights reserved.
- Page 18 Getting Started: Infineon ePower SDK Keil µVision5 Template 4) Compile Project › Compile Project: › Press “Build” Button or press “F7” › Project “Build Output” window shows 0 Error(s) , 0 Warning(s) 2017-02-10 Copyright © Infineon Technologies AG 2017. All rights reserved.
- Page 19 5) Adding Modules from Run-Time Environment › Go to: › Enter “Device-> SDK” Section › Select “PORT” › Select “Timer2x” › Press “OK” › Add Code to main.c: › Include Libraries › Initialize Modules 2017-02-10 Copyright © Infineon Technologies AG 2017. All rights reserved.
- Page 20 “Tools->IFXConfigWizard” › IFXConfigWizard will open in a separate window › orange status bar indicates an new project › status bar indicates unsaved changes › white status bar indicates saved project 2017-02-10 Copyright © Infineon Technologies AG 2017. All rights reserved.
- Page 21 Select: “PORT” Chapter › Expand “Port0” › Expand “PIN2” › Configure pin to “Output” mode › Save with “File” -> “Save Project” › After Saving, status bar turns white color 2017-02-10 Copyright © Infineon Technologies AG 2017. All rights reserved.
- Page 22 Go to: “Reload / Capture Register” › Enter “1000” µs › Go to: “Interrupt Enable” › Enable Overflow Interrupt › Type “task_1ms” in “Call Back” line › Press “Enter” and “Save” 2017-02-10 Copyright © Infineon Technologies AG 2017. All rights reserved.
- Page 23 › Go to Keil MDK › Start Timer2 before the “while(1)” loop › Write function definiton of Interrupt call back › Use API function “PORT_ChangePin()” › “Save” and “Build” project 2017-02-10 Copyright © Infineon Technologies AG 2017. All rights reserved.
- Page 24 Supply board via banana jacks (VBAT, GND) › Debug LED lights up 9) Connect Debugger › Go to › Choose: › Debug->use: J-Link › Go to “Settings” › SWD connection established when “IDCODE” is visible 2017-02-10 Copyright © Infineon Technologies AG 2017. All rights reserved.
- Page 25 › “Flash Load finished” is shown in “Build Output” window › Press: “Reset” button on Evaluation Board › LED on Port “P0.2” will light up › Port toggle every 1ms 2017-02-10 Copyright © Infineon Technologies AG 2017. All rights reserved.
- Page 26 “breakpoint” › Hit “Run” or press “F5” to start execution › Code execution stops at breakpoint › In this example: › Every time “Run” is pressed: “P0.2” toggles 2017-02-10 Copyright © Infineon Technologies AG 2017. All rights reserved.
- Page 27 Getting Started: Infineon ePower SDK Example Code Infineon Example Code available in “Pack Installer” 2017-02-10 Copyright © Infineon Technologies AG 2017. All rights reserved.
Need help?
Do you have a question about the TLE9879QX and is the answer not in the manual?
Questions and answers