
Related Manuals for VIAIR 10005


Summary of Contents for VIAIR 10005
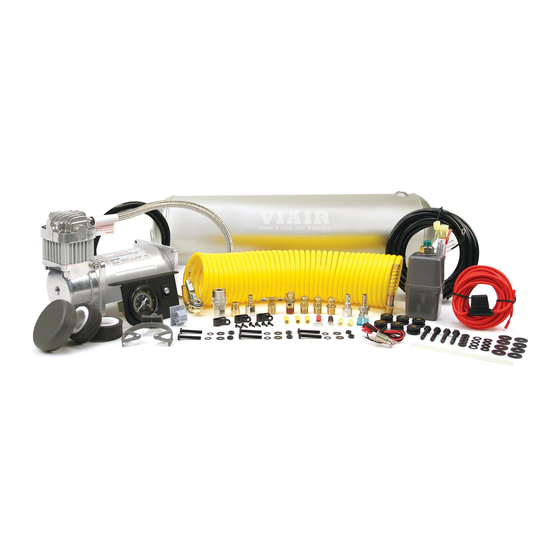
- Page 2 Please follow these instructions to install your new system. OBA Components: 1 - 2.5 Gallon, 6 port VIAIR Air Tank 1 - 400C model VIAIR compressor 1 - 36-ft. Length of 1/4” Air Line (for accessory and gauge installation) 1 - 35-foot Coil Hose with clip-on chuck (Please check to make sure that you have four labeled packages in your Onboard Air System kit.
- Page 3 HEAVY DUTY ONBOARD AIR SYSTEM PARTS PACKAGES REDUCER Package #1 – Air Tank Installation: Package #3 – Pressure Switch & Reducer: BB. Pressure Switch with Relay - (110 PSI on, 145 PSI off) (1pc) CC. Reducer (1/8” NPT F to 1/4” NPT M) (1pc) A.
- Page 4 HEAVY DUTY ONBOARD AIR SYSTEM P/N 10005, 10007 2.5 GALLON AIR TANK & PLUMBING (USE CONTENTS OF PARTS PACKAGE #1) OBA PLUMBING DIAGRAM Typical System Configuration, May Vary Depending on Installation Your 2.5 Gallon air tank comes with six 1/4” NPT port openings to allow installation in many configurations on your vehicle.
- Page 5 HEAVY DUTY ONBOARD AIR SYSTEM 400C AIR COMPRESSOR INSTALLATION (USE CONTENTS OF PARTS PACKAGE #2) Your Heavy Duty Onboard Air System comes complete with a 400C, 33% duty cycle compressor. Please follow the installation instructions that follow to enjoy the best use of your onboard air system. CAUTION - To reduce risk of electrical shock or electrocution: - Do not disassemble the compressor.
- Page 6 (USE CONTENTS OF PARTS PACKAGE #3) Your VIAIR Heavy Duty Onboard Air System comes complete with a pressure switch with relay that will turn on the compressor at 110 PSI, and off at 145 PSI. The pressure switch has a 1/8" NPT inlet at the bottom that will need to have the supplied 1/8"...
- Page 7 (USE CONTENTS OF PARTS PACKAGE #4) Your VIAIR Heavy Duty Onboard Air System comes complete with a Dash Panel Gauge to monitor the pressure of your 2.5 gallon VIAIR air tank. Additionally, the Dash Panel Gauge has an ON/OFF switch preinstalled that will allow you to turn the system off by cutting power to the pressure switch with relay that you have already installed.
- Page 8 HEAVY DUTY ONBOARD AIR SYSTEM DASH PANEL GAUGE INSTALLATION (CONT’D) 5. Wiring the Dash Panel Gauge for Illumination: There are two wires, one red and one black connected to the light bulb of the gauge. Connect the red wire to a suitable fused dash panel circuit. Use the quick splice connector included in the kit for wire connections. The black wire is to be connected to a suitable ground source.
-
Page 9: Troubleshooting Guide
HEAVY DUTY ONBOARD AIR SYSTEM TROUBLESHOOTING GUIDE: PROBLEM POSSIBLE CAUSE(S) CORRECTIVE ACTION Tank pressure drops when 1. Loose drain cock 1. Tighten drain cock compressor (s) shut off 2. Check valve leaking 2. Replace check valve or 3. Loose connections compressor(s) 3. - Page 10 HEAVY DUTY ONBOARD AIR SYSTEM COMPRESSOR APPLICATION GUIDE To ensure that you get the highest level of satisfaction from your compressor performance, refer to information below: VIAIR COMPRESSOR REFERENCE CHART COMPRESSOR SERIES DUTY CYCLE MAX. WORKING PRESSURE (100 PSI @ 72°F)
- Page 11 HEAVY DUTY ONBOARD AIR SYSTEM AMERICAN WIRE GAUGE GUIDE 12-VOLT: Length of wire from battery to compressor (in feet) Amp Draw P/N 10003, 10005, 10007, 20001 COMPRESSOR WIRING DIAGRAM (with combination pressure switch / relay) Wiring Diagram: (Figure 2) To Lamp Circuit...
-
Page 12: Limited Warranty
Manual. It is the user’s responsibility to determine whether there have been any such updates or amendments. Neither VIAIR nor any of its directors, officers, employees or agents shall be liable in contract, tort or in any other manner whatsoever to any person for any loss, damage, injury, liability, cost or expense of any nature, including without limitation incidental, special, direct or consequential damages arising out of or in connection with the use of the Manual.
Need help?
Do you have a question about the 10005 and is the answer not in the manual?
Questions and answers