Advertisement
Quick Links
MODEL NUMBER:
10008 – SUPER DUTY ONBOARD AIR SYSTEM
IMPORTANT:
It is essential that you and any other operator of this product read and understand the
contents of this manual before installing and using this product.
SAVE THIS MANUAL FOR FUTURE REFERENCE
USER MANUAL
P/N 10008 – SUPER DUTY ONBOARD AIR SYSTEM:
Contained in one package, you'll find everything you'll need to install a high
performance, dual compressor powered onboard air source for your vehicle. Please
follow these instructions to install your new system.
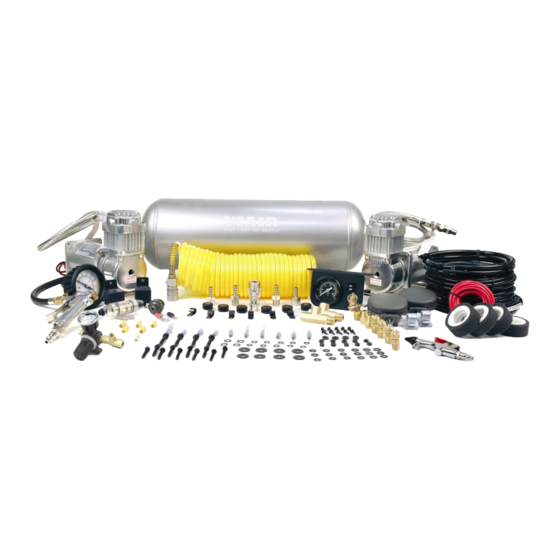
System Components:
Advertisement

Related Manuals for VIAIR 10008


Summary of Contents for VIAIR 10008
- Page 1 SAVE THIS MANUAL FOR FUTURE REFERENCE USER MANUAL P/N 10008 – SUPER DUTY ONBOARD AIR SYSTEM: Contained in one package, you’ll find everything you’ll need to install a high performance, dual compressor powered onboard air source for your vehicle. Please follow these instructions to install your new system.
- Page 2 1 2.0 Gallon, six ¼-inch port VIAIR Air Tank 2 325C model VIAIR compressors 1 35-ft. Length of ¼” air line (for accessory and gauge installation) (Check that you have seven labeled packages in your Onboard Air System kit. Each package contains the parts needed for specific areas of onboard air installation.)
- Page 3 Package #2 – Compressor Installation 8 13/64” Nuts, shorter bolts, washers & locking washers (mounting hardware) 2 Remote Mount Air Filter Assemblies 2 Sets of remote mount air filter fittings for compressor to air filter connection 2 2-packs of replacement air filters 2 Leader Hose Bracket Clip 2 Air line for remote mounting air filter 2 4-inch Strip of Continuous Grommet Material...
- Page 4 1 35-foot Coil Hose with 1/4” NPT Quick Connect Coupler and 1/4” NPT stud Package #6 – Accessories 2 1/8” BSP Female to 1/4” NPT Male Adaptors (for air locker use) 1 T-fitting (1/4” male x 1/4” female x 1/4” female NPT female 1 1/4”...
- Page 5 CAUTION! DO NOT PRESSURIZE YOUR TANK UNTIL YOU HAVE INSTALLED ALL NECESSARY PORT FITTINGS AND ACCESSORIES. • Apply sealant to threads of fittings prior to assembly and tighten each part with a wrench. • Do not over tighten if your port fittings are made from brass, since brass threads can be stripped.
- Page 6 Mounting the Tank: We have included 6 pieces of rubber bushings in your tank mounting hardware. You have the option of using two layers of rubber bushings on one of your tank lags to slightly tilt tank toward the drain cock port to improve drainage properties. Use the provided longer bolts, and corresponding washers, lock washers and nuts to mount the tank to a suitable chassis or other place on your vehicle.
- Page 7 • For compressors with remote filter mounting, select compressor mounting locations where air line can be routed from compressors’ air inlet to remote inlet air filter. Make sure that the remote inlet air filter is located in a dry location, away from water.
- Page 8 10. To remove hose from the hose bracket, simply press down on the hose clamp release tab to release bracket clamp. 11. Tie compressor’s positive lead wires together and connect to pressure switch lead. 12. Make sure that your compressor setup is properly fused. Dual 325C compressors pull approximately 40 maximum amps of power.
- Page 9 Pressure Switch Installation Your VIAIR Onboard Air System comes complete with a heavy duty pressure switch that will turn on the compressor at 110 PSI, and off at 145 PSI. The pressure switch has a 1/8”...
- Page 10 Dash Panel Gauge Installation Your VIAIR Onboard Air System comes complete with a Dash Panel Gauge to monitor the pressure of your 2.0 gallon VIAIR air tank. Additionally, the Dash Panel Gauge has an ON/OFF switch preinstalled that will allow you to turn the system off by cutting power to the pressure switch with relay that you have already installed.
- Page 11 malfunction and void warranty. The Dash Panel Gauge included in this kit is rated for 150 PSI. Do not pressurize gauge over 150 PSI. 1. Select Mounting Location for Dash Panel Gauge Select a mounting location with a rigid mounting surface such as the bottom edge of the dashboard.
- Page 12 There are two wires, one red and one black connected to the light bulb of the gauge. Connect the red wire to a suitable fused dash panel circuit. Use the quick splice connector included in the kit for wire connections. The black wire is to be connected to a suitable ground source.
- Page 13 Use a 1/4” NPT compression fitting on the “IN” side of the regulator receiving air from the air tank. On the “OUT” side of the regulator, you may install a 1/4” NPT quick connect coupler, or use another 1/4” NPT compression fitting to route the air line to the source of the item that pressure is being regulated to.
- Page 14 has a normally closed lever style air chuck at the end of its rubber hose. After connection to an air source such as an air tank via the quick connect stud preinstalled in the unit, air may be discharged from the gun by simply squeezing the inflation trigger.
-
Page 15: Installation Diagram
P/N 10008 – SUPER DUTY ONBOARD AIR SYSTEM INSTALLATION DIAGRAM... -
Page 16: Limited Warranty
LIMITED WARRANTY... - Page 17 PROOF OF PURCHASE TO THE RETAILER FROM WHOM IT WAS PURCHASED. RETURNS SHOULD BE MADE WITHIN THE TIME PERIOD AND CONDITIONS OF THE RETAILER’S POLICY FOR EXCHANGES. IF YOU ARE UNABLE TO CONTACT YOUR DEALER, CONTACT VIAIR DIRECTLY FOR REPAIRS OR REPLACEMENT AT OUR OPTION.
Need help?
Do you have a question about the 10008 and is the answer not in the manual?
Questions and answers