
Related Manuals for urmet domus egeo


Summary of Contents for urmet domus egeo
- Page 1 Mod. 4099 DS 4099-001E LBT 8438 VIDEO-CITOTELEFONO VIDEODOOR-FEATURE PHONE MANUALE DI INSTALLAZIONE E USO USER AND INSTALLATION MANUAL...
- Page 2 FUNZIONAMENTO IN ASSENZA DI ALIMENTAZIONE DA RETE EGEO è progettato per funzionare in presenza della alimentazione di rete fornita dal suo adapter. In assenza della alimentazione la funzionalità sarà limitata alle sole telefonate in uscita e in entrata, senza l’ausilio della rubrica e delle funzioni legate al display che resterà...
-
Page 3: Table Of Contents
INDICE DESCRIZIONE E CARATTERISTICHE DEL VIDEOCITOTELEFONO EGEO ..........4 Principali caratteristiche ..........................5 USO DEL TERMINALE COME TELEFONO ....................6 Rispondere alle chiamate ........................... 6 Effettuare chiamate (Modalità normale) ...................... 7 Effettuare chiamate (Modalità pre selezione) ..................... 8 Ripetizione dell’ultimo numero selezionato ....................8 Funzione Mute ............................ -
Page 4: Descrizione E Caratteristiche Del Videocitotelefono Egeo
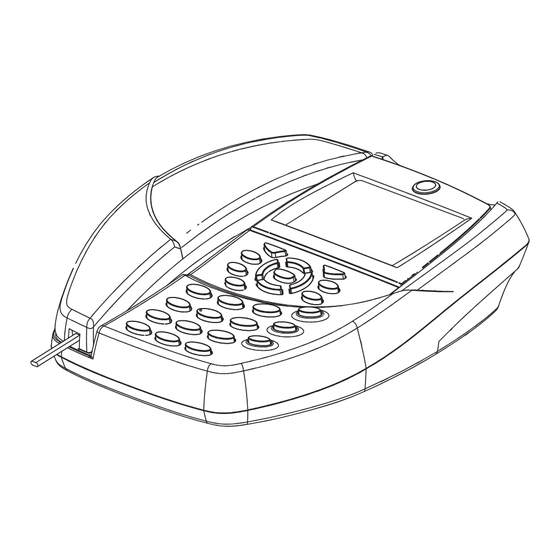
DESCRIZIONE E CARATTERISTICHE DEL VIDEO-CITOTELEFONO EGEO Il telefono Egeo si compone dei seguenti elementi: Descrizione Descrizione Display Tastiera di selezione Tasti funzione Altoparlante vivavoce Tasto vivavoce Leva gancio Tasto RP Microtelefono Tasto R Descrizione Descrizione Auricolare Connettore RJ45 per patch cord... -
Page 5: Principali Caratteristiche
Gruppo tasti funzione Funzione Funzione durante navigazione Esclusione microfono Apertura porta Tasto programmabile SW2 Destra Accensione luci scale Tasto (attuatore 2) Tasto Menu Giù Chiamata a centralino Tasto (attuatore 1) Switch telefono-videocitofono Autoinserzione Sinistra Tasto programmabile SW1 Esci Disponibili solo per sistemi 2Voice PRINCIPALI CARATTERISTICHE •... -
Page 6: Uso Del Terminale Come Telefono
Il video-citotelefono può essere installato come terminale in diversi tipi di impianto: in derivazione da PABX, in impianti videocitofonici 2Voice e Coax (4+n) o connesso direttamente alla linea telefonica. Il funzionamento del video-citotelefono è pressoché lo stesso per ogni tipo di installazione anche se la funzione di alcuni tasti si differezia a seconda del tipo di impianto. -
Page 7: Effettuare Chiamate (Modalità Normale)
Per terminare la conversazione premere nuovamente il tasto o riagganciare il microtelefono. In caso di non risposta ad una o più chiamate sul display verrà visualizzato il numero delle chiamate telefoniche ricevute alle quali non vi è stata risposta. Premendo il tasto (OK) verranno visualizzati i numeri ed i nomi dei chiamanti (i nomi verranno visualizzati se i contatti sono presenti in rubrica, in caso contrario verranno visualizzati i soli numeri telefonici) così... -
Page 8: Effettuare Chiamate (Modalità Pre Selezione)
EFFETTUARE CHIAMATE (MODALITÀ PRE SELEZIONE) • Comporre il numero • Sollevare il microtelefono o premere il tasto vivavoce per inviare il numero digitato In questa modalità è possibile, in caso di errore, correggere il numero digitato cancellando, una per volta, le cifre composte tramite il tasto (X). -
Page 9: Passaggio Da Chiamata Videocitofonica A Chiamata Telefonica
Per passare dalla conversazione telefonica a quella videocitofonica ci sono due modalità: • Premere il tasto (la chiamata telefonica verrà messa in attesa dal PABX con una musica). • Riporre e rialzare il microtelefono (premere due volte il tasto se si è in modalità vivavoce). §... -
Page 10: Funzionamento Attuatori Supplementari (Con Sistemi Urmet)
FUNZIONAMENTO ATTUATORI SUPPLEMENTARI (con sistemi Urmet) Il video-citotelefono fornisce la possibilità di comandare due attuatori supplementari azionabili in qualsiasi momento premendo semplicemente i tasti § Per maggiori dettagli sugli attuatori vedere gli schemi e le relative note riportate in questo libretto. IMPOSTAZIONI AUDIO/VIDEO DURANTE... -
Page 11: Menu Rubrica Telefonica (99 Nomi)
MENU RUBRICA TELEFONICA (99 NOMI) CHIAMARE UN CONTATTO DALLA RUBRICA TELEFONICA Permette di chiamare un numero telefonico precedentemente memorizzato nella rubrica telefonica Ogni voce è costituita da un nome (30 caratteri) e un numero (31 cifre) • Premere il tasto MENU •... -
Page 12: Modifi Care Un Contatto In Rubrica Telefonica
§ Con i tasti si scorre il cursore lungo il nome/numero, con il tasto # si cancella il carattere che precede il cursore, con il tasto si inserisce lo spazio e con il tasto RP si inserisce una pausa. § Ricordarsi di memorizzare il prefi... -
Page 13: Eliminare Un Contatto Dalla Rubrica Telefonica
§ Con i tasti si scorre il cursore lungo il nome/numero, con il tasto # si cancella il carattere che precede il cursore, premendo il tasto si inserisce uno spazio e con il tasto RP si inserisce una pausa. Inserimento nome Pressione Tasto una volta... -
Page 14: Menu Lista Chiamate
inserite. Tra i contatti visualizzati selezionare quello desiderato mediante i tasti ( • Premere il tasto (OK) per confermare la selezione Scegliere l’opzione Elimina mediante i tasti ( • ) e premere il tasto (OK) • Premere il tasto (OK) per confermare la cancellazione del contatto, premere il tasto (X) per annullare e tornare al menu Rubrica Telefonica oppure tenere premuto il tasto (X) per annullare e tornare allo stato di riposo. -
Page 15: Ultime 20 Chiamate Effettuate
oppure tenere premuto il tasto (X) per annullare e tornare allo stato di riposo. Le chiamate contrassegnate con l’icona indicano le chiamate ricevute alle quali c’è stata risposta, mentre le chiamate contrassegnate con l’icona indicano le chiamate ricevute ma senza risposta. Una volta entrati nel menu “opzioni chiamate ricevute”... -
Page 16: Utilizzo Negli Impianti
• Aggiungi in rubrica: il numero selezionato in precedenza dall’elenco comparirà automaticamente nel campo numero (vedi “aggiungere un contatto alla rubrica telefonica”), bisognerà quindi aggiungere solo il nome del contatto che si vuole aggiungere. • Elimina: il numero verrà cancellato dalla lista delle chiamate effettuate UTILIZZO NEGLI IMPIANTI Il video-citotelefono può... - Page 17 Impianto Tasto PABX Linea telefonica 4 + N COAX Interfaccia 2 Voice In programmazione: In programmazione: In programmazione: In programmazione: conferma conferma conferma conferma A riposo: A riposo: A riposo: A riposo: OK / nessuna azione nessuna azione nessuna azione nessuna azione In conversazione: In conversazione:...
-
Page 18: Menu Impostazioni
MENU IMPOSTAZIONI IMPOSTAZIONI AUDIO VOLUME VIVAVOCE Permette di regolare le impostazioni standard del volume dell’altoparlante per le conversazioni in vivavoce • Premere il tasto MENU • Selezionare Impostazioni mediante i tasti ( ) e premere il tasto (OK) Selezionare Impostazioni Audio mediante i tasti ( •... -
Page 19: Volume Microtelefono (In Conversazione)
Selezionare Volume Microtelefono mediante i tasti ( • • Utilizzare i tasti ( ) per impostare il livello di volume del microtelefono desiderato • Premere il tasto (OK) per confermare e memorizzare il livello, premere il tasto (X) per annullare e tornare al menu Impostazioni oppure tenere premuto il tasto (X) per annullare e tornare allo stato di riposo. -
Page 20: Impostazioni Video
Per la regolazione del volume di ascolto sono disponibili 8 livelli; il videocitofono viene venduto con la regolazione posta sul livello 4. IMPOSTAZIONI VIDEO COLORE, LUMINOSITÀ, E CONTRASTO Permette di scegliere le impostazioni video provenienti dalla telecamera • Premere il tasto MENU •... -
Page 21: Soneria
Selezionare Impostazioni mediante i tasti ( • e premere il tasto (OK) Selezionare Luminosità Display e premere il tasto (OK) • • Utilizzare i tasti ( ) per selezionare i settaggi desiderati • Premere il tasto (OK) per confermare, premere il tasto (X) per annullare e tornare al menu Impostazioni oppure tenere premuto il tasto (X) per annullare e tornare allo stato di riposo. -
Page 22: Cambio Lingua
CAMBIO LINGUA Permette di cambiare la lingua del menù • Premere il tasto MENU Selezionare Impostazioni mediante i tasti ( • ) e premere il tasto (OK) Selezionare Cambio Lingua mediante i tasti ( • ) e premere il tasto (OK) •... -
Page 23: Codice Pabx
Anche in assenza di alimentazione per massimo 2 giorni la data e l’ora resteranno in memoria. CODICE PABX Permette di inserire il codice del prefi sso (normalmente 0) nel caso il dispositivo sia collegato sotto un PABX • Premere il tasto MENU Selezionare Impostazioni mediante i tasti ( •... -
Page 24: Menu Tasti Programmabili
MENU TASTI PROGRAMMABILI TASTI PROGRAMMABILI (SW1 E SW2) Permette di impostare i tasti SW1 e SW2 per attuare in modo rapido una funzione a scelta altrimenti richiamabile tramite il menù. • Premere il tasto MENU Selezionare Tasti programmabili mediante i tasti ( •... -
Page 25: Menu Versione Software
MENU VERSIONE SOFTWARE VERSIONI SOFTWARE Permette di visualizzare la versione software caricata nel dispositivo • Premere il tasto MENU • Selezionare Versioni Software e premere il tasto (OK) • Premere il tasto (X) oppure il tasto (OK) per tornare al menù principale §... -
Page 26: Possibilita' Di Connessione
4099/55 COAX (Non Urmet) PABX Generico INSTALLAZIONE DEL VIDEO-CITOTELEFONO IN IMPIANTO COAX (4+N) Interfaccia telefonica Sch. 1332/40 Linea telefonica Trasformatore Alimentazione Sch. 9000/230 230V~ Convertitore Dalla colonna Sch. 4099/55 videocitofonica 7 + coax coax (4+n) RJ11 RJ45 Video-citotelefono Egeo DS4099-001E... -
Page 27: Installazione Del Video-Citotelefono In Impianto 2Voice Con Pabx
INSTALLAZIONE DEL VIDEO-CITOTELEFONO IN IMPIANTO 2VOICE CON PABX Centralino PABX Agorà Alimentazione 230V~ Convertitore Sch.4099/55 Linee telefoniche 2 + coax Interfaccia telefonica Sch. 1083/67 Dalla colonna videocitofonica 2Voice RJ11 RJ45 Alimentazione 230V~ Video-citotelefono Egeo DS4099-001E... -
Page 28: Installazione Del Video-Citotelefono In Impianti Coax (4+N) Con Pabx
Il funzionamento degli attuatori supplementari dipende dal tipo di sistema sul quale viene installato il video-citotelefono EGEO. Nel caso si utilizzi il dispositivo con una interfaccia videocitofonica coax (4+N) del PABX bisogna utilizzare gli attuatori ATT2-3 per 1372/312 ATT1-2 per 1362/624 presenti sulla scheda citofonica del PABX. -
Page 29: Installazione Di 3 Video-Citotelefoni In Impianti Coax (4+N) Con Pabx - Chiamata Citofonica Separata
INSTALLAZIONE DI 3 VIDEO-CITOTELEFONI IN IMPIANTO COAX (4+N) CON PABX Chiamata citofonica separata. Centralino PABX Agorà Alimentazione 230V~ Linee telefoniche Dalla colonna 9 + coax videocitofonica Convertitori Sch.4099/55 RJ11 RJ11 RJ11 RJ45 RJ45 RJ45 Video-citotelefono Video-citotelefono Video-citotelefono Egeo Egeo Egeo DS4099-001E... -
Page 30: Collegamento Del Video-Citotelefono Alla Linea Urbana E A 1 Telecamera Di Controllo
COLLEGAMENTO DEL VIDEO-CITOTELEFONO ALLA LINEA URBANA E A 1 TELECAMERA DI CONTROLLO Linea telefonica Convertitore Sch.4099/55 2+coax Alimentatore a spina Sch. 1092/801 RJ11 RJ45 Video-citotelefono Egeo DS4099-001E... -
Page 31: Collegamento Del Video-Citotelefono Alla Linea Urbana E Amassimo 4 Telecamere Di Controllo
Convertitore Sch.4099/55 2+coax RJ11 RJ45 Alimentatore a spina Sch.1092/801 Video-citotelefono Egeo Pulsante per visione ciclica delle telecamere CARATTERISTICHE TECNICHE Dimensioni: ........................202 x 205 x 69 mm Peso: ............................... 750 g Alimentazione: ......................Adapter 230Vca/12Vcc Selezione: .............................. DTMF Installazione: ......................... Appoggio tavolo... -
Page 32: Menu In Assenza Di Conversazione
MENU IN ASSENZA DI CONVERSAZIONE CHIAMA AGGIUNGI RUBRICA MODIFICA ELIMINA TELEFONICA CERCA RICHIAMA RICEVUTE LISTA CHIAMATE AGGIUNGI IN RUBRICA EFFETTUATE ELIMINA VOLUME VIVAVOCE IMPOSTAZIONI AUDIO VOLUME MICROTELEFONO VOLUME SUONERIA COLORE IMPOSTAZIONI VIDEO LUMINOSITA’ CONTRASTO LUMINOSITA’ DISPLAY SONERIA 1 1 - SONERIA TELEFONO ………………... -
Page 33: Menu Durante Conversazione
MENU DURANTE CONVERSAZIONE IMPOSTAZIONI VOLUME VIVAVOCE AUDIO VOLUME MICROTELEFONO COLORE IMPOSTAZIONI VIDEO LUMINOSITA’ CONTRASTO DS4099-001E... -
Page 34: Packing Contents
OPERATION WHEN MAINS POWER SUPPLY IS INTERRUPTED EGEO has been designed to operate from mains current supplied by its adapter. In the absence of a mains supply, functionality will be limited to outgoing and incoming phone calls only, that is without the auxiliary features of the phonebook and functions using the display, that in this case will remain switched off. - Page 35 TABLE OF CONTENTS EGEO VIDEO-INTERCOM DESCRIPTION AND FEATURES ................ 36 Main features ..............................37 USING TERMINAL AS A TELEPHONE ......................38 Answering the calls ............................38 Dialling calls (normal mode) ........................39 Dialling calls (pre-dialling mode) ....................... 40 Redialling the last selected number ......................40 Mute function............................
-
Page 36: Egeo Video-Intercom Description And Features
EGEO VIDEO-INTERCOM DESCRIPTION AND FEATURES Egeo telephone is composed by the following elements: Description Description Display Dialling keypad Function buttons Hands-free loudspeaker Hands-free button Switch hook RP button Handset R button Description Description Earphone RJ45 connector for patch cord Microphone... -
Page 37: Main Features
Function buttons detail Function Function during menu navigation Microphone mute Door opening Programmable button SW2 Stairs lights Right button (actuator 2) Menu button Call to switchboard Down button (actuator 1) Switch between telephone and video door phone Auto-on Left Programmable button SW1 Quit Available only for 2Voice systems MAIN FEATURES... -
Page 38: Using Terminal As A Telephone
The video combiphone can be installed as terminal in different types of system: connected to a PABX derived line, in 2Voice and Coax (4+n) video door phone systems or directly connected to the telephone line. The video combiphone operates almost in the same way in each system type, but the function of some buttons is different according to the system type. -
Page 39: Dialling Calls (Normal Mode)
To end the conversation press again the button or hang the handset up. If one or more phone calls are not answered, the number of the unanswered calls received is shown on the display. By pressing the button (OK), the display will show caller numbers and names (names are displayed if contacts are present in the directory, otherwise only telephone numbers will be displayed), as shown in the paragraph concerning received calls. -
Page 40: Dialling Calls (Pre-Dialling Mode)
DIALLING CALLS (PRE-DIALLING MODE) • Enter the number • Pick the handset up or press the hands-free button to dial the entered number In this mode, in case of an error during dialling, the dialled number can be modifi ed by deleting the digits one by one with the button (X). -
Page 41: Switching From Video Door Phone Call To Telephone Call
Two modes are available for switching from telephone to video door phone conversation: • Press the key (the telephone call will be put on hold by the PABX with some music). • Put down the micro-telephone and pick it up again (press the key twice if in hands-free mode). -
Page 42: Operation Of Additional Actuators
OPERATION OF ADDITIONAL ACTUATORS (for Urmet systems) The video-intercom provides the possibility of controlling two additional actuators that can be activated at any moment by simply pressing the keys. § For further details on actuators, see the fi gures and related notes given in this booklet. AUDIO/VIDEO SETTINGS WHILE IMAGES ARE DISPLAYED The conversation volume and image brightness, contrast and colour for the conversation in course •... -
Page 43: Adding A Contact To The Telephone Directory
after each character entered, only the contact names starting with the entered letters will be displayed. Among the displayed contacts, select the desired one with the buttons ( • To dial the contact number should be: – Pick the handset up –... -
Page 44: Changing A Contact In The Telephone Directory
§ Using the keys, scroll through the names/numbers with the cursor. The # key can be used to cancel the character immediately preceding the cursor. The * key inserts a space while the RP key inserts a pause. § Remember to store the line activation prefi x (normally 0) if connected as a derivative under a PABX. CHANGING A CONTACT IN THE TELEPHONE DIRECTORY It allows to change a contact in the telephone directory •... -
Page 45: Deleting A Contact From The Telephone Directory
Name entry Press Once Twice Once times times times times times times times times times > 2 sec recycle recycle recycle recycle recycle recycle recycle recycle recycle recycle space recycle delete recycle Number entry Press Once Once > 2 sec space delete Pause... -
Page 46: Calls List Menu
after each character entered, only the contact names starting with the entered letters will be displayed. Among the displayed contacts, select the desired one with the buttons ( • Press the button (OK) to confi rm the selection. • Select the contact to be deleted and press the button (OK) Select the option Delete with the buttons ( •... -
Page 47: Last 20 Calls Made
• Select one of the available options (recall, add to the the directory, delete) with the buttons ( ) and press the button (OK), press the button (X) to cancel and go back to the menu Received calls or keep the button (X) pressed to cancel and go back to standby mode. -
Page 48: Use In Systems
disabled). • Save to phone book: the previously selected number will automatically be displayed in the number fi eld (see “add a contact to the phone-book”); only the contact name must be added. • Delete this number: the number will be deleted from the list of dialled calls. USE IN SYSTEMS The video combiphone can be installed as terminal in different types of system: connected to a PABX derived line, in 2Voice and Coax (4+n) video door phone systems or directly connected to the telephone... - Page 49 System Button PABX Telephone line 4 + N COAX 2 Voice interface During During During During programming: programming: programming: programming: confi rm confi rm confi rm confi rm In standby: In standby: In standby: In standby: OK / no action no action no action no action...
-
Page 50: Settings Menu
SETTINGS MENU AUDIO SETTINGS HANDS-FREE VOLUME It allows to adjust default settings of loudspeaker volume for hands-free conversations • Press the button MENU • Select Settings with the buttons ( ) and press the button (OK) • Select Audio settings with the buttons ( ) and press the button (OK) Select Speaker volume with the buttons ( •... -
Page 51: Handset Volume (During Conversation)
• Use the buttons ( ) to set the desired handset volume level • Press the button (OK) to confi rm and save the level, press the button (X) to cancel and go back to the menu Settings or keep the button (X) pressed to cancel and go back to standby mode. HANDSET VOLUME (DURING CONVERSATION) It allows to adjust handset earphone volume for the conversation in progress •... -
Page 52: Video Settings
8 levels are available to adjust the hearing volume; the video combiphone is confi gured by default with level 4. VIDEO SETTINGS COLOUR, BRIGHTNESS AND CONTRAST It allows to select video settings • Press the button MENU • Select Settings with the buttons ( ) and press the button (OK) •... -
Page 53: Lcd Brightness
LCD BRIGHTNESS The brightness of the display can be set • Press the MENU key Select Settings using the ( • ) keys and press the (OK) key Select Display Brightness and press the (OK) key • • Use the ( ) keys to choose the settings desired •... -
Page 54: Language Change
LANGUAGE CHANGE It allows to change the language of the menu • Press the button MENU Select Settings with the buttons ( • ) and press the button (OK) Select Change language with the buttons ( • ) and press the button (OK) •... -
Page 55: Pabx Code
Even in the absence of a power supply lasting for up to 2 days, the date and time will be retained in memory. PABX CODE The prefi x code (normally 0) can be inserted when the device is connected under a PABX •... -
Page 56: Programmable Buttons Menu
MENU TYPE IMPORTANT ! It is necessary to set the type of system used as fi rst confi guration at fi rst Egeo installation. That is necessary to ensure proper functionality of the phone in relation to the system in which it is installed. -
Page 57: Software Version Menu
SOFTWARE VERSION MENU SOFTWARE VERSION It allows to display the software version loaded on the device • Press the button MENU • Select Software version and press the button (OK) • Press the button (X) or the button (OK) to go back to the main menu §... -
Page 58: Possible Connections
COAX (Not Urmet) 4099/55 PABX Generic VIDEO COMBIPHONE INSTALLATION IN (4+N) COAX Telephone interface Ref. 1332/40 Telephone line Transformer Power supply Ref. 9000/230 230V~ From the Converter coax (4+n) Ref. 4099/55 video-intercom 7 + coax column RJ11 RJ45 Egeo Video-intercom DS4099-001E... -
Page 59: Installation Of Video-Intercom On 2Voice System
INSTALLATION OF VIDEO-INTERCOM ON 2VOICE SYSTEM PABX Agora switchboard Power supply 230V~ Converter Ref. 4099/55 Telephone lines 2 + coax Telephone interface Ref. 1083/67 From 2Voice video-intercom column RJ11 RJ45 Power supply 230V~ Egeo Video-intercom DS4099-001E... -
Page 60: Installation Of Video-Intercom In Systems With Pabx
Operation of the additional actuators depends on the type of system on which the EGEO video- intercom is installed. If the device is used with a PABX coax (4+N) video-intercom interface, the ATT2-3 actuators must be used for the 1372/312, and ATT1-2 for the 1362/624 present on the PABX intercom card. -
Page 61: Installation Of 3 Video-Intercoms On A Pabx System Separate Intercom Call
INSTALLATION OF 3 VIDEO-INTERCOMS ON A PABX SYSTEM Separate intercom call. PABX Agora switchboard Power supply 230V~ Telephone lines From video-intercom 9 + coax column Converters Ref. 4099/55 RJ11 RJ11 RJ11 RJ45 RJ45 RJ45 Egeo Egeo Egeo Video-intercom Video-intercom Video-intercom DS4099-001E... -
Page 62: Video-Intercom Connection To Urban Line And To 1 Surveillance Camera
VIDEO-INTERCOM CONNECTION TO URBAN LINE AND TO 1 SURVEILLANCE CAMERA Telephone line Converter Ref. 4099/55 2+coax AC Adapter Ref. 1092/801 RJ11 RJ45 Egeo Video-intercom DS4099-001E... -
Page 63: Video-Intercom Connection To Urban Line And Max. 4 Surveillance Cameras
2+coax 2+coax Converter 2+coax Ref. 4099/55 RJ11 AC Adapter RJ45 Ref. 1092/801 Egeo Video-intercom Camera cyclic display button TECHNICAL CHARACTERISTICS Dimensions ........................202 x 205 x 69 mm Weight ..............................750 g Power supply ......................Adapter 230Vac/12Vdc Dialling ..............................DTMF Installation: ..........................Table mounting... -
Page 64: Menu With No Conversation
MENU WITH NO CONVERSATION CALL PHONE BOOK EDIT DELETE DIAL YHIS NUMBER RECEIVED CALLS CALL LIST SAVE TO PHONE BOOK DIALLED CALLS DELETE THIS NUMBER SPEAKER VOLUME AUDIO SETTINGS HANDSET VOLUME RINGER VOLUME COLOUR VIDEO SETTINGS BRIGHTNESS CONTRAST LCD BRIGHTNESS TONE 1 RINGER 1 - TELEPHONE... -
Page 65: Menu During Conversation
MENU DURING CONVERSATION AUDIO SPEAKER VOLUME SETTINGS HANDSET VOLUME COLOUR VIDEO BRIGHTNESS SETTINGS CONTRAST DS4099-001E... -
Page 66: Schemi Di Collegamento
NOTE LEGATE AGLI SCHEMI NOTES RELATING TO DIAGRAMS TF.015 - TABELLA CONDUTTORI TELEFONICI TF.015 - TELEPHONE WIRES TABLE Distanza m Distance m Impiegare cavo telefonico Use twisted telephone Conduttori Wires 1 coppia (2 x 0,6 mm cable (2 x 0.6 mm - Posare i cavi a un'adeguata distan- - Lay the wires at a suitable distan- za dalle linee di potenza (maggiore... - Page 67 VX.040 - MINIMUM WIRE VX.040 - SEZIONI MINIME DEI CONDUTTORI CROSS-SECTION AREAS Distanza Distance Conduttori normali Normal Wires Conduttori R1,R2,+TC, Wires RD e RT. R1,R2,+TC, RD and RT Se non presenti nello schema, prevede- re due conduttori per lʼilluminazione If not present in diagram, plan 2 conductors for entrance panel name dei cartellini della pulsantiera.
- Page 68 Collegamento dell’interfaccia telefonica in derivazione alla colonna montante videocitofonica con cavo coax. Nota: per la visione si utilizza 1 video-citotelefono Mod. Egeo. Connection of telephone interface to an extension of coax video door phone riser. Note: One Mod. Egeo video door-feature phone is used for vision. SV 104-0319B DS4099-001E...
- Page 69 2Voice. Nota: per la visione si utilizza 1 video-citotelefono Mod. Egeo. Connection of telephone switchboard Ref. 1372/312 in derivation to video-intercom riser column of 2Voice system. Note: One Mod. Egeo video door-feature phone is used for vision. SV 124-1104B DS4099-001E...
- Page 70 Nota: per la visione si utilizza 1 video-citotelefono Mod. Egeo. Connection of telephone switchboard Ref. 1372/312 in derivation to video-intercom riser column with coax cable. Note: One Mod. Egeo video door-feature phone is used for vision. SV 104-0321B DS4099-001E...
- Page 71 Nota: per la visione si utilizza 1 video-citotelefono Mod. Egeo. Connection of telephone switchboard Ref. 1362/624 in derivation to video-intercom riser column with coax cable. Note: One Mod. Egeo video door-feature phone is used for vision. SV 104-0322B DS4099-001E...
- Page 72 Collegamento in entra-esci del cavo coax sui convertitori video. Connection of telephone switchboard Ref. 1372/312 in derivation to video-intercom riser column with coax cable. Note: 3 Mod. Egeo video door-feature phones are used for vision. In-out connection of coax cable on video converters. SV 104-0320B...
- Page 73 Collegamento di una telecamera ad 1 video-citotelefono Egeo. Connection of a camera to 1 Egeo video-intercom. SV 104-0323A DS4099-001E...
- Page 74 Collegamento di 4 telecamere ad 1 video-citotelefono Mod. Egeo. Possibilità di autoinserzione e visione delle telecamere mediante selettore ciclico. Connection of 4 cameras to 1 Egeo model video-intercom. Possibility of auto-activation and viewing cameras through cyclical selector. SV 104-0324A DS4099-001E...
- Page 75 LEGENDA A - Sch./Ref. 4099/45 Telephone switchboard (PABX) 3/12 Video-citotelefono Equip. 1/4 Ref. 1372/312 Videodoor-feature phone - Expansion card Ref. 1372/2 1 urban line - Expansion card Ref. 1372/3 1 derivative B - Alimentatore a corredo - Interface card Ref. 1372/56 4+n intercom Adapter included Q - Presa telefonica C - Linea~...
- Page 76 DS 4099-001E LBT 8438 URMET S.p.A. Area tecnica 10154 TORINO (ITALY) servizio clienti +39 011.23.39.810 VIA BOLOGNA 188/C http://www.urmet.com Telef. +39 011.24.00.000 (RIC. AUT.) e-mail: info@urmet.com +39 011.24.00.300 - 323 Fabbricato da Urmet Electronics Limited (azienda del gruppo Urmet) - Made in P.R.C. Manufactured by Urmet Electronics Limited (an Urmet group company) - Made in P.R.C.
Need help?
Do you have a question about the egeo and is the answer not in the manual?
Questions and answers