urmet domus 2VOICE ELEKTA Installation, Programming And Use Instruction Manual
Calling module 50 hz / 60 hz
Hide thumbs
Also See for 2VOICE ELEKTA:
- Installation and programming (72 pages) ,
- User booklet (44 pages) ,
- Installation, programming and use instruction manual (38 pages)
Table of Contents
Advertisement
Available languages
Available languages
Quick Links
Mod.
1083
DS 1083-046A
LBT 8955
MODULO DI CHIAMATA 2VOICE ELEKTA ED ELEKTA STEEL
2VOICE ELEKTA AND ELEKTA STEEL CALLING MODULE
Sch./Ref. 1083/15 - 1083/16 (50 Hz)
1083/25 - 1083/27 (60 Hz)
LIBRETTO DI INSTALLAZIONE, PROGRAMMAZIONE ED USO
INSTALLATION, PROGRAMMING AND USE INSTRUCTION MANUAL
(Manuals in French, Spanish and German can be downloaded from www.urmet.com)
(La documentation en langue française, espagnole et allemande peut être téléchargée sur le site www.urmet.com)
(La documentación en francés, español y alemán se puede descargar en el sitio www.urmet.com)
(Die Dokumentation in französischer, spanischer und deutscher Sprache kann von der Website
www.urmet.com heruntergeladen werden)
Advertisement
Chapters
Table of Contents

Related Manuals for urmet domus 2VOICE ELEKTA


Summary of Contents for urmet domus 2VOICE ELEKTA
- Page 1 Mod. 1083 DS 1083-046A LBT 8955 MODULO DI CHIAMATA 2VOICE ELEKTA ED ELEKTA STEEL 2VOICE ELEKTA AND ELEKTA STEEL CALLING MODULE Sch./Ref. 1083/15 - 1083/16 (50 Hz) 1083/25 - 1083/27 (60 Hz) LIBRETTO DI INSTALLAZIONE, PROGRAMMAZIONE ED USO INSTALLATION, PROGRAMMING AND USE INSTRUCTION MANUAL (Manuals in French, Spanish and German can be downloaded from www.urmet.com)
-
Page 2: Table Of Contents
ITALIANO SEZIONE INSTALLATORE ........................... 4 PRESTAZIONI ............................4 INSTALLAZIONE MODULO DI CHIAMATA ELEKTA (1083/15 e 1083/25) ..........4 INSTALLAZIONE MODULO DI CHIAMATA ELEKTA STEEL (1083/16 e 1083/27)......... 5 COLLEGAMENTI ELETTRICI ......................... 6 4.1. Descrizione morsetti ........................7 REGOLAZIONE VOLUME ........................7 DESCRIZIONE DEL MODULO DI CHIAMATA .................. - Page 3 8.6. Chiavi ( ) ............................29 8.6.1. Nuovo ..........................30 8.6.2. Cancella .......................... 30 8.6.3. Cancella tutto ......................... 31 8.7. Reset ............................31 PROGRAMMAZIONE VIA BLUETOOTH ....................32 10. CARATTERISTICHE TECNICHE......................32 10.A. Legenda ............................32 10.B. Dichiarazione di conformità alla Direttiva 1999/5/CE ..............32 SEZIONE UTENTE ............................
-
Page 4: Sezione Installatore
SEZIONE INSTALLATORE PRESTAZIONI I moduli di chiamata mod. Elekta ed Elekta Steel sono stati realizzati per installazioni ad incasso in ambienti esterni. Le prestazioni dei moduli di chiamata nel sistema a due fi li 2Voice sono le seguenti: • Possono chiamare tutti i potenziali utenti dell’impianto (128 appartamenti per 32 colonne, pari a 4096 appartamenti max) tramite digitazione del codice fi... -
Page 5: Installazione Modulo Di Chiamata Elekta Steel (1083/16 E 1083/27)
• Eseguire i collegamenti elettrici (vedi apposito paragrafo). • Fissare il modulo di chiamata alla scatola da incasso con le viti in dotazione. Completare il modulo di chiamata con la cornice di fi nitura, che viene fi ssata tramite due viti con impronta Torx®. INSTALLAZIONE MODULO DI CHIAMATA ELEKTA STEEL (1083/16 e 1083/27) •... -
Page 6: Collegamenti Elettrici
del 11/02/2005, nel Decreto 2006-555 del 17/05/2006 e successive modifi che del 1/08/2006, del 26/02/2007 e del 21/03/2007). A L T Viti speciali antifurto (Impronta Torx®) Viti M4 x 20 COLLEGAMENTI ELETTRICI Per la realizzazione dei cablaggi, per le distanze massime realizzabili e per gli schemi elettrici di riferimento fare riferimento alle informazioni contenute nel manuale di sistema. -
Page 7: Descrizione Morsetti
4.1. DESCRIZIONE MORSETTI ILA + - CT PA SP S+ S- LINE C NC NO Positivo azionamento elettroserratura pedonale con scarica capacitiva Negativo azionamento elettroserratura pedonale con scarica capacitiva LINE Linea bus a 2 fi li entrante LINE Elettroserratura a relè (NO – contatti normalmente aperti) (per passo carraio) Uscita ausiliaria a relè... -
Page 8: Descrizione Del Modulo Di Chiamata
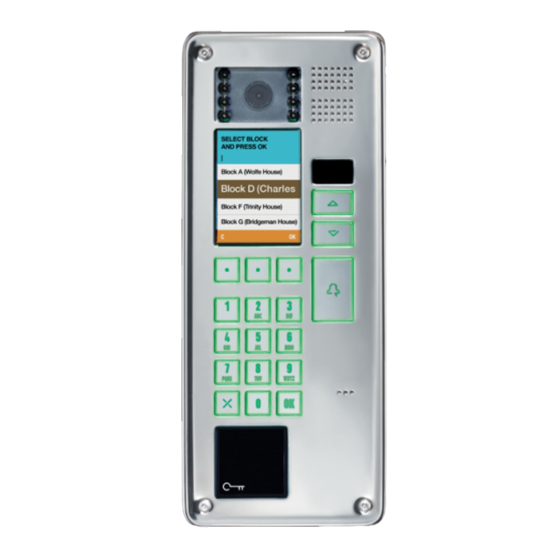
DESCRIZIONE DEL MODULO DI CHIAMATA Lettore chiavi transponder (solo nei modelli 1083/15 e 1083/16) Tastiera Tasti contestuali che si confi gurano dinamicamente. L’icona sopra il tasto identifi ca la funzione disponibile. Display a colori 320 x 240 pixel Telecamera con illuminazione a LED Altoparlante Sensore IR di presenza Tasti di scorrimento... -
Page 9: Programmazione
PROGRAMMAZIONE 7.1 STRUTTURA MENU LINGUA CONFIGURAZIONE NOMI GUI (*) SEMPLIFICATA APRIPORTA PRINCIPALE SECONDARIO CHIAVI TIPO MODULO RESET MULTICOLONNA NUMERO COLONNA ID MODULO PRINCIPALE ID MODULO SECONDARIO TIPO CODICE RIEMPIMENTO AUTOMATICO (**) TEMPO OCCUPATO INTERROMPIBILE TEMPO APERTURA APRIPORTA 1 APRIPORTA 1 TEMPO APERTURA APRIPORTA 2 APRIPORTA 2 PASSWORD... -
Page 10: Confi Gurazione Parametri
7.2. CONFIGURAZIONE PARAMETRI Dopo aver installato il modulo di chiamata procedere con la sua programmazione, che consiste nel confi gurare i seguenti parametri. 7.2.1. TABELLA PARAMETRI Valori Valore di Parametro Descrizione consentiti fabbrica Čeština, Deutsch, English, English UK, Español, Français, Lingua Lingua utilizzata sul display Italiano, Magyar,... - Page 11 Determina se un’autoinserzione senza audio oppure conversazione intercomunicante possano essere interrotte da una chiamata proveniente dal posto esterno. Interrompibile SÌ, NO Deve essere programmato lo stesso parametro “Interrompibile” in tutti i moduli di chiamata dell’impianto. Tipo dell’apriporta e tempo di attivazione dell’uscita della postazione esterna.
-
Page 12: Procedura Di Programmazione
PROCEDURA DI PROGRAMMAZIONE La programmazione avviene attraverso uno specifi co menu multilivello, accessibile solo tramite password. Si possono scorrere e selezionare le opzioni del menu, o il valore del parametro, coi tasti , confermando la scelta col tasto OK. Il tasto X annulla la scelta fatta e torna al livello di menu precedente Per uscire dalla confi... - Page 13 Digitare la password (valore di fabbrica 1000) e confermare premendo OK. Se la password è errata appare la schermata mostrata a lato. Dopo circa 3 secondi sarà nuovamente possibile digitare una password. IMPORTANTE: Se si è modifi cata la password di fabbrica e ci si dimentica la nuova password impostata, è...
-
Page 14: Lingua
Qui di seguito viene mostrata la procedura per la programmazione di tutti i parametri del modulo di chiamata. Non è necessario programmare sempre tutti i parametri. Se alcuni valori di fabbrica sono idonei, oppure se si devono modifi care solo alcuni parametri di un modulo già confi gurato, si possono selezionare solo le voci di menu corrispondenti;... -
Page 15: Tipo Modulo
8.3.2. Di seguito selezionare coi tasti il tipo di modulo PRINCIPALE e confermare la scelta con il tasto OK. 8.3.3. Se si è selezionato PRINCIPALE per il modulo di chiamata appare la schermata mostrata a lato. Selezionare SI se il sistema è multicolonna, NO in caso contrario e confermare la scelta col tasto OK. -
Page 16: Id Modulo Secondario
8.3.6. Ogni colonna può avere fi no a due moduli secondari. Impostare con la tastiera il codice identifi cativo (ID) del modulo secondario nella colonna e confermare la scelta col tasto OK. Valori ammissibili 0 o 1. L’eventuale segnalazione di errore dell’ID del modulo secondario è... -
Page 17: Tempo Occupato
8.3.9. Selezionare coi tasti il tempo di occupato desiderato e confermare la scelta con il tasto OK. Valori ammissibili: 1, 10, 20, 30, 40, 50, 60, 70 secondi. 8.3.10. Selezionare coi tasti se, durante il tempo di occupato, un’autoinserzione senza audio oppure una conversazione intercomunicante possano essere interrotte da una chiamata proveniente dal posto esterno. -
Page 18: Tempo Apertura Apriporta 2
8.3.13. Impostare con la tastiera la durata dell’attivazione dell’apriporta 2 (azionamento relè morsetti SE2) e confermare la scelta con il tasto OK. Valori ammissibili: 0 ÷ 90 secondi, con incrementi di 1 secondo. Se il tempo è impostato a 0 secondi, l’apertura della porta è disabilitata. -
Page 19: Tono Tasti
8.3.17. Selezionare coi tasti se il modulo di chiamata deve emettere un tono di riscontro ogni volta che si preme un tasto e confermare la scelta con il tasto 8.3.18. Digitare il codice fi sico dell’interno al quale indirizzare la chiamata generata premendo contemporaneamente almeno 3 tasti (CHIAMATA D’EMERGENZA) quando l’impianto non è... - Page 20 Questa schermata mostra come apparirà un valore di FUSO ORARIO diverso da quello di fabbrica dopo averlo memorizzato Selezionare coi tasti il CONTINENTE dove è installato l’impianto e confermare la scelta con il tasto OK. la nazione e confermare la scelta con il tasto OK. Selezionare coi tasti Se la nazione comprende più...
-
Page 21: Data E Ora
8.3.21. Impostare con la tastiera la data nel formato gg/mm/aaaa e successivamente l’ora nel formato hh:mm (valori ammessi 00:00 ÷ 23:59). Confermare la data e ora immesse con il tasto OK. Se durante la digitazione si commette un errore è possibile cancellare il numero immesso con il tasto C del menu contestuale. - Page 22 Se si è attivata la funzione postino è possibile determinare le fasce orarie in cui essa è attiva. Vengono presentati in sequenza tutti i giorni della settimana, a partire da LUNEDÌ. Selezionare coi tasti se abilitare la funzione postino nel giorno indicato e confermare la scelta con il tasto OK.
-
Page 23: Sintesi Vocale
8.3.23. Selezionare coi tasti se attivare la funzione SINTESI VOCALE e confermare la scelta con il tasto OK. Se viene attivata la funzione Sintesi vocale, l’inoltro della chiamata e l’apertura della porta sono descritti da appositi messaggi vocali nella lingua impostata. 8.3.24. -
Page 24: Nuovo
8.4.1. Nuovo Inserire con la tastiera il nuovo nome (si possono inserire anche i caratteri speciali, come accade con i telefoni cellulari premendo i tasti 1 e 0) e confermare il nome immesso con il tasto OK. Il nome può essere lungo fi no a 32 caratteri. Se durante la digitazione si commette un errore è... - Page 25 Se il codice è sbagliato appare la schermata mostrata a lato e la tastiera viene disabilitata per circa 3 secondi. Se il modulo è stato confi gurato per usare anche i codici logici (vedere il paragrafo Confi gurazione), appare la schermata mostrata a lato. Abbinare al nome il CODICE LOGICO che identifi...
-
Page 26: Modifi Ca
Se il codice è sbagliato appare la schermata mostrata a lato e la tastiera viene disabilitata per circa 3 secondi. Il nuovo utente viene aggiunto al database e si torna al menu NOMI. 8.4.2. Modifi ca Per modifi care un nome, o i parametri ad esso abbinati, selezionare coi tasti il nome da modifi... -
Page 27: Cancella Tutto
8.4.4. Cancella tutto Per cancellare l’intero database dei nomi e i parametri ad essi abbinati, confermare l’operazione di cancellazione premendo il tasto OK o annullarla premendo il tasto X. ATTENZIONE: L’operazione di cancellazione è irreversibile. 8.5. APRIPORTA Con il menu di secondo livello APRIPORTA è possibile confi gurare un massimo di 100 codici apriporta non legati ad alcun nome/codice fi... -
Page 28: Modifi Ca
Se si conferma un codice già presente appare la schermata mostrata a lato e la tastiera viene disabilitata per circa 3 secondi. Se il codice ha una lunghezza errata appare la schermata mostrata a lato e la tastiera viene disabilitata per circa 3 secondi. Il nuovo codice viene aggiunto al database e si torna al menu APRIPORTA. -
Page 29: Cancella Tutto
Confermare l’operazione di cancellazione premendo il tasto OK o annullarla premendo il tasto X. ATTENZIONE: L’operazione di cancellazione è irreversibile. 8.5.4. Cancella tutto Per cancellare tutti i codici apriporta confermare l’operazione di cancellazione premendo il tasto OK o annullarla premendo il tasto X. ATTENZIONE: L’operazione di cancellazione è... -
Page 30: Nuovo
8.6.1. Nuovo Posizionare la chiave a transponder da acquisire vicino al lettore chiavi del modulo di chiamata. Se la chiave viene acquisita appare per 2 secondi un pop- up con il messaggio “CHIAVE SALVATA”. Ripetere l’operazione per tutte le chiavi da acquisire. Al termine premere il tasto OK per uscire dalla fase di acquisizione e tornare al menu precedente. -
Page 31: Cancella Tutto
Confermare l’operazione di cancellazione premendo il tasto OK o annullarla premendo il tasto X. ATTENZIONE: L’operazione di cancellazione è irreversibile. 8.6.3. Cancella tutto Per cancellare tutte le chiavi a transponder confermare l’operazione di cancellazione premendo il tasto OK o annullarla premendo il tasto X. ATTENZIONE: L’operazione di cancellazione è... -
Page 32: Programmazione Via Bluetooth
Premere il tasto OK per confermare l’operazione di reset o X per annullare e tornare al menù principale. PROGRAMMAZIONE VIA BLUETOOTH In alternativa alla programmazione effettuata direttamente sul modulo di chiamata, si può programmare il modulo tramite un personal computer (PC) oppure un dispositivo portatile (tablet o telefono cellulare) dotato di interfaccia Bluetooth e software dedicato. -
Page 33: Sezione Utente
SEZIONE UTENTE 11. DESCRIZIONE DEL MODULO DI CHIAMATA Lettore chiavi transponder (solo nei modelli 1083/15 e 1083/16) Tastiera Tasti contestuali che si confi gurano dinamicamente. L’icona sopra il tasto identifi ca la funzione disponibile. Display a colori 320 x 240 pixel Telecamera con illuminazione a LED Altoparlante Sensore IR di presenza... - Page 34 Digitare il codice sulla tastiera. Appare la schermata mostrata a lato. Premere il tasto per effettuare la chiamata. Il tasto C permette di cancellare eventuali errori di digitazione. Se il codice inserito è errato appare per 2 secondi una schermata con un messaggio di errore.
- Page 35 Se entro 60 secondi il posto interno non risponde sul display appare il messaggio di avviso mostrato a lato. Se il posto interno attiva la comunicazione, il modulo di chiamata entra in modalità conversazione e sul display appare il messaggio di avviso mostrato a lato.
-
Page 36: Chiamata Tramite Nome
12.2. CHIAMATA TRAMITE NOME L’immagine a fi anco mostra l’aspetto della schermata di partenza del modulo di chiamata. La voce “PER CENTRALINO PREMERE” è presente solo se è stato confi gurato un centralino citofonico sul modulo di chiamata. Selezionare con i tasti il nome e premere il tasto per effettuare la chiamata. - Page 37 Digitare il codice apriporta e confermare con il tasto OK. Se durante la digitazione si commette un errore è possibile cancellare la cifra a sinistra del cursore con il tasto C del menu contestuale. Con si può spostare il cursore sulla stringa numerica. Il tasto X permette di tornare alla schermata di partenza.
-
Page 38: Apertura Della Porta Tramite Chiave A Trasponder ( )
12.4. APERTURA DELLA PORTA TRAMITE CHIAVE A TRANSPONDER (prestazione disponibile solo nei modelli 1083/15 e 1083/16) Per aprire la porta con la chiave a transponder passare la chiave vicino al lettore del modulo di chiamata. L’operazione può essere effettuata anche se è in corso una conversazione con un posto interno. -
Page 39: Chiamata A Centralino
12.6. CHIAMATA A CENTRALINO L’immagine a fi anco mostra l’aspetto della schermata di partenza del modulo di chiamata. La voce “SELEZIONARE NOME E PREMERE” è presente solo se sono stati inseriti dei nomi nella rubrica. Premere una volta il tasto per essere messi in contatto con l’operatore. -
Page 40: Manutenzione
Se il codice rientra nell’intervallo [0÷254] sul display appare il messaggio di avviso mostrato a lato. L’avvenuto invio del codice non da la certezza che il comando è stato eseguito. Se il codice non rientra nell’intervallo, sul display appare il messaggio di avviso mostrato a lato. -
Page 41: Appendice
APPENDICE 14. PROGRAMMAZIONE E UTILIZZO DELLA GUI SEMPLIFICATA La GUI SEMPLIFICATA consente di scegliere l’utilizzo di una interfaccia utente (GUI) particolarmente semplice, che richiede all’utente di selezionare una delle colonne presenti nell’impianto e digitare semplicemente il numero dell’appartamento da chiamare. Per entrare nella procedura di programmazione fare riferimento al paragrafo 8.1. -
Page 42: Confi Gurazione Modulo Di Chiamata Secondario
Impostare con la tastiera il codice identifi cativo (ID) del modulo principale e confermare la scelta col tasto OK. Valori ammissibili: 0÷3. Se si imposta un ID già utilizzato, quando si esce dalla modalità di confi gurazione e si riporta il dispositivo alla modalità di funzionamento normale viene segnalato un errore. -
Page 43: Colonne
Ogni colonna può avere fi no a due moduli secondari. Impostare con la tastiera il codice identifi cativo (ID) del modulo secondario nella colonna e confermare la scelta col tasto OK. Valori ammissibili 0 o 1. L’eventuale segnalazione di errore dell’ID del modulo secondario è... - Page 44 In questa schermata è possibile modifi care il nome di una colonna utilizzando la tastiera alfanumerica ed i tasti C, del menu contestuale. Per confermare la modifi ca premere il tasto OK . Questa schermata viene visualizzata se si cerca di inserire un nome vuoto per una colonna.
-
Page 45: Funzionamento Del Modulo Di Chiamata Nella Modalità Gui Semplifi Cata
In questa schermata si chiede conferma per il ripristino ai valori predefi niti di tutti i nomi delle colonne memorizzate nel modulo di chiamata. Le voci di menù di secondo livello successive sono descritte ai seguenti punti: - 8.5. Apriporta - 8.6. - Page 46 Digitare con la tastiera del modulo di chiamata il numero dell’appartamento da chiamare; il numero digitato appare nella schermata. oppure con il tasto OK per inviare la chiamata. Confermare con il tasto Se si attiva la modalità GUI SEMPLIFICATA su un modulo di chiamata confi...
-
Page 47: English (Index)
ENGLISH SECTION FOR INSTALLERS ........................49 1. FUNCTIONS ............................49 2. INSTALLATION ELEKTA CALLING MODULE (1083/15 and 1083/25) ........... 49 3. INSTALLATION ELEKTA STEEL CALLING MODULE (1083/16 and 1083/27) ........50 4. ELECTRIC CONNECTIONS ........................51 4.1 Description of terminals ........................52 5. - Page 48 8.6. Keys ( ) ............................73 8.6.1. New ............................. 74 8.6.2. Delete ..........................74 8.6.3. Delete all ..........................75 8.7. Reset ............................75 9. BLUETOOTH PROGRAMMING ......................76 10. TECHNICAL SPECIFICATIONS ......................76 10.A. Legend ............................76 10.B. Declaration of conformity to Directive 1999/5/EC ................. 76 SECTION FOR USERS..
-
Page 49: Section For Installers
SECTION FOR INSTALLERS FUNCTIONS The Elekta and Elekta Steel calling modules were created for fl ush-mounting in outdoor environments. The features of these calling modules in the 2Voice two-wire system are the following: • Possibility of calling all potential system users (128 apartments on 32 risers, equal to 4096 apartments in total) by keying in a physical code or selecting the name directly (the name list can be scrolled or searched by initial). -
Page 50: Installation Elekta Steel Calling Module (1083/16 And 1083/27)
INSTALLATION ELEKTA STEEL CALLING MODULE (1083/16 and 1083/27) • Arrange the duct so that it ends at the lower hole of the fl ush-mounting box. • Remove the lower cap from the wire hole (1). • Apply adhesive labels on the holes for the screws of the frame (2). •... -
Page 51: Electric Connections
A L T Torx® special tamper-proof screws M4 x 20 screws ELECTRIC CONNECTIONS Refer to the information contained in the system manual for more information on wiring, maximum distances and reference wiring diagrams. The calling module is provided with an extractable terminal board to facilitate connection operations. DS1083-046A... -
Page 52: Description Of Terminals
4.1. DESCRIPTION OF TERMINALS ILA + - CT PA SP S+ S- LINE C NC NO Pedestrian electrical lock with capacitance discharge actuation positive Pedestrian electrical lock with capacitance discharge actuation negative LINE Two-wire bus line in LINE Relay electrical lock (NO - normally open contacts) (vehicle entrance) Auxiliary relay output - common contact (for pedestrian door) Auxiliary relay output - normally closed contact (for pedestrian door) Auxiliary relay output - normally opened contact (for pedestrian door) -
Page 53: Calling Module Description
CALLING MODULE DESCRIPTION Transponder key reader (only for models 1083/15 and 1083/16) Keypad Dynamically confi gured short-cut buttons The icon over the button indicates the available function Colour display, 320 x 240 pixel Camera with LED lighting Speaker IR presence sensor Scroll buttons: Call button 10 - Microphone... -
Page 54: Programming
PROGRAMMING 7.1. MENU STRUCTURE LANGUAGE CONFIGURATION NAMES GUI (*) SEMPLIFICATA DOOR OPENER PRIMARY SECONDARY KEYS MODULE TYPE RESET MULTIRISE RISE NUMBER ID PRIMARY MODULE ID SECONDARY MODULE CODE TYPE AUTOMATIC FIT (**) BUSY TIME STOPPABLE DOOR LOCK RELEASE TIME 1 OPEN DOOR 1 DOOR LOCK RELEASE TIME 2 OPEN DOOR 2... -
Page 55: Parameter Confi Guration
7.2. PARAMETER CONFIGURATION Program the calling module after having installed it by confi guring the following parameters. 7.2.1. PARAMETERS TABLE Default Parameter Description Possible values settings Čeština, Deutsch, English, English UK, Español, Français, Language Language used on the display Italiano, Magyar, ITALIANO Nederlands, Polski,... -
Page 56: Programming Procedure
The door unit lock release type and lock output activation time. The type may be: SECRET: pressing the door opener button on Type: an apartment station will activate the door unit Type: SECRET, SECRET Door lock output only after having received a call or during FREE Door Lock 1 release type... -
Page 57: Access To Programming Procedure
8.1. ACCESS TO PROGRAMMING PROCEDURE Access programming mode as follows to program a new calling module or editing exiting programming: Key in 99999 on the keypad. The page shown by the side will appear. Enter the password (default password: 1000) and press OK to confi rm. The page by the side will appear if the password is not correct. -
Page 58: Language
The main menu will appear if the correct password was entered. The procedure for programming all calling module parameters is described below. Some parameters do not need to be programmed. Select only the relevant menu items if some default values are already correct or to modify only some parameters of a previously confi gured module;... -
Page 59: Simplifi Ed Gui
8.3.1. Select CONFIGURATION on the main menu. The menu shown to the side buttons to select the NO item. appears where the user can press the 8.3.2. Then select the type of PRIMARY module with the buttons and press OK to confi... -
Page 60: Rise Number
8.3.5. The page shown here by the side will appear if SECONDARY calling module type is selected. Set the column number of the secondary module on the keypad and press OK to confi rm the selection. Permitted values: 0 ÷ 31 No specifi... -
Page 61: Busy Time
8.3.9. buttons and press OK to Select the required BUSY TIME with the confi rm. Permitted values: 1, 10, 20, 30, 40, 50, 60, 70 seconds. 8.3.10. Use the buttons to select whether auto-on without audio or an intercom conversation may be interrupted by a call from the door unit. 8.3.11. -
Page 62: Door Lock 2 Release Time
8.3.13. Set the release time of door lock 2 (relay actuation, terminals SE2) on the keypad and press OK to confi rm the selection. Permitted values: 0 ÷ 90 seconds, with 1 second increments. If the time is set at 0 seconds, the opening of the door is disabled. It is not possible to program both the opening times of door opener 1 and of door opener 2 at 0 seconds. -
Page 63: Button Sound
8.3.17. Select whether the calling module must generate a feedback tone when a buttons and press OK to confi rm. button is pressed using the 8.3.18. Enter the physical code of the extension where to route the call generated by pressing at least three buttons at the same time (multitouch or emergency call) if the system is not provided with concierge switchboard or if this is present but confi... - Page 64 This screen shows time zone value after default value has been changed. Select the CONTINENT where the system is installed with the buttons and press OK to confi rm. buttons and press OK to confi rm. Select the COUNTRY with the The page shown by the side will appear if there are multiple time zones in the selected country.
-
Page 65: Date And Time
8.3.21. Set the date in dd/mm/yyyy format and then select the time in hh:mm format (permitted values: 00:00 ÷ 23:59). Press OK to confi rm the entered date and time. Press C on the short-cut menu to delete the entered number if you make a mistake. - Page 66 The time slots during which the postman function is activated can be selected. The days of the week (starting from MONDAY) are shown in sequence. Select whether to activate the postman function on the indicated day with the buttons and press OK to confi rm. The start and end time of the service will appear if the postman function was enabled for the day.
-
Page 67: Vocal Synthesis
8.3.23. Select the VOCAL SYNTHESIS function with the buttons and press OK to confi rm. If this function is activated, calls and door opening events will be described by specifi c voice messages in the set language. 8.3.24. The function is available only if the calling module was confi gured as PRIMARY. -
Page 68: New
8.4.1. New Enter the new NAME using the keypad (special characters can be added like on a mobile phone by pressing buttons 1 and 0) and press OK to confi rm the entered name. The name may be up to 32 characters only. Press C on the short-cut menu to enter the digit to the left of the cursor if you make a mistake. - Page 69 The page shown here by the side will appear and the keypad will be deactivated for approximately three seconds if the code is incorrect. The page shown here by the side will appear if the module is confi gured to use logical codes (see Confi...
-
Page 70: Modify
The page shown here by the side will appear and the keypad will be deactivated for approximately three seconds if the code is incorrect. The new user will be added to the database and the system will go back to the NAMES menu. 8.4.2. -
Page 71: Delete All
8.4.4. Delete all Press OK to delete the entire database containing names and paired parameters or press X to cancel the operation. IMPORTANT: The deletion operation cannot be undone. 8.5. DOOR OPENER The second level DOOR OPENER code can be used to confi gure up to 100 door codes which are not linked to any name or physical code. -
Page 72: Modify
The page shown here by the side will appear and the keypad will be deactivated for approximately three seconds if a code which is already present is confi rmed. The page shown here by the side will appear and the keypad will be deactivated for approximately three seconds if the code length is incorrect. -
Page 73: Delete All
Press OK to confi rm deletion or press X to cancel it. IMPORTANT: The deletion operation cannot be undone. 8.5.4. Delete all Press OK to delete all door codes or press X to cancel the operation. IMPORTANT: The deletion operation cannot be undone. 8.6. -
Page 74: New
8.6.1. New Position the transponder key to be acquired near the key reader of the calling module. The message “KEY STORED” will appear for two seconds when the key is acquired. Repeat the operation for all the keys to be acquired. At the end, press OK to exit the acquisition step and go back to the previous menu. -
Page 75: Delete All
Press OK to confi rm deletion or press X to cancel it. IMPORTANT: The deletion operation cannot be undone. 8.6.3. Delete all Press OK to delete all transponder keys or press X to cancel the operation. IMPORTANT: The deletion operation cannot be undone. 8.7. -
Page 76: Bluetooth Programming
DC supply voltage 10.B. DECLARATION OF CONFORMITY TO DIRECTIVE 1999/5/EC Hereby Urmet S.p.A., declares that these 2Voice Elekta and Elekta Steel calling modules (1083/15 and 1083/16 codes) are in compliance with the essential requirements and other relevant provisions of Directive 1999/5/EC. -
Page 77: Section For Users
SECTION FOR USERS 11. CALLING MODULE DESCRIPTION Transponder key reader (only for models 1083/15 and 1083/16) Keypad Dynamically confi gured short-cut buttons. The icon over the button indicates the available function. Colour display, 320 x 240 pixel Camera with LED lighting Speaker IR presence sensor Scroll buttons:... - Page 78 Enter the code on the keypad. The page shown by the side will appear. Press the button again to make the call. Press C to delete mistakes made while keying in. A page containing an error message will appear for two seconds if an incorrect code is entered.
- Page 79 The message shown here by the side will appear if the apartment unit does not reply within 60 seconds. If the communication is activated on the apartment unit, the calling module will enter conversation mode and the message shown by the side will appear on the display.
-
Page 80: Calling By Name
12.2. CALLING BY NAME The home page of the calling module is shown here by the side. The “FOR SWITCHBOARD PRESS” option is only present if a door phone switchboard is confi gured on the calling module. Select the name using the buttons and press the button to make the call. - Page 81 Enter the door opener code and press OK to confi rm. Press C on the short-cut menu to enter the digit to the left of the cursor if you make a mistake. The cursor can be moved onto the numeric string using the buttons.
-
Page 82: Opening The Door Using A Transponder Key
12.4. OPENING THE DOOR USING A TRANSPONDER KEY (function available only for models 1083/15 and 1083/16) Pass the transponder key near the reader on the calling module. This operation may be carried out also during a conversation with an apartment station. The message shown here by the side will appear for two seconds if the key is not valid. -
Page 83: Calls To Switchboard
12.6. CALLS TO SWITCHBOARD The home page of the calling module is shown here by the side. The “SELECT NAME WITH AND PRESS ” option will only be present if names are stored in the repository. Press the button once to be put into contact with the operator. 12.7. -
Page 84: Maintenance
The warning message shown here by the side will appear on the display if the code is in the [0-254] range. Sending the code is not confi rmation that the command was carried out. The warning message shown here by the side will appear on the display if the code is not in the range. -
Page 85: Appendix
APPENDIX 14. PROGRAMMING AND USE OF THE SIMPLIFIED GUI Simplifi ed GUI is used to select to use a very simple user interface (GUI) allowing the user to select one or more columns (or blocks) in the system and enter the number of the apartment to be called. To enter the programming procedure, see paragraph 8.1. -
Page 86: Confi Guration Of Secondary Calling Module
Set the identifi cation code (ID) of the primary module on the keypad and press OK. to confi rm the selection. Admissible values: 0÷3 An error will appear when exiting confi guration mode and returning the device to normal operating mode if a previously used ID is set. The next items on the menu are the same ones found in points 8.3.9 to 8.3.22. -
Page 87: Blocks
Each column may have up to two secondary modules. Set the identifi cation code (ID) of the secondary module in the riser on the keypad and press OK to confi rm the selection. Permitted values: 0 or 1. Secondary module ID errors will only be shown when exiting confi... - Page 88 This page can be used to edit the name of a block by using the alphanumeric keyboard and the C, buttons in the shortcut menu. Press the OK button to confi rm the change. This page appears if an attempt is made to enter an empty name for a block. The system will automatically go back to the block modify page after approximately three seconds This page appears if an attempt to assign a name which was previously used...
-
Page 89: Calling Module Operation In Simplifi Ed Gui Mode
This screen prompts to confi rm to reset all the default names of blocks stored in the calling module. The items on the next second level menu are described in the following points: - 8.5. Door opener - 8.6. Keys - 8.7. - Page 90 Key in the number of the apartment to be called on the calling module panel. The number will appear on the screen. or the OK button to send the call. Press the If SIMPLIFIED GUI mode is chosen on a calling module confi gured to call a single block, simply key in the number assigned to the apartment and press the OK or button to call.
- Page 91 DS1083-046A...
- Page 92 DS 1083-046A LBT 8955 URMET S.p.A. Area tecnica 10154 TORINO (ITALY) servizio clienti +39 011.23.39.810 VIA BOLOGNA 188/C http://www.urmet.com Telef. +39 011.24.00.000 (RIC. AUT.) e-mail: info@urmet.com +39 011.24.00.300 - 323...
Need help?
Do you have a question about the 2VOICE ELEKTA and is the answer not in the manual?
Questions and answers