Chapters
Table of Contents

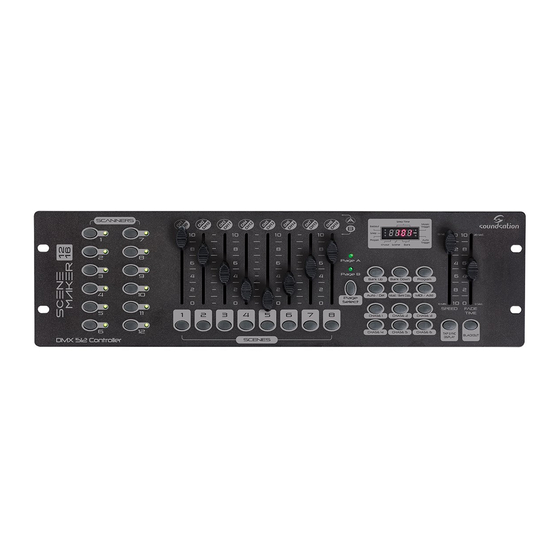
Related Manuals for soundsation Scenemaker 1216


Summary of Contents for soundsation Scenemaker 1216
-
Page 1: User Manual
DMX512 Lighting Controller USER MANUAL MANUALE utente Please read this manual carefully and proper take care of this manual. Leggete questo manuale e conservatelo per future consultazioni! - Page 2 Dear customer, First of all thanks for purchasing a SOUNDSATION® product. Our mission is to satisfy all possible needs of musical instrument, professional audio and lighting users offering a wide range of products using the latest technologies. We hope you will be satisfied with this item and, if you want to collaborate, we are looking for a feedback from you about the operation of the product and possible im- provements to introduce in the next future.
-
Page 3: Table Of Contents
ENGLISH TABLE OF CONTENTS 1. 1. INTRODUCTION ....................6 1.1. UNPACKING ................................6 1.2. ACCESSORIES ................................7 2. OVERVIEW ........................7 3. MAIN FEATURES ......................7 4. OVERVIEW ........................8 4.1. Front Panel ................................8 4.2. Rear Panel .................................9 4.3. Common Terms..............................10 5. OPERATION GUIDE ....................11 5.1. Setting up the system ............................11 5.2. - Page 4 ENGLISH 9.3. Delete a Scene ..............................19 9.4. Delete all Scenes ..............................19 10. PLAYBACK ........................20 10.1. Running in Sound Mode ...........................20 10.2. Running in Auto Mode ............................20 10.3. Blackout ...................................20 11. MIDI OPERATION ....................21 12. APPENDIX ........................21 12.1. DMX Introduction ..............................21 12.2.
- Page 5 ENGLISH SCENEMAKER 1216 User manual IMPORTANT SAFETY SYMBOLS The symbol is used to indicate that some hazardous live terminals are involved within this apparatus, even under the normal operating con- ditions, which may be sufficient to constitute the risk of electric shock or death.
-
Page 6: Introduction
1.1. UNPACKING Your SCENEMAKER 1216 controller was carefully packed to ensure safe transport. De- spite this, we recommend you to carefully examine the package and its contents for any signs of physical damage, which can occur during transport. It is composed by follow-... -
Page 7: Accessories
1.2. ACCESSORIES SOUNDSATION can supply a wide range of quality accessories that you can use with your DMX controller, like Cables, Splitters, Stands, and a wide range fixtures. All products in our catalogue has been long tested with this device so we recommend to use Genuine SOUNDSATION Accessories and Parts. -
Page 8: Overview
ENGLISH SCENEMAKER 1216 User manual 4. OVERVIEW 4.1. Front Panel 19 18 Scanners Step/Time Music Balckout Trigger Step 0.1 SEC. 30 SEC. Program Auto Trigger Chase Scene Bank Page A Page B Bank Up Bank Down Program Auto / Del... -
Page 9: Rear Panel
ENGLISH SCENEMAKER 1216 User manual Music/Bank Copy: Activates Music mode or copies a bank of scenes. LED Display: Shows current activity or programming state. Mode indicator LEDs: Provides operating mode status (Manual, Music or Auto). Bank Up: Selects target bank from the available 30 banks. -
Page 10: Common Terms
ENGLISH SCENEMAKER 1216 User manual 21. MIDI IN: For triggering of Banks/Chases using a MIDI device 22. DMX Out: This connector sends your DMX values DMX scanners or DMX packs. 23. DC Input: DC 9 -12V, 500mA min. 24. USB Port: Used to connect a USB goose-neck lamp (not included). -
Page 11: Operation Guide
21 section in the Appendix of this manual. 5.2. Fixture Addressing SCENEMAKER 1216 is programmed to control 16 channels of DMX per fixture, therefore the fixtures you wish to control with the corresponding “SCANNER” buttons on the unit, must be spaced 16 channels apart. Please refer to your individual fixture’s manual for DMX addressing instructions. -
Page 12: Resetting The System
ENGLISH SCENEMAKER 1216 User manual Press and hold & buttons to exit and save set- Program TAP SYNC/DISPLA Y ting. All LEDs will blink. NOTE: All wheels can be re-assigned to output on different DMX channels. You can re-assign Pan / Tilt channel to all controller fader channels. -
Page 13: Operation
ENGLISH SCENEMAKER 1216 User manual all channels (A) or Pan & Tilt only (P). Press to save settings. All LEDS will blink BLACKOUT TAP SYNC/DISPLA Y to confirm setting. 6. OPERATION 6.1. MANUAL MODE Manual mode allows direct control of all scanners. You are able to move them and change attributes by using the channel faders. -
Page 14: Programming
MANUAL 7. PROGRAMMING A program (bank) is a sequence of different scenes (or steps) that will be called up one after another. In the SCENEMAKER 1216, 23 programs can be created of 8 scenes in each. 7.1. Entering Program Mode Press button around 2 seconds until its LED blinks. -
Page 15: Running A Program
ENGLISH SCENEMAKER 1216 User manual 7.3. Running a Program buttons to change Program banks if necessary. BANK UP/DOWN Press the button repeatedly until the LED turns on. AUTO/DEL AUTO Adjust speed via the fader and the loop rate via the... -
Page 16: Chase Programming
ENGLISH SCENEMAKER 1216 User manual buttons to select the destination bank. BANK UP/DOWN PROGRAM Press button to execute the copy. All LEDs on the controller MUSIC/BANK COPY will blink. NOTE: All 8 scenes in a Program bank will be copied. -
Page 17: Edit A Chase
ENGLISH SCENEMAKER 1216 User manual Select the desired button. CHASE Press the button to switch the LED display to steps. TAP SYNC/DISPLA Y Review each scene/step individually by using the buttons. BANK UP/DOWN 8.4. Edit a Chase Copy a Bank into A Chase Press and hold the button to enter programming mode. -
Page 18: Delete All Chase Programs
8.5. Delete all CHASE Programs CAUTION! This procedure will result in irrevocable loss of chase step memo- ry. The individual scenes and program banks will be preserved. 1) Turn the SCENEMAKER 1216 off. 2) Press and hold button and button while turning on the... -
Page 19: Copy A Scene
ENGLISH SCENEMAKER 1216 User manual Use the button to locate the BANK UP/DOWN SCENE Press the button that corresponds to the scene to be inserted. SCENE Press button to insert the scene. All LEDs will blink. MIDI/Add 9.2. Copy a Scene Press and hold button to enter programming mode. -
Page 20: Playback
ENGLISH SCENEMAKER 1216 User manual 10. PLA YBACK 10.1. Running in Sound Mode Press button until LED turns on. MUSIC/BANK COPY MUSIC NOTE: In the Sound mode, programs will be triggered by the sound using its built-in microphone. Select the program... -
Page 21: Midi Operation
SCENEMAKER 1216 User manual 11. MIDI OPERATION SCENEMAKER 1216 only responds to MIDI commands on the MIDI channel which is set to full stop. All MIDI controls are performed using Note on commands. All other MIDI instructions are ignored. To stop a chase, send the blackout on note. -
Page 22: Building A Serial Dmx Chain
ENGLISH SCENEMAKER 1216 User manual 12.2. Building a Serial DMX Chain DMX fixtures are designed to receive data through a serial Daisy Chain. A Daisy Chain connection is where the DATA OUT of one fixture connects to the DATA IN of the next fixture. -
Page 23: 3-Pin Vs 5-Pin Dmx Cables
However, two are the most common standards: 5-Pin XLR and 3-Pin XLR system. If you wish to connect SCENEMAKER 1216 to a 5-Pin XLR input fixture, you need to use an adapter-cable or make it by yourself. -
Page 24: Warranty And Service
SOUNDSATION shall satisfy the warranty obligations by remedying any material or manufacturing faults free of charge at SOUNDSATION’s discretion either by repair or by exchanging individual parts or the entire appliance. Any defective parts removed from a product during the course of a warranty claim shall become the property of SOUNDSATION. - Page 25 ITALIANO Manuale d’uso SCENEMAKER 1216 SOMMARIO 1. INTRODUZIONE .......................28 1.1. DISIMBALLAGGIO ..............................28 1.2. Accessori .................................29 2. PANORAMICA ......................29 3. CARATTERISTICHE PRINCIPALI ................29 4. INTRODUZIONE .......................30 4.1. Pannello Frontale ..............................30 4.2. Pannello Posteriore .............................31 4.3. Terminologia ................................32 5. GUIDA OPERATIVA ....................33 5.1.
- Page 26 ITALIANO Manuale d’uso SCENEMAKER 1216 9.3. Eliminare una Scena ............................41 9.4. Eliminare Tutte le Scene ............................42 10. PLAYBACK ........................42 10.1. Esecuzione in Modalità Sound ........................42 10.2. Esecuzione in Modalità Automatica ......................42 10.3. Blackout ...................................43 11. UTILIZZO DEL MIDI ....................43 12. APPENDICE .......................44 12.1.
- Page 27 ITALIANO Manuale d’uso SCENEMAKER 1216 IMPORTANTI SIMBOLI DI SICUREZZA Il simbolo è usato per indicare che in questa apparecchiatura sono presenti alcuni terminali sotto tensione pericolosi, anche in condizioni di normale funzionamento, che possono costituire rischio di scosse elettriche o di morte.
-
Page 28: Introduzione
INTRODUZIONE Grazie per aver acquistato il nostro controller luci SCENEMAKER 1216. Godetevi la vostra nuova attrezzatura e assicuratevi di leggere attentamente questo manuale prima dell’operazione! Questo manuale utente è fatto per fornire una panoramica dei control- li, nonché... -
Page 29: Accessori
2. PANORAMICA SCENEMAKER 1216 è un controller luci universale. Permette di gestire fino a 12 appa- recchi con 16 canali DMX ciascuno (192 canali in totale) e fino a 184 scene programma- bili. -
Page 30: Introduzione
ITALIANO Manuale d’uso SCENEMAKER 1216 4. INTRODUZIONE 4.1. Pannello Frontale 19 18 Scanners Step/Time Music Balckout Trigger Step 0.1 SEC. 30 SEC. Program Auto Trigger Chase Scene Bank Page A Page B Bank Up Bank Down Program Auto / Del... -
Page 31: Pannello Posteriore
ITALIANO Manuale d’uso SCENEMAKER 1216 Display LCD: Mostra l’attività corrente o lo stato di programmazione. Indicatori LED di modalità: Indicano lo stato della modalità di funzionamento (Manuale, Musicale o Auto). Bank Up: Incrementa si 1 la selezione dei banchi di memoria tra i 30 disponibili. -
Page 32: Terminologia
Scanner si riferisce ad uno strumento di illuminazione con uno specchio Pan e Tilt; Tuttavia, il controller SCENEMAKER 1216 PRO USB può essere utilizzato per controllare qualsiasi dispositivo compatibile DMX-512 come teste mobili, PAR, ecc. -
Page 33: Guida Operativa
5.2. Impostazione DMX SCENEMAKER 1216 è programmato per controllare 16 canali DMX per singolo appa- recchio, quindi i dispositivi che si desidera assegnare ai corrispondenti pulsanti “SCAN- NER” devono essere distanziati di 16 canali l’uno dall’altro. Fare riferimento al manuale del proprio apparecchio per le istruzioni di indirizzamento DMX. -
Page 34: Ripristino Del Sistema
ITALIANO Manuale d’uso SCENEMAKER 1216 Tenere premuto il tasto & per uscire e salvare le Program TAP SYNC/DISPLA Y impostazioni. Tutti i LED lampeggiano. NOTA: Tutte le ruote possono essere riassegnate per l’uscita su diversi canali DMX. È possibile riassegnare il canale Pan/Tilt a tutti i canali del fader del controller. -
Page 35: Guida Operativa
ITALIANO Manuale d’uso SCENEMAKER 1216 Premere il tasto per passare tra le due modalità. Tutti i canali TAP SYNC/DISPLA Y (A) o Pan & Tilt (P). Premere per salvare le impostazioni. Tutti i BLACKOUT TAP SYNC/DISPLA Y LED lampeggeranno per confermare l’impostazione. -
Page 36: Programmazione
MANUALE 7. PROGRAMMAZIONE Un programma (banca) è una sequenza di diverse scene (o passaggi) che verranno ri- chiamate una dopo l’altra. Nel SCENEMAKER 1216, 23 programmi possono essere creati da 8 scene in ciascuna. 7.1. Entrare in Modalità di Programmazione Premere il tasto circa 2 secondi fino a che il suo LED lampeggia. -
Page 37: Eseguire Un Programma
ITALIANO Manuale d’uso SCENEMAKER 1216 7.3. Eseguire un Programma Usare i tasti per cambiare il banco se necessario BANK UP/DOWN Premere ripetutamente il tasto fino a che il LED si accende. AUTO/DEL AUTO Regolare la velocità del tramite il fader e la velocità... -
Page 38: Programmazione Di Una Chase
ITALIANO Manuale d’uso SCENEMAKER 1216 Premere il tasto per preparare la copia. MIDI/Add Usare i tasti per selezionare ila banco di destinazione del BANK UP/DOWN PROGRAMMA Premere il tasto per eseguire la copia. Tutti i LED del con- MUSIC/BANK COPY troller lampeggiano NOTA: Tutte le 8 scene in una banca Programma saranno copiate. -
Page 39: Eseguire Una Sequenza
ITALIANO Manuale d’uso SCENEMAKER 1216 8.2. Eseguire una sequenza Premere un tasto poi premere il tasto CHASE AUTO/DEL Regolare la velocità della Sequenza toccando due volte il tasto TAP SYNC/DIS- in base al ritmo scelto. PLA Y NOTA: Il tempo tra 2 tocchi imposterà la velocità della Sequenza (fino a 10 minuti) 8.3. -
Page 40: Eliminare Tutte Le Chase
ITALIANO Manuale d’uso SCENEMAKER 1216 Premere il tasto desiderato. CHASE Premere per passare dalla visualizzazione LED alla visualiz- TAP SYNC/DISPLA Y zazione di passi. Usare i tasti per navigare tra i passi e individuare il punto di BANK UP/DOWN inserimento della nuova scena. Il display leggerà il numero del passo (ad esempio: per inserire una scena tra il passo 05 e il 06, navigare usando i tasti BANK finché... -
Page 41: Programmazione Delle Scene
ITALIANO Manuale d’uso SCENEMAKER 1216 controller 3) Tutti i LED lampeggeranno. 9. PROGRAMMAZIONE DELLE SCENE 9.1. Inserire una Scena Tenere premuto il tasto per entrare in modalità di programmazione. PROGRAM Premere il tasto desiderato (es.: per inserire una scena tra lo Step 05 e 06,... -
Page 42: Eliminare Tutte Le Scene
ITALIANO Manuale d’uso SCENEMAKER 1216 Selezionare il banco che contiene la scena che deve essere cancellata usando i tasti BANK UP/DOWN NOTA: Quando si elimina una scena, la posizione fisica non viene rimossa, tuttavia tutti i 192 canali DMX disponibili alla scena saranno impostati sul valore 0. -
Page 43: Blackout
Blackout 11. UTILIZZO DEL MIDI SCENEMAKER 1216 risponde ai comandi MIDI sul canale MIDI impostato nella centralina. Tutti i controlli MIDI vengono eseguiti utilizzando i comandi di Nota; tutte le altre istruzioni MIDI vengono ignorate. Tali comandi possono richiamare scene, avviare/interrompere una chase, attivare annullare la funzione blackout. -
Page 44: Appendice
ITALIANO Manuale d’uso SCENEMAKER 1216 12. APPENDICE 12.1. Introduzione DMX Una connessione DMX contiene 512 canali. Tali canali possono essere assegnati in qualsiasi modo. Un apparecchio in grado di ricevere il DMX 512 richiederà uno o più canali in successione. L’utente deve assegnare un indirizzo di partenza sul dispositivo che indica il primo canale riservato nel controller. -
Page 45: Terminatore Dmx
ITALIANO Manuale d’uso SCENEMAKER 1216 12.3. Terminatore DMX DMX è un protocollo di comunicazione resiliente, tuttavia si possono verificare errori. Al fine di prevenire disturbi e deteriorare i segnali di controllo DMX, una buona abitudine è di collegare l’uscita DMX dell’ultimo dispositivo nella catena a un terminatore DMX, in particolare in caso di collegamenti molto lunghi. -
Page 46: Garanzia E Assistenza
In alternativa è possibile inviare il prodotto a SERVIZIO ASSISTENZA SOUNDSATION - Via Enzo Ferrari, 10 - 62017 Porto Recanati - Italia. Per poter inviare un prodotto al centro di assistenza è necessario un numero di RMA. Le spese di trasporto devono essere coperte dal proprietario del prodotto. - Page 47 Questo prodotto viene importato nella UE da FRENEXPORT SPA – Via Enzo Ferrari, 10 - 62017 Porto Recanati - Italy www.soundsa tionmusic.com Soundsation® is a registered trademark of FRENEXPORT SPA - Italy Soundsation® è un marchio di fabbrica registrato della FRENEXPORT SPA - Italy...
- Page 48 www.soundsa tionmusic.com Ver 1.0 - July 2017...
Need help?
Do you have a question about the Scenemaker 1216 and is the answer not in the manual?
Questions and answers