
Related Manuals for HunterDouglas Silhouette Duolite


Summary of Contents for HunterDouglas Silhouette Duolite
- Page 1 Installation Operation Care • • UltraGlide ® PowerView ™ Motorization Silhouette Duolite Window Shadings ® ™ UltraGlide 2 Click and Walk Away ™ PowerView Motorization Operating Systems...
-
Page 2: Table Of Contents
CONTENTS Getting Started: Product Views ................... 1 Tools and Fasteners Needed .............. 2 Installation: Installation Overview ................. 3 STEP 1: Mount the Installation Brackets ..........3 Mount the Installation Brackets — Inside Mount ......4 Mount the Installation Brackets — Outside Mount ......6 STEP 2: Install the Shading ............... -
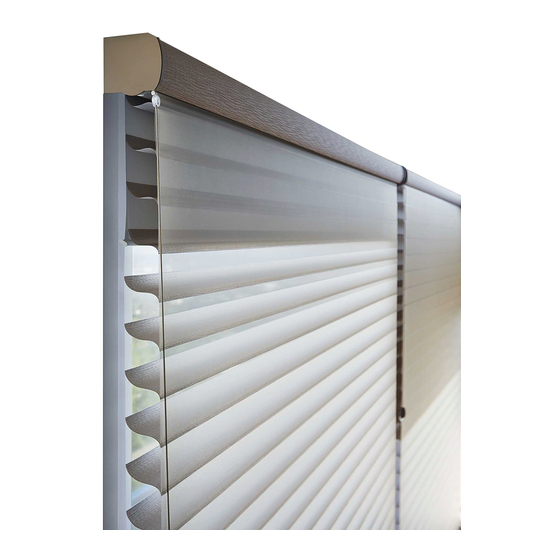
Page 3: Getting Started
GETTING STARTED Product Views Optional Dust Cover Installation Brackets Limit Stops UltraGlide Headrail ® Tassel Cord Rear Roller Shade Tassel Front Shading Shading Bottom Rail Roller Shade Bottom Rail Battery Wand Manual Control PowerView ™ Button Motorization Remote... -
Page 4: Tools And Fasteners Needed
GETTING STARTED Thank you for purchasing Hunter Douglas Silhouette window shadings. With proper installation, ® operation, and care, your new shadings will provide years of beauty and performance. Please thoroughly review this instruction booklet before beginning the installation. If your shading has a protective plastic cover on the fabric-covered headrail, keep the plastic in place until the shading is installed. -
Page 5: Installation
INSTALLATION Installation Overview To install your shading, you will need to perform the following four steps: STEP 1: Mount the Installation Brackets STEP 2: Install the Shading STEP 3: PowerView Only: Connect the Power Source ™ STEP 4: Install the Optional Back Cover (If Applicable) STEP 1: Mount the Installation Brackets The number of installation brackets required ■... -
Page 6: Mount The Installation Brackets - Inside Mount
INSTALLATION Mount the Installation Brackets — Inside Mount Mark 2" from each jamb for bracket location. ■ ■ If more than two installation brackets came with your order, space additional bracket(s) ➤ ■ between the two end brackets and mark their location. Mount into wood whenever possible. - Page 7 INSTALLATION Use a level to check that the mounting surface is level. Shim the brackets, if necessary, ■ ■ using the top tabs that were removed from the brackets. Use a " drill bit to drill holes for the mounting screws. ■...
-
Page 8: Mount The Installation Brackets - Outside Mount
INSTALLATION Mount the Installation Brackets — Outside Mount Center the headrail over the window opening at the desired height. Use a pencil to lightly ■ ■ mark each end of the headrail. Alternatively, measure the width of the headrail and use that width to mark the headrail ➤... - Page 9 INSTALLATION Additonal Clearance with Spacer Blocks NOTE: A minimum of " additional clearance is required for PowerView shadings with ™ battery wand. Spacer If using " or " spacer blocks, attach the spacer block(s) ■ ■ Blocks and installation bracket to a flat vertical mounting surface Longer Screws with #6 screws long enough for a secure installation.
-
Page 10: Step 2: Install The Shading
INSTALLATION STEP 2: Install the Shading Mount the Headrail Lever Installation Bracket Peel back the protective covering Headrail ■ ■ from the top of the Palette fabric- ® covered headrail. Leave the rest Slide the Headrail Between the Lever of the protective covering on the and the Bracket front of the headrail. -
Page 11: Step 3: Powerview ™ Only - Connect The Power Source
INSTALLATION STEP 3: PowerView Only — Connect the Power Source ™ NOTE: When power is connected to the motor, a green LED inside the manual control button housing will flash to indicate the shading is ready for operation. Refer to the appropriate page based on your order. ■... - Page 12 INSTALLATION Satellite Battery Pack Install the Batteries into the Battery Wand See the instructions under “Battery Wand” on page 9. ■ ■ Mount the Satellite Battery Pack Decide where you want to attach the wall mount bracket for the satellite battery pack. It may ■...
- Page 13 INSTALLATION DC Power Supply Power Cable from Shading Connect the Power Supply Plug the power cable from the shading into ■ ■ the extension cable. Wire Retainers Plug the other end of the extension cable ■ ■ 15" into the DC power supply. Maximum Plug the DC power supply into a standard ■...
-
Page 14: Step 4: Install The Optional Back Cover (If Applicable)
INSTALLATION STEP 4: Install the Optional Back Cover (If Applicable) If the shading was ordered with an optional back cover, follow the instructions below. Otherwise, proceed to “Operate the Shading” on page 13. The optional back cover is used on inside mounts only. ■... -
Page 15: Operation
OPERATION Operate the Shading A single control is used to operate both the front window shading and the rear roller shade. Operation is sequential. The front shading must be lowered and the vanes opened before the rear roller shade can be lowered. Conversely, the rear roller shade must be raised before the vanes on the front shading can be closed and the shading raised. -
Page 16: Powerview Motorization
OPERATION UltraGlide 2 Click and Walk Away Operation ® ™ Pull the cord Pull the cord to the center, down in long listen for the even strokes. Lower Raise “click,” and Allow the cord Shading Rear release the to retract Shade Open cord. -
Page 17: Basic Operation
OPERATION OPEN Group 4 Group 3 Group 5 Group 2 Group 1 Group 6 LEFT ARROW RIGHT ARROW Tilts vanes closed Tilts vanes open Favorite (Shading/vane position) STOP CLOSE (Press and hold for programming mode) Joining a Shading to a Group IMPORTANT: The shading will not operate using the remote until it has been joined to a group. - Page 18 For information regarding operation and programming of the PowerView Scene Controller, refer to your PowerView Motorization Scene Controller Guide. PowerView App Operation The PowerView Hub is required for PowerView App operation. For information regarding setup and operation using the PowerView App, refer to the online PowerView App Software Guide at hunterdouglas.com/powerview/support.
- Page 19 OPERATION Resetting the Shading (If Necessary) Basic Reset The basic reset is used to reset the shading’s travel limits. 1. Press and hold the manual control button for 6 seconds. The shading will move slightly. 2. Release the manual control button. The shading will raise to its fully open position to set the upper travel limit, then lower to the fully closed position with vanes open to set the lower travel limit.
-
Page 20: Troubleshooting
OPERATION Troubleshooting If your shading is not operating correctly: First review the guide that came with your control device. ■ ■ Refer to the following troubleshooting procedures for specific solutions for your shading. ■ ■ If questions remain, please contact the Hunter Douglas Customer Information Center at 1-888-501-8364. - Page 21 OPERATION Problem The shading raises or lowers unevenly, the fabric rubs against one end of the headrail, or the bottom rail is uneven when fully raised. Solution Check that the window is square by measuring the diagonals. Check that the installation brackets are level. Shim to level, if necessary. Check that the limit stops are adjusted the same and are not too tight.
- Page 22 OPERATION Problem The shading or shade is hard to raise or lower, or will not raise or lower. Solution Shadings cannot be forced into tight inside mount window openings. If an inside mount, check that the headrail is installed correctly. Make sure there is clearance between the ends of the shading or shade and the window casement.
- Page 23 OPERATION Problem The vanes do not open when the shading is first operated. Solution Make sure the shading is completely lowered. Open and close the shading several times to help open the vanes. If necessary, gently pull down on the bottom rail when the shading is fully lowered. Problem The vanes do not close fully when the shading stops in the lowest position.
- Page 24 OPERATION Problem PowerView only: The bottom rail does not raise or lower completely, or its ™ location when fully lowered has changed over time. Solution The batteries may be low in the battery wand or satellite battery pack. Replace the batteries. Check that the battery wand, satellite battery pack, or DC power supply is securely connected to the power cables and the cables are not pinched or caught in the headrail or installation brackets.
-
Page 25: Care
CARE Removing the Shading Top View Move each lever of the installation brackets to the left to release ■ ■ the shading. A flat blade screwdriver can be used to move the lever. ➤ ■ CAUTION: Be very careful to not tear or damage any of Move the lever to the left to release the shading. - Page 26 CARE Forced Air Blow away dirt and debris between the vanes using clean compressed air. ■ ■ Spot-Cleaning Do not spot-clean anything other than the Palette fabric-covered headrail. ® Ultrasonic Cleaning Silhouette shadings can be ultrasonically cleaned by a professional, with the exception of ®...
-
Page 27: Child Safety
CHILD SAFETY WARNING For more safety information call 1-888-501-8364 in the U.S. or 1-800-265-8000 in Canada. Young children can wrap cords around their necks and STRANGLE. ■ ■ Always keep cords out of the reach of children. ■ ■ Move cribs, playpens and other furniture away from cords. Children can climb ■... -
Page 28: Powerview Declarations
Piekstraat 2, 3071 EL Rotterdam, The Netherlands certify and declare under our sole responsibility that assembly PV6 conforms with the essential requirements of the EMC directive 2004/108/EC and R&TTE directive 1999/5/EC. A copy of the original declaration of conformity may be found at: www.hunterdouglas.com/RFcertifications. - Page 29 Notes...
- Page 30 Notes...
-
Page 32: Warranty
If you are not thoroughly satisfied, simply contact Hunter Douglas at (888) 501-8364 or visit hunterdouglas.com. In support of this policy of consumer satisfaction, we offer our Lifetime Limited Warranty as described below.
Need help?
Do you have a question about the Silhouette Duolite and is the answer not in the manual?
Questions and answers