Table of Contents
Advertisement
Quick Links
Advertisement
Table of Contents

Related Manuals for CompuLab IPC3


Summary of Contents for CompuLab IPC3
- Page 1 Owner’s Manual Revision 2.3 Nov-2017...
-
Page 2: Table Of Contents
QUICK START GUIDE ......................9 ......................9 O OPEN SERVICE DOOR RAM ........................9 NSTALLING ....................... 10 NSTALLING STORAGE ......................11 NABLING BATTERY IPC3 ......................... 11 ONNECTING ....................... 12 OOTING INDOWS ........................12 OOTING INUX BIOS S ....................... 12 ETUP TILITY MAINTENANCE ........................ -
Page 3: Introduction
LAN1: Intel I219 GbE PHY (MAC integrated into the chipset) (RJ-45) LAN2: Intel I211 GbE controller (RJ-45) Wireless (optional) WLAN 802.11ac (2.4/5GHz dual band) + Bluetooth 4.0 5GHz channel availability depends on regulations of Country where IPC3 is used http://www.fit-pc.com Page 3 of 15 IPC3 owner’s manual... - Page 4 Relative Humidity 10% to 90% (operation) 5% to 95% (storage) Enclosure Material Die Cast Aluminum Cooling Passive Cooling Fanless Design Dimensions 19cm x 16cm x 4cm Weight 1150gr Package Warranty 5 years http://www.fit-pc.com Page 4 of 15 IPC3 owner’s manual...
-
Page 5: Ipc3 Features
1x HDMI 1.4 with audio support 1x DisplayPort 1.2 To connect IPC3 to a DVI display, use the provided HDMI to DVI-D adapter. Use a DVI cable to connect the adapter to the display. Audio There are 2 standard 3.5mm jacks on the back panel. -
Page 6: Serial Port
Stereo line-out using a standard 3.5mm plug S/PDIF 7.1 out using provided cable IPC3 features two 10/100/1000BaseT Ethernet ports using standard RJ45 connectors. Use a standard Ethernet cables to connect. The connectors feature built-in LEDs that are lit when a connection is detected. -
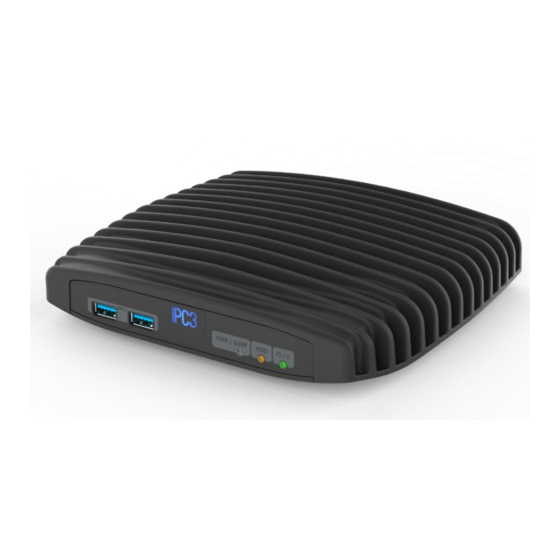
Page 7: Front Panel
Tel: +972-48-290-168 | Fax: +972-48-325-251 | www.fit-iot.com Front panel The features of the front panel of IPC3 depend on the specific FACE Module used. FACE Module FACE Modules are extension boards that integrate seamlessly into IPC3 to provide custom functionality and I/O extension. -
Page 8: Board Features
Hayetsira St. 17, Yokneam, Israel Tel: +972-48-290-168 | Fax: +972-48-325-251 | www.fit-iot.com Board features http://www.fit-pc.com Page 8 of 15 IPC3 owner’s manual... -
Page 9: Quick Start Guide
Installing RAM Note: Make sure to use non-ECC DDR4. IPC3 rev 2.0 supports two DDR4-2133 SODIMM modules up to 16 GB each (32 GB total) in dual channel configuration. RAM SODIMM sockets are accessible once service door is removed. Make sure RAM modules are seated and latched properly. -
Page 10: Installing Storage
Hayetsira St. 17, Yokneam, Israel Tel: +972-48-290-168 | Fax: +972-48-325-251 | www.fit-iot.com Installing storage IPC3 rev 2.0 supports the following storage devices: M.2 M-key 2280 NVMe / SATA SSD 2.5” HDD / SSD Either can be installed as a boot device. Both can be installed together. -
Page 11: Enabling Rtc Battery
To enable RTC battery push the RTC battery DIP switch to “ON” state Connecting IPC3 Turn off the display and connect it to the IPC3 HDMI (use the HDMI to DVI adapter if needed) or DisplayPort connector. Connect the USB keyboard and mouse to USB2 port. -
Page 12: Booting Windows
Linux loads automatically on power up. Upon boot you will be guided through the Linux Mint first-boot setup procedure. BIOS Setup Utility Turn off the IPC3. Turn on while holding down the Del key, until access into AMI Inc. BIOS utility. See http://www.fit-pc.com/wiki/index.php/Main_Page. -
Page 13: Maintenance
Hayetsira St. 17, Yokneam, Israel Tel: +972-48-290-168 | Fax: +972-48-325-251 | www.fit-iot.com Maintenance IPC3 requires no maintenance. You should not take the IPC3 apart other than opening the service door. Taking IPC3 apart will void its warranty. Safety instructions Use the following safety guidelines to help protect your computer from potential damage and to help to ensure your personal safety. -
Page 14: Service
This warranty is void if the product has been altered or damaged by accident, misuse or abuse. Keep the original package for shipping in case of hardware failure. In case of HW failure of an IPC3 under warranty, please contact the seller of that IPC3. Please provide the following required information: ... - Page 15 -Increase the separation between the equipment and the party responsible for compliance receiver. (Compulab Ltd.) could void the user’s -Connect the equipment into an outlet on a circuit authority to operate the equipment. different from that to which the receiver is connected.
Need help?
Do you have a question about the IPC3 and is the answer not in the manual?
Questions and answers