
Related Manuals for HTP MicroCut 875SC


Summary of Contents for HTP MicroCut 875SC
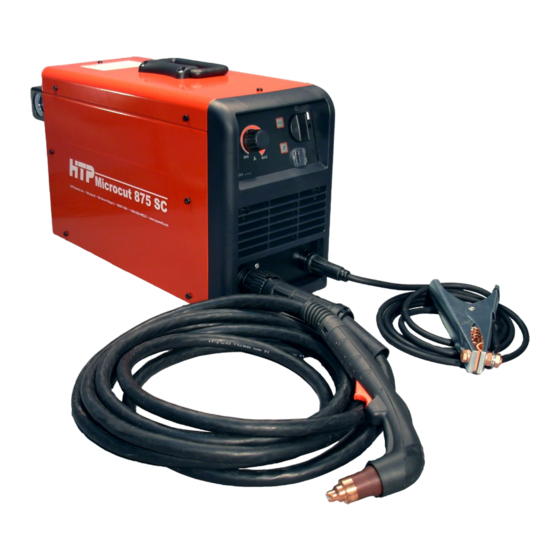
- Page 1 HTP MicroCut 875SC Owner’s Manual HTP America, Inc. · 180 Joey Drive · Elk Grove Village, IL 60007-1304 Phone: 847-357-0700 · Fax: 847-357-0744 · Web: www.usaweld.com...
-
Page 2: Table Of Contents
CNC interface and 20’ machine torch. However, you can also operate the MicroCut 875SC manually with a 20’ hand torch. If you purchased the 20’ hand torch, you can always upgrade your machine to meet CNC plasma cutting table compatibility at a later date. -
Page 3: Warranty
As a matter of general policy only, HTP may honor claims submitted by the original user within the foregoing periods. In the case of HTP’s breach of warranty or any other duty with respect to the quality of any goods, the exclusive remedies therefore shall be, at HTP’s option, (1) repair or (2) replacement or, where authorized in writing by HTP in appropriate cases, (3) the reasonable cost of repair or replacement at an authorized HTP service station upon return of the goods at the Customer’s risk and expense. -
Page 4: General Precautions & Safety Suggestions
General Precautions & Safety Suggestions HTP America values your safety and the safety of those around you. Please read, follow, and save the following safety precautions and operating instructions in order to maintain a safe work environment and to ensure proper handling of all equipment. - Page 5 Risk of Fire or Explosion Wear protective clothing to protect yourself Wear protective clothing and insulated weld- from flying sparks and hot metal. ing gloves, or use proper tools, if you must Do not cut near flammable material. If handle hot parts or materials.
- Page 6 Wear protective clothing made from durable, Do not cut coated metals, such as galvanized, flame-resistant material (leather or wool) and lead, or cadmium plated steel, unless you foot protection. remove the coating from the workpiece, the Wear a helmet or face shield with the correct area is well ventilated, or you are wearing an ...
-
Page 7: Inspection
The MicroCut 875SC operates off of a 220 volt (+/ Damage incurred due to water and oil entering -20%) single phase input power supply, wired for your plasma cutting system from the air supply a minimum of 30 amps. -
Page 8: Front Panel Connections And Controls
If installed incorrectly, you exceed the duty cycle (40% at 55 amps) the cutter will not operate. of the MicroCut 875SC. If you exceed the duty cycle of the cutter, leave the machine on, 2) Cutting Current Adjustment: Controls the allowing the cooling fan to run. -
Page 9: Setup
To purge the torch, press the gas purge on the torch into the center of the adapter block button; air will flow and then stop flowing on the front of the MicroCut 875SC (See Fig. 3, automatically. #1). Rotate the plasma torch until the plastic tab... -
Page 10: Operation
Depress the torch trigger to start the plasma arc, 2) Connect the MicroCut 875SC to a clean, dry and slowly roll the torch perpendicular to the source of compressed air. Set the regulator on workpiece. -
Page 11: Maintenance & Service
If you notice any damage to the machine or torch cover by blowing into the louvers located on the cable assembly, contact HTP America, Inc. directly front and/or back of the power source. Removing at 1-800-USA-WELD. -
Page 12: Hand Torch Parts Breakdown
MicroCut 875SC Tecmo TH-70 Hand Torch Parts & Consumables Part# Description A) 87005HSMO Shield Cap B) 87005HMO Shield Cup Body C) 87030MO Contact Cutting Tip, 20-50A D) 87003MO Electrode E) 87058MO Swirl Ring F) 87002HTH TH-70 Torch Head 87030GSMO (Not Pictured) Gouging Tip, 45A... -
Page 13: Machine Torch Parts Breakdown
MicroCut 875SC Tecmo TM-70 Machine Torch Parts & Consumables Part# Description A) 87005SMMO Shield Cap B) 87005HMO Shield Cup Body C) 87030MO Contact Cutting Tip, 20-50A D) 87003MO Electrode E) 87058MO Swirl Ring F) 87002MTH TM-70 Torch Head 87002MT (Not Pictured) -
Page 14: Microcut 875Sc Parts Breakdown
MicroCut 875SC Parts Breakdown Description Part Number Description Part Number Description Part Number Front Panel Label 66117 18 Thermostat 65023 35 — — Amp Adjustment Knob 66106 19 Fan 64182 36 Pressure Switch 64032 On/Off Knob — 20 — —... -
Page 15: Wiring Diagram
Wiring Diagram Switch Pilot-Cut 61083300 OUT1 OUT2 OUT3 PCB Line Filter PCB Fuses 61734000 618200000L Primary Inverter PCB Sec. 61088800 Inverter Torch 61267000 400V 230V Man/Auto Pressure Switch Tr. Aux. Panel Safety Switch Pilot SICOR1 Torch Safety Switch SICOR2 Torch Switch Pilot Solenoid Valve Res.
Need help?
Do you have a question about the MicroCut 875SC and is the answer not in the manual?
Questions and answers