Table of Contents
Advertisement
Advertisement
Table of Contents

Related Manuals for Seaga Space Saver Series


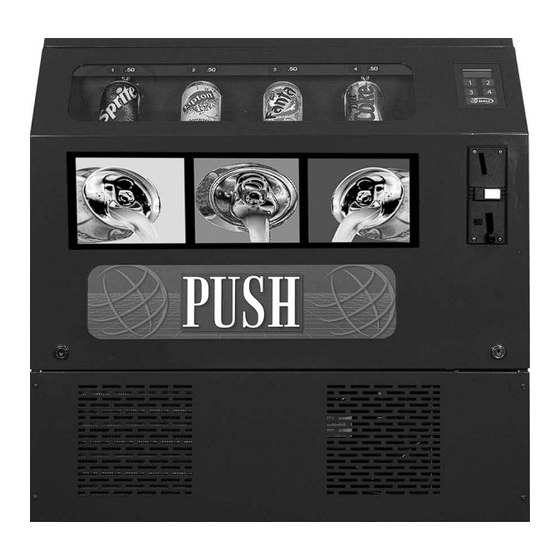
Summary of Contents for Seaga Space Saver Series
- Page 1 Space Saver Series Table Top Soda Vendor Operator’s Manual...
-
Page 2: Equipment Inspection
8:30 a.m. - 4:00 p.m. CST. Mon thru Fri +44(0)1492 874010 815.297.9500 ext 160 +44(0)1492 874644 Fax 815.297.1758 Fax email: info@seaga.co.uk email: customercare@seagamfg.com Seaga Manufacturing, Inc. Seaga UK Ltd. 700 Seaga Drive Unit 8, Caebach, Off Builders Street Freeport, IL 61032 U.S.A. Llandudno North Wales LL30 1DR seagamfg.com... -
Page 3: Important Notices
The Space Saver Series Table Top Soda Vendor The Standard models are for operation in the North American markets where as the [F] versions are intended for the European and U.K. markets This Operator’s Manual is divided into four (4) main sections consisting of a brief description of the Space Saver Beverage Vendor, Service Mode,... - Page 4 LEVELING YOUR VENDOR Once you have installed your vendor in its proper location, you will need to level it to ensure trouble free operation. The vendor is provided with 4 threaded levelers. These can be screwed into the bottom of the vendor and can be adjusted up or down as needed to ensure a proper level.
-
Page 5: Service Mode
Fig.4 LCD Display Key Pad The LCD Display shows the customer the amount of money entered into the vendor, and the cost of their selection, it shows the operator the Service Mode function for setting and testing the various functions of the vendor. Section 2 SERVICE MODE The operation of the machine can be adjusted by entering service mode by pressing the red button on the VMC circuit... - Page 6 3. Individual Product Vended (from each selection) up to 999 i. Press the Red Service Button repeatedly till the LCD Displays Au.— You are now in Audit Mode ii. Press Selection 1 to reveal the total cash ($/£/€) and (c/p) taken Displays ****and--.
- Page 7 00.50 00.10 00.05 10.00 20.00 50.00 Notes: - Coin Values between 00.00 and 99.99 can be set to any coin - Setting a value of 00.00 to a coin still allows the coin to be accepted. - The machine will automatically exit from Coin Value Setting within 60 seconds unless a button hasn’t been pressed or coin inserted in that time.
- Page 8 There is no automatic exit from this mode, this must be done through Service Code Ct MOTOR ASSIGNMENT Overview The following details would be helpful in a proper assignment of the Motor version. The vendor uses Seaga 3 wire 12v DC gray motor Motor Version...
- Page 9 Generally speaking the timing value is set to the normal vend time. For example, if the vend normally takes 6 seconds to complete, then set the timing value to 6. This allows for the VMC to ‘expect’ a home signal at the required time and to ignore any spurious signals in the meantime.
-
Page 10: Factory Default Setting
2. Press Selection 1 to activate test sequence Displays test The machine will now perform a test as outlined below any faults that occurred will be indicated by a 2 digit code at the end of the Test Sequence. Displays Er.** where ** may be a 2 digit code 3. -
Page 11: Software Version
Motor 5 Error Remove Jam-Activate Test Sequence-Exit Service Mode available in Motor 6 Error Remove Jam-Activate Test Sequence-Exit Service Mode Beverage Motor 7 Error Remove Jam-Activate Test Sequence-Exit Service Mode Vendor Motor 8 Error Remove Jam-Activate Test Sequence-Exit Service Mode Motor 9 Error Remove Jam-Activate Test Sequence-Exit Service Mode Motor 10 Error... -
Page 12: Sold Out Feature
Occurrences of this are extremely rare and are usually a result of Voltage Spikes or strong Electro-Magnetic Interferences. The Device may also be reset by depressing the Black reset Button on the Circuit Board. This does not effect any of the overall operation of the VMC;... -
Page 13: Common Questions And Answers
Vertical Shelf screws Coin Validator PCB card Coin Box COMMON QUESTIONS AND ANSWERS Q. How High Can I set my Prices? A. Each selection can be priced individually up to $95.95 Q. Can Customers reach down and help themselves to product? A. - Page 14 The Beverage Can Unit is a refrigerated unit. The Unit has 4 different lanes handling 26 Cans each. Total Can handling capacity is 104. The unit incorporates a self-contained pull out type refrigeration deck. ACCESSING CAN UNIT The can dispensing unit can be easily accessed by opening the two locks at the top of the can unit door (Fig. 6). The door is then opened downwards.
- Page 15 and then load 1 can in 3rd shelf (step 2), fill the bottom shelf completely (step 3) Now Load 1 can in 2 shelf (step 4) Load 3rd shelf completely (step 5)
- Page 16 Load 1 can in 1 sty shelf (step 6) Load 2 shelf completely (step 7) After this load the remaining cans in the 1st shelf (step 8). Special Note: We suggest that you always partially fill the vendor with product and perform at least five (5) test vends. Test vends can be performed easily by entering Service Mode and running “Individual motors testing”.
- Page 17 The Cans are vended as per Fig.7 Shelf No.1 vends first Fig.7 Shelf No.2 vends second Shelf No.3 vends third Shelf No.4 vends last Note: The beverage cans in the lower shelf will be the last to be vended by the machine. The new product stock must be loaded in the lower shelves.
-
Page 18: Temperature Check
Fig.9 Thermostat Knob TEMPERATURE CHECK Once your vendor is unboxed you will need to plug in your vendor and allow it to come to operating temperature. It will take about 18 hours for the vendor to reach an operating temperature of 38 F - 45 F. Temperature fluctuation is normal, and will depend upon your local climate.
Need help?
Do you have a question about the Space Saver Series and is the answer not in the manual?
Questions and answers