
Subscribe to Our Youtube Channel
Related Manuals for Svantek SV 103


Summary of Contents for Svantek SV 103
- Page 1 SV 103 USER'S MANUAL________________________________________________________ Daily Vibration Exposure Meter USER’S MANUAL USER’S MANUAL USER’S MANUAL USER’S MANUAL SVANTEK Sp. z o.o.
- Page 2 Microsoft and Windows are registered trademarks of Microsoft Corporation Copyright © 2014, SVANTEK sp. z o.o. All rights reserved. No part of this publication may be reproduced or distributed in any form, or by any means, without prior written consent from SVANTEK, Warsaw, Poland...
-
Page 3: Table Of Contents
SV 103 USER'S MANUAL________________________________________________________ CONTENTS INTRODUCTION Vibration risk and it’s assessment SV 103 as a new generation vibration exposure meter SV 103 SYSTEM DESCRIPTION SV 103 key features Kit components Related equipment & accessories Instrument Software (Firmware) options available GETTING STARTED... - Page 4 SV 103 USER'S MANUAL________________________________________________________ Reviewing measurements BASIC OPERATIONS WITH THE PC SOFTWARE Installing and connecting to PC Main software window Instruments inventory panel 5.3.1 Manage the instrument options Configuration setup 5.4.1 Working with configuration setup files 5.4.2 Measurement parameters settings tab 5.4.3...
-
Page 5: Introduction
SV 103 USER'S MANUAL________________________________________________________ INTRODUCTION Vibration risk and it’s assessment During human contact with the surface of the vibrating machine, mechanical vibrations are transmitted directly to the human body, affecting the individual tissues or even the whole body. Vibration that affects humans is called human vibration and is divided into whole-body and hand-arm vibration. -
Page 6: Sv 103 As A New Generation Vibration Exposure Meter
SV 103 is the first ever made personal hand-arm Daily Vibration Exposure Meter (DVEM). Instrument meets ISO 8041 standard and it is an ideal choice for the measurements according to ISO 5349. The SV 103 is typically attached to the user’s arm. Similarly to noise dosimeters, SV 103 daily vibration exposure meter is small enough not to interfere with working activities. -
Page 7: Sv 103 System Description
49.5x 19.2 mm, weight 150-160 grams with SV107 accelerometer and one of vibration contact adapters Kit components • SV 107 – hand-arm triaxial accelerometer for SV 103 instrument including hand straps • SC 156 - micro USB 2.0 cable • CD with instruction •... -
Page 8: Related Equipment & Accessories
Related equipment and accessories • SV 111 –Vibration calibrator for in-situ check to ISO 8041:2005 • SA 73 - Carrying case for SV 103 instrument and accessories (waterproof) Instrument Software (Firmware) options available • SF 103 OCT 1/1 –11 band 1/1 Octave real time analysis option •... -
Page 9: Getting Started
USB connector (charging, and data download) • charging connector (reserved for future use) • fast infrared port (reserved for future use) • accelerometer mounting head micro USB connector Figure 3-2 SV 103 side view – accelerometer and micro USB connector... -
Page 10: Mounting Of Sv 103 Vibration Exposure Level Meter
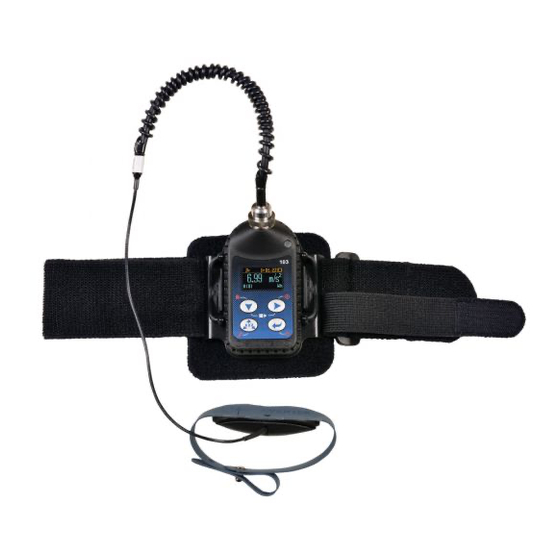
Figure 3-3 SV 103 back view - charging and infrared port (reserved for future use) Mounting of SV 103 vibration exposure level meter The SV 103 should be attached to the arm of the operator and the accelerometer mounted on the hand. Figure 3-4 Typical mounting of SV 103 on an operator’s arm The transducer is supplied with 3 adapters of different shape. -
Page 11: Led Status Indicator
SV 103 USER'S MANUAL________________________________________________________ LED status indicator There is a three-colour instrument LED status indicator on the SV 103, located to the right of the accelerometer mounting head and above the display. Błąd! Nie można odnaleźć źródła odwołania. explains conditions under which the specific LED colour appears. -
Page 12: Primary Key Functions
SV 103 USER'S MANUAL________________________________________________________ 3.6.1 Primary key functions On the front panel of the instrument the following control push-buttons are located. See below for primary (short press) key functions description: <SCROLL> key <SCROLL> key <AXIS> key <ENTER> key Figure 3-7 Control keypad on the front panel – primary key functions The <SCROLL>... -
Page 13: Alternate Key Functions
Figure 3-9 Control keypad on the front panel – alternate key functions Holding down individual key for few seconds a countdown is displayed. If you release the key too early, SV 103 returns to the last used VIEW mode and the selected control is not executed. -
Page 14: Alternate Combined Keys Function
USB port or optionally provided charger (SA 54). Ensure the SV 103 is fully charged prior to use by connecting it to a USB port or to USB charger. Ensure the power supply is connected and the supply is switched on. The SV 103 will automatically switch on during charging and display how much charge is within the instrument. -
Page 15: Turning On/Off
(“Shutting down” 3 ) is displayed. Thus, the SV 103 gives you time to decide if you really want to turn off the instrument. If you release the key too early, the SV 103 returns to the last presented VIEW mode. -
Page 16: Starting And Stopping Measurement Run
Notice: If auto-run (timer) mode is active, SV 103 will automatically stop the measurement when the set time is over and then turn off. If no auto-run mode is used and specific time has not been preset, the unit will continue to measure until the battery is exhausted. -
Page 17: Running And Operating Basic Procedures
The VIEW mode presentation concept Such an advanced vibration instrument as the SV 103 offers a large amount of parameters for the operator to inspect. Therefore all information is divided in neatly organized manner as VIEW modes for each channel. -
Page 18: Results For Channels View Mode
SV 103 USER'S MANUAL________________________________________________________ channel name parameter units parameter value measured parameter name weighting filter Figure 4-2 Primary parameters view mode screen 4.1.3 Results for channels view mode To get information about a number of results at one time it is handy to switch to the “results list” view mode. -
Page 19: Instrument Status View Mode
SV 103 USER'S MANUAL________________________________________________________ current value of the centre spectrum frequency at cursor position weighting cursor filter Figure 4-4 1/1 and 1/3 Octave analysis spectrum graph RMS view mode screens Figure 4-5 1/1 and 1/3 Octave analysis spectrum graph MAX view mode screens 4.1.5... -
Page 20: File Information View Mode
Apart from simple LED alarm indications (see chapter 0) there are a two alarm conditions (EAV and ELV), when ALARM presentation screens will appear. During a measurement run the SV 103 will immediately turn on the display at the time that the programmable alarm condition is exceeded. Press any key, to confirm the information. -
Page 21: Loading Measurement Setups
These tests shall be carried out immediately before and after measurements are made. The SV 103 instrument is offered with the dedicated SV 107 hand-arm accelerometer. It makes the calibration very easy by direct usage of commonly available vibration calibrators. The instrument is factory calibrated with the supplied accelerometer. -
Page 22: Calibration The Instrument
Notice: The manufacturer’s recommended factory calibration interval is every 12 months for this instrument to be confident in its continuing accuracy and compliance with the international specifications. Please contact your local SVANTEK distributor for further details. 4.5.1 Calibration the Instrument To calibrate the instrument the user has to perform next steps: 1. -
Page 23: Verification The Instrument's Calibration
Notice: If it is required to perform so called post-calibration of the instrument (in case the Post Calibration is pre-programmed within configuration setup) the SV 103 automatically adds the calibration factor to the header of the result files. This doesn’t modify the saved results and gives the user to possibility to compare the possible changes of accelerometer sensitivity before and after the measurements. -
Page 24: Calibration The Contact Forces Transducer
SV 103 USER'S MANUAL________________________________________________________ The measurement lasts minimum 30 second and stops until the same result is obtained 3 consecutive times. It is possible to stop the measurement by pressing the <AXIS> key. After the measurement, its result is presented on the display. The user can now check if the result of the measurement is close enough to the calibration level. -
Page 25: Auto-Run Mode Information
(see chapter 5.4.6 General settings tab). Locking SV 103 unit: The SV 103 can be set up to automatically go into locked mode when it starts. For this purpose the “Lock During Measurement” position in the SUPERVISOR software should be set to On. -
Page 26: Measurement Procedures
SV 103 USER'S MANUAL________________________________________________________ gives you time to decide if you really want to activate security lock. If you release the key too early, SV 103 returns to the last presented VIEW mode. Unlocking SV 103 unit: There are two ways for unlocking the instrument, which can be programmed via the SUPERVISOR software. -
Page 27: Reviewing Measurements
SV 103 USER'S MANUAL________________________________________________________ Reviewing measurements Most of the results can be inspected in real-time during either measurement run or stopped mode of operation. If the display screen is turned off just press any key (but watch notice below). The keys on the keypad of the instrument enable you to navigate thru most of the parameters. For specific information on the VIEW modes. -
Page 28: Basic Operations With The Pc Software
Plug the opposite end of the cable (micro USB) into the instrument itself • The SV 103 is powered and charged directly through the computer; thus, you do not need separate • charger. The instrument screen will be switched on automatically with current charging information only Turn on the instrument - long press of the <ENTER>... -
Page 29: Main Software Window
Control panel enables you to select: Instrument control, Data browser or Session you work with • Instrument filter enables SV 103 device selection, or other Health and Safety dedicated instruments • Inventory panel detects all SV 103 connected devices (see chapter 5.3) •... -
Page 30: Instruments Inventory Panel
SV 103 USER'S MANUAL________________________________________________________ Instruments inventory panel Click the SV 103 big instrument icon in the left “Instrument filter” Panel (see Figure 5-2) to get access to the devices. Inventory panel (Figure 5-3) enables you to see all currently connected, or previously connected instruments of the same type. -
Page 31: Manage The Instrument Options
SV 103 USER'S MANUAL________________________________________________________ possible context operations right click on instrument row Figure 5-3 Inventory panel and its capabilities There are two control buttons near the Inventory Panel top menu: Settings button enables to configure current local configuration file, that can be later uploaded to the SV 103 instrument;... -
Page 32: Configuration Setup
Settings described here apply to the type SV 103 model. If you are also using other instruments and have them connected, they will appear in the Inventory section panel, but no device will appear unless you first select the appropriate model picture on the left side of the application in instrument filter section. - Page 33 Setup files manager panel For example: To download current settings file from the SV 103, modify it, save with custom name, send it back to the device, export the setup to USB flash memory, and make sure the uploaded settings...
- Page 34 SV 103 USER'S MANUAL________________________________________________________ Figure 5-2) 4. Go through all the tabs to verify, or change required parameters of the measurement runs. Follow the chapters from Błąd! Nie można odnaleźć źródła odwołania. to 0 to understand and configure the instrument 5.
- Page 35 SV 103 USER'S MANUAL________________________________________________________ Figure 5-6 "Instrument files" panel and context commands 11. This ends the procedure. Disconnect the instrument and the instrument is now ready for a new measurement run using the settings you have just uploaded. Notice: During configuration there are quite a number of parameters to set. To understand detailed meaning of parameters and how the results are calculated refer to Appendix D and check the following by chapters.
-
Page 36: Measurement Parameters Settings Tab
Others fields must be setup by the user. Within the Dosimetry tab you can choose in which mode of operation the SV 103 should work: Dosimeter, or Dosimeter with 1/1 or 1/3 octave analysis. -
Page 37: Triggering Settings Tab
SV 103 USER'S MANUAL________________________________________________________ The No. of Measurements parameter defines the number of cycles (with the measurement period • defined by Integration Time) to be performed by the instrument. The No. of Measurements number values are within the limits [1, 1000] of infinitive (Inf.). -
Page 38: Time-History Data Logging Settings Tab
SV 103 USER'S MANUAL________________________________________________________ result value (Source) passes below the level determined by the selected decibel Level. The measurement is stopped when the conditions set in the General Settings sub-list are fulfilled or after pressing the <Start/Stop> push-button or after receiving the proper control code remotely. -
Page 39: Display View Configuration Tab
You can choose the units of the displayed results in the position Units as Logarithmic, Linear Metric or Linear Non-Metric. right panel named “Display Results”, will find list twenty • measurement parameters, that can be configured to be presented on the SV 103 display, when... -
Page 40: General Settings Tab
SV 103 USER'S MANUAL________________________________________________________ you press <SCROLL> key. See Appendix D to review acronyms for each parameter. Figure 5-10 Display VIEW configuration tab 5.4.6 General settings tab General settings tab concerns to many different usability options: See the followed by chapters... -
Page 41: Security Settings Panel
See the chapter 4.7 how to lock, and unlock the SV 103 instrument. If “Unlock on Key” is set to On, SV 103 will require special code to be input by pressing four keys defined in this panel in a particular sequence. -
Page 42: Auxiliary Settings Panel
SV 103 USER'S MANUAL________________________________________________________ Figure 5-12 Keyboard security settings panel 5.4.6.2 Auxiliary settings panel Under auxiliary settings panel it is possible to: Set the calibration level and enable to perform additional calibration after a measurement session • and add the results to the file saved in the memory. In the panel below, there are three options for saving results: not to save “Off”, save in the last file “Last File”... -
Page 43: Auto-Run Settings (Timer, Pauses) Tab
SV 103 USER'S MANUAL________________________________________________________ 5.4.7 Auto-Run settings (timer, pauses) tab The Auto-Run panel enables the user to program the internal real time clock to act as a delayed start and stop timer. The instrument can be switched on by itself at the pre-selected programmed time and it can then perform the measurement run, which was used before it was last switched off. -
Page 44: Signal Recording Options Tab
SV 103 USER'S MANUAL________________________________________________________ The Day of week determines the days in a week when the measurements should start. The timer can be of measurements days) up programmed (Max. no. to 100 days ahead or without limitation (Infinity) and during these days settings of the current state of the Real Time Clock is taken into account. Make sure to check that the real time clock settings for the measurement location are correct before beginning a delayed timer measurement. -
Page 45: Working With Data Files
SV 103 USER'S MANUAL________________________________________________________ If Whole Measurement is chosen the panel consists only positions, where the user may select three signals for record (Record) from tri-axial transducer. Figure 5-16 Continuous recording configuration panel Working with data files 5.5.1 Downloading instrument files If you want to download any recorded files, whatever it is: logger, wave or time domain files, you should click the Download button on the control area. -
Page 46: Local Files "Data Browser
SV 103 USER'S MANUAL________________________________________________________ further manage downloaded files. Run data files in the instrument can be optionally deleted after download by checking the box under the Download button. To change the working directory or scan other folders, press the “Change dir” button, and appropriate window will appear, see figure below. - Page 47 SV 103 USER'S MANUAL________________________________________________________...
-
Page 48: Working With Sessions And Reporting
SV 103 USER'S MANUAL________________________________________________________ Working with sessions and reporting One of the main advantages of the SUPERVISOR is its incredibly simple but professional and user customizable report creation. Once you get familiar with the power of document design you will love it and probably never come back to the old fashioned way of reporting. - Page 49 SV 103 USER'S MANUAL________________________________________________________ SESSION configuration panel enables you to see the currently selected measurement data in the “Session data” sub-panel. double click to add panel to the “Add panel” contains a list of available information sections or chunks report so called panels that are available to place in the report.
-
Page 50: Force Threshold Slider
SV 103 USER'S MANUAL________________________________________________________ 5.6.1 Force threshold slider The contact force plot is shown in the Logger results panel. Supervisor provides set of tools for creating automatic marker in relation to the force threshold: Figure 5-23 Force threshold slider Changing the value of the force threshold adjusts the marker Force level+ for which results such as Current Exposure or Vector are calculated beneath the graph. - Page 51 SV 103 USER'S MANUAL________________________________________________________ Figure 5-24 SUPERVISOR Report Options Figure 5-25 Hand-Arm vibration exposure (ISO 5349-A) panel Figure 5-26 Instrument configuration panel...
- Page 52 SV 103 USER'S MANUAL________________________________________________________ Figure 5-27 Logger results panel Figure 5-28 Logger results (table) panel Figure 5-29 Session header panel...
- Page 53 SV 103 USER'S MANUAL________________________________________________________ Figure 5-30 Configurable Text panel Figure 5-31 Total results panel...
-
Page 54: Sv103 Maintenance
Cleaning Few things to remember: Every time the SV 103 gets too dirty, clean the surface of the instrument with damp soft cloth. • Changing the accelerometer To change the hand-arm triaxial accelerometer, you have to:... -
Page 55: Storing The Instrument
Do not store the instrument permanently connected to the USB port. It shortens battery lifecycle • When the SV 103 is turned off, it still draws a small amount of battery power. Therefore • it is recommended to charge the cell every few months if it is not going to be used regularly. -
Page 56: Svantek Service
5. In case the measurement of the vibration level is frozen or set to a fixed value proceed with turn- off/turn-on procedure (chapter 3.8), then with hardware reset of the instrument (chapter 7.2). 6. In case the reset does not help call Local Authorized Distributor or Svantek Service Office. Resetting the instrument SYSTEM RESET: (internal software reset clears any setup configuration, and brings back the •... - Page 57 Contact your local authorized distributor from whom the product was purchased. You can obtain the name and contact information of your local authorized distributor from SVANTEK by using the e-mail or telephone information listed above or use our website to find nearest distributor office.
Need help?
Do you have a question about the SV 103 and is the answer not in the manual?
Questions and answers