
Related Manuals for Viega 8142


Summary of Contents for Viega 8142
- Page 1 Viega Eco Plus washbasin corner element Instructions for Use for WB with single-hole fitting Model Year built: 8142 from 09/2005 en_INT...
- Page 2 Viega Eco Plus washbasin corner element 2 from 24...
-
Page 3: Table Of Contents
Areas of use Product description 2.3.1 Overview 2.3.2 Compatible components 2.3.3 Sound protection 2.3.4 Technical data Handling Assembly information 3.1.1 Mounting conditions 3.1.2 Installation dimensions 3.1.3 Required tools Assembly 3.2.1 Mounting element Disposal Viega Eco Plus washbasin corner element 3 from 24... -
Page 4: About These Instructions For Use
This restriction does not extend to possible operating instructions. The installation of Viega products must take place in accordance with the general rules of engineering and the Viega instructions for use. -
Page 5: About This Translated Version
German/European directives specified in this manual: The information herein is not binding for other countries and regions; as said above, they should be understood as a recommendation. Viega Eco Plus washbasin corner element 5 from 24... -
Page 6: Product Information
Intended use 2.2.1 Areas of use The Viega Eco Plus washbasin element is suitable for mounting on masonry wall constructions and support profiles pursuant to the regula- Ä „Regulations from section: Fields of application / tions in section Mounting conditions“ on page 6 . -
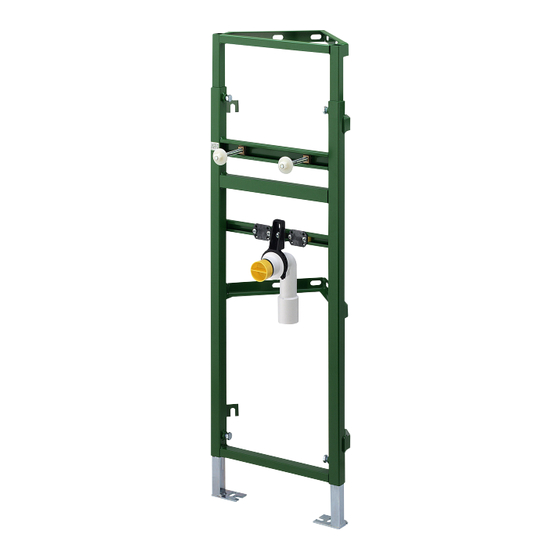
Page 7: Product Description
Product information Product description 2.3.1 Overview Fig. 1: Components and scope of delivery 1 - Viega Eco Plus element 2 - adjusting screws 3 - threaded bolt 4 - mounting bracket for drain elbow 5 - connections for wall plates... -
Page 8: Technical Data
Product information 2.3.4 Technical data The product has the following technical data: drain elbow DN 40 / 50 Rubber nipple DN 40 / 30 Construction height 980 mm–1130 mm Viega Eco Plus washbasin corner element 8 from 24... -
Page 9: Handling
With the construction height, the marked height of the upper edge of the finished floor must be observed. 3.1.2 Installation dimensions Fig. 2: Dimensions 3.1.3 Required tools The following tools are required for mounting the washbasin element: Viega Eco Plus washbasin corner element 9 from 24... - Page 10 Handling drill with 10 mm drill bit ratchet with sockets: 13 mm / 17 mm fork or ring spanner: 13 mm / 17 mm Viega Eco Plus washbasin corner element 10 from 24...
-
Page 11: Assembly
Handling Assembly 3.2.1 Mounting element Mounting in a corner (approx. 90°) Position the element at construction height. The element can be adjusted continuously from 980–1130 mm. Align element. Mark drill holes. Viega Eco Plus washbasin corner element 11 from 24... - Page 12 Handling Drill holes for the wall fixing and the floor supports. Hit dowel (10 mm) into the wall/floor. Viega Eco Plus washbasin corner element 12 from 24...
- Page 13 Handling Screw the element into the wall and into the floor (SW 13 / 17). Viega Eco Plus washbasin corner element 13 from 24...
- Page 14 Handling Connect water and wastewater pipe. Clad the element with a single layer of IFGP cladding panels (1 x 12.5 mm). Viega Eco Plus washbasin corner element 14 from 24...
- Page 15 Position the element at construction height. The element can be adjusted continuously from 980–1130 mm. Remove the floor support where the drainage line is. Align element. Mark drill holes (5 wall fixings and one floor support). Viega Eco Plus washbasin corner element 15 from 24...
- Page 16 Handling Drill holes for the wall fixing and the floor support. Hit dowel (10 mm) into the wall/floor. Viega Eco Plus washbasin corner element 16 from 24...
- Page 17 Handling Screw the element into the wall and into the floor (SW 13 / 17). Viega Eco Plus washbasin corner element 17 from 24...
- Page 18 Handling Connect water and wastewater pipe. Clad the element with a single layer of IFGP cladding panels (1 x 12.5 mm). Viega Eco Plus washbasin corner element 18 from 24...
- Page 19 Mounting on the wall (one-sided fixing) Position the element at construction height. The element can be adjusted continuously from 980–1130 mm. Align element. Mark drill holes (4 wall fixings and two floor supports). Viega Eco Plus washbasin corner element 19 from 24...
- Page 20 Handling Drill holes for the wall fixing and the floor support. Hit dowel (10 mm) into the wall and the floor. Viega Eco Plus washbasin corner element 20 from 24...
- Page 21 Handling Screw the element into the wall and into the floor (SW 13). Viega Eco Plus washbasin corner element 21 from 24...
- Page 22 Handling Connect water and wastewater pipe. Clad the element with a single layer of IFGP cladding panels (1 x 12.5 mm). Viega Eco Plus washbasin corner element 22 from 24...
- Page 23 Screw elements into the wall, into the floor and together (SW 13). Connect water and wastewater pipe. Clad the corner elements with a single layer of IFGP cladding panels (1 x 12.5 mm). Viega Eco Plus washbasin corner element 23 from 24...
-
Page 24: Disposal
Clad the element with a single layer of IFGP cladding panels (1 x 12.5 mm). Disposal Separate the product and packaging materials (e. g. paper, metal, plastic or non-ferrous metals) and dispose of in accordance with valid national legal requirements. Viega Eco Plus washbasin corner element 24 from 24...
Need help?
Do you have a question about the 8142 and is the answer not in the manual?
Questions and answers