
Related Manuals for Cata UBIND60BV


Summary of Contents for Cata UBIND60BV
- Page 1 Induction Hob Instruction Manual / Installation Manual MODEL: UBIND60BV/ UBIND60DBV UBINDB60BV / UBIND60ECOBV UBIND77BV / UBIND90BV / UBIND30BV...
-
Page 2: Safety Warnings
SAFETY WARNINGS PLEASE READ THE FOLLOWING INSTRUCTIONS CAREFULLY BEFORE USING THE APPLIANCE. Installation Electrical Shock Hazard • Disconnect the appliance from the mains electricity supply before carrying out any work or maintenance on it. • Connection to a good earth wiring system is essential and mandatory. - Page 3 • This appliance is to be properly installed and earthed only by a suitably qualified person. • This appliance should be connected to a circuit which incorporates an isolating switch providing full disconnection from the power supply. • WARNING: Use only hob guards designed by the manufacturer of the cooking appliance or indicated by the manufacturer of the appliance in the instructions for use as suitable or hob guards incorporated in the appliance.
-
Page 4: Important Safety Instructions
• During use, accessible parts of this appliance will become hot enough to cause burns. • Do not let your body, clothing or any item other than suitable cookware contact the ceramic glass until the surface is cool. • Metallic objects such as knives, forks, spoons and lids should not be placed on the hob surface since they can get •... - Page 5 • Do not store items of interest to children in cabinets above the appliance. Children climbing on the cooktop could be seriously injured. • Do not leave children alone or unattended in the area where the appliance is in use. •...
- Page 6 • Care should be taken to avoid touching heating elements. • Children less than 8 years of age shall be kept away unless continuously supervised. • This appliance can be used by children aged from 8 years and above and persons with reduced physical, sensory or mental capabilities or lack of experience and knowledge if they have been given supervision or instruction concerning use of the appliance in a safe way and understand the...
-
Page 7: Product Overview
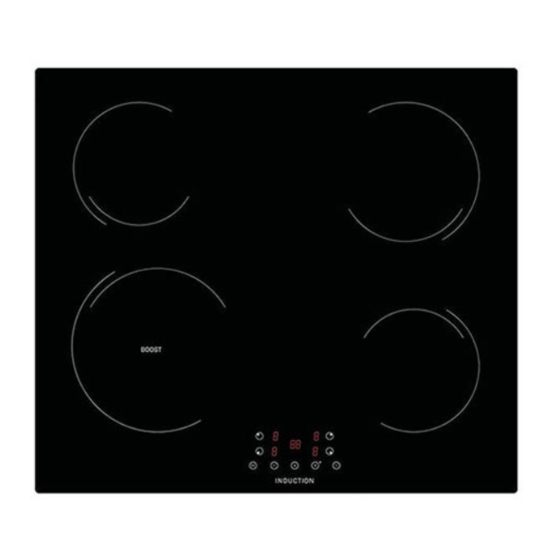
1. max. 1800/2200 W zone 2. max. 1400 W zone 3. max. 1800 W zone 4. max. 1400 W zone 5. Control panel UBIND60BV 1. max. 1800/2200 W zone 2. max. 1400 W zone 3. max. 1800 W zone 4. max. 1400 W zone 5. - Page 8 1. max. 1800/2100 W zone 2. max. 1200/1500 W zone 3. max. 1800/2100 W zone 4. max. 1200/1500 W zone 5. Control panel UBIND60ECOBV 1. max. 1800/2100 W zone 2. max. 1200/1500 W zone 3. max. 1800/2100 W zone 4. max. 1800/2100 W zone 5.
- Page 9 1. max. 1200/1500 W zone 2. max. 1800/2100 W zone 3. Control panel UBIND30BV...
- Page 10 The Control Panel UBIND60BV UBIND60DBV UBINDB60BV UBIND60ECOBV 1. ON/OFF switch 4. Child lock 7. Keep warm 2. Select power level 5. Select heating zone 8. Pause 3. Setting the timer 6. Boost control...
- Page 11 UBIND90BV UBIND77BV UBIND30BV 1. ON/OFF switch 4. Child lock 7. Keep warm 2. Select power level 5. Select heating zone 8. Pause 3. Setting the timer 6. Boost control...
-
Page 12: Product Information
Product Information The ceramic/induction hob can meet different kinds of cuisine demands because of resistance wire heating, micro-computerized control and multi-power selection, really the optimal choice for modern families. The hob centers on customers and adopts personalized design. The hob has safe and reliable performances, making your life comfortable and enabling to fully enjoy the pleasure from life. -
Page 13: Choosing The Right Cookware
Choosing the right Cookware Only use cookware with a base suitable for induction cooking. Look for the • induction symbol on the packaging or on the bottom of the pan. • You can check whether your cookware is suitable by carrying out a magnet test. -
Page 14: Using Your Hob
Using your Hob To start cooking After power on, the buzzer beeps once, all the indicators light up for 1 second then • go out, indicating that the hob has entered the state of standby mode. 1. Touch the ON/OFF switch. - Page 15 when the surface has cooled down to a safe temperature. It can also be used as an energy saving function if you want to heat further pans, use the hotplate that is still hot. Using Boost function (for induction hob only) Activate the boost function 1.
- Page 16 Cancel Keep Warm function 1. Touching the heating zone selection control. 2. a:Touching “slider” to cancel the keep warm function, then the cooking zone will revert to the level you select. b: Touching the function control such as boost, then the cooking zone will revert to you select.
-
Page 17: Using The Timer
To unlock the controls 1. Make sure the hob is turned on. 2. Touch and hold the keylock control for 3 seconds. 、 3. You can now start using your hob. When the hob is in lock mode, all the controls are disabled except the ON/OFF, you can always turn the hob off with the ON/OFF control in an emergency, but you shall unlock the hob first in the next operation. - Page 18 3. Set the time by touching the”-”” +”or touching the “slider” control of the timer (e.g. 5) 4. Touch timer control again, then “1” will flash. 5. set the time by touching the “-“ “+” or touching the “slider”, now the timer you set is 95 minutes. 6.
- Page 19 4. Touch timer control again, the “1” will flash. 5. set the time by touching the ”-“”+” or “slider” control (e.g.9), now the timer you set is 95 minutes. 6. When the time is set, it will begin to count down immediately. The display will show the remaining time.
-
Page 20: Cooking Guidelines
Cancelled the timer 1. Touching the heating zone selection control that you want to cancel the timer. 2. Touching the timer control, the indicator will flash. 3. Touch the “-” control to set the timer to ”00”, the timer is cancelled. Cooking Guidelines ke care when frying as the oil and fat heat up very quickly, particularly if you’re using Boost. -
Page 21: Heat Settings
5. Leave the steak to rest on a warm plate for a few minutes to allow it to relax and become tender before serving. For stir-frying 1. Choose a ceramic compatible flat-based wok or a large frying pan. 2. Have all the ingredients and equipment ready. Stir-frying should be quick. If cooking large quantities, cook the food in several smaller batches. -
Page 22: Care And Cleaning
Care and Cleaning What? How? Important! Everyday soiling on 1. Switch the power to the cooktop off. • When the power to the cooktop is glass (fingerprints, 2. Apply a cooktop cleaner while the switched off, there will be no ‘hot marks, stains left by glass is still warm (but not hot!) surface’... -
Page 23: Hints And Tips
Hints and Tips Problem Possible causes What to do The cooktop cannot No power. Make sure the cooktop is connected to Be turned on. the power supply and that it is switched on. Check whether there is a power outage in your home or area. If you’ve checked everything and the problem persists, call a qualified technician. -
Page 24: Technical Specification
The above are the judgment and inspection of common failures. Please do not disassemble the unit by yourself to avoid any dangers and damages to the induction hob. Technical Specification Induction Hob UBIND60BV UBIND60DBV Cooking Zones 4 Zones Supply Voltage... - Page 25 Induction Hob UBIND60ECOBV Cooking Zones 4 Zones Supply Voltage 220-240V~ 50/60Hz Installed Electric Power 2800W Product Size D× W× H(mm) 590× 520× 58 Building-in Dimensions A× B (mm) 560× 490 Induction Hob UBIND90BV Cooking Zones 5 Zones Supply Voltage 220-240V~ 50/60Hz Installed Electric Power 9300W Product Size D×...
- Page 26 As shown below: Warning: The work surface material must use the impregnated wood or other insulation material. L(mm) W(mm) H(mm) D(mm) A(mm) B(mm) X(mm) UBIND60BV 50 mini UBIND60DBV 50 mini UBIND60BV 50 mini 50 mini UBIND60ECOBV UBIND90BV 50 mini...
- Page 27 A(mm) B(mm) C(mm) 50 mini 20 mini Air intake Air exit 5mm Before you install the hob, make sure that • the work surface is square and level, and no structural members interfere with space requirements. the work surface is made of a heat-resistant material. •...
- Page 28 The isolating switch is easily accessible by the customer. • Before locating the fixing brackets The unit should be placed on a stable, smooth surface (use the packaging). Do not apply force onto the controls protruding from the hob. locating the fixing brackets The unit should be placed on a stable, smooth surface (use the packaging).
-
Page 29: Connecting The Hob To The Mains Power Supply
Connecting the hob to the mains power supply The power supply should be connected in compliance with the relevant standard, or a single-pole circuit breaker. The method of connection is shown below. UBIND60BV / UBIND60DBV / UBINDB60BV / UBIND60ECOBV / UBIND90BV / UBIND77BV UBIND90BV UBIND30BV ... - Page 30 For more detailed information about treatment, recovery and recycling of this for special treatment is product, please contact your local city office, your household waste disposal necessary. service or the shop where you purchased the product. User manual of UBIND60BV&UBIND60DBV&UBINDB60BV&UBIND60ECOBV& UBIND77BV&UBIND90BV&UBIND30BV_v20170601.pdf...
Need help?
Do you have a question about the UBIND60BV and is the answer not in the manual?
Questions and answers