
Related Manuals for CYP CETH-4HDI


Summary of Contents for CYP CETH-4HDI
- Page 1 CETH-4HDI Ethernet/USB PC 4-Port HDMI Converter/Extender Operation Manual Operation Manual...
- Page 3 DISCLAIMERS The information in this manual has been carefully checked and is believed to be accurate. Cypress Technology assumes no responsibility for any infringements of patents or other rights of third parties which may result from its use. Cypress Technology assumes no responsibility for any inaccuracies that may be contained in this document.
-
Page 4: Safety Precautions
SAFETY PRECAUTIONS Please read all instructions before attempting to unpack, install or operate this equipment and before connecting the power supply. Please keep the following in mind as you unpack and install this equipment: • Always follow basic safety precautions to reduce the risk of fire, electrical shock and injury to persons. - Page 5 CONTENTS 1. Introduction ..........1 2. Applications ........... 1 3. Package Contents ........ 1 4. System Requirements ......2 5. Features ..........2 6. Operation Controls and Functions ..3 6.1 Front Panel .........3 6.2 Rear Panel .........4 7. Software Installation ......5 7.1 Installing the DisplayLink Software ..5 7.2 Installing the USB Server Software ...6 7.3 Using the USB Server......7...
-
Page 6: Introduction
1. INTRODUCTION The Ethernet/USB to 4 Port HDMI Converter allows the user to display the output from a PC/Laptop on up to four TV/Monitors either by direct connection (via USB or CAT cable) or over a network connection. For the home, it makes it easy to have multiple screens for browsing the internet, editing word processor documents or playing music or movies simultaneously on all connected displays. -
Page 7: System Requirements
4. SYSTEM REQUIREMENTS • System Hardware Requirements: 2.4 GHz single core CPU with at least 1 GB of RAM for optimal performance. • Operating Systems: Windows XP SP2, Vista (32-bit) & Windows 7 • USB Port Extension: An available USB 2.0 port with USB to mini-USB cable •... -
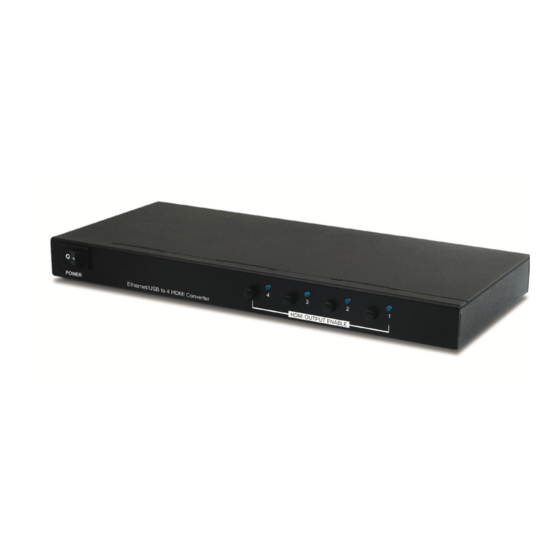
Page 8: Operation Controls And Functions
6. OPERATION CONTROLS AND FUNCTIONS 6.1 Front Panel Power Switch: Turns the system ON or OFF. Enable HDMI Output and LED Indicators: Press the HDMI output enable button to enable or disable the corresponding HDMI output ports. When enabled, the LED for the corresponding HDMI output port will illuminate blue. -
Page 9: Rear Panel
6.2 Rear Panel EDID Control Switch: Use the EDID control switches to determine which EDID setting the unit will use for that HDMI output. When the switch is set to TV, the EDID settings from the TV will be used. When switched to INT, the unit's own EDID settings will be used. -
Page 10: Software Installation
7. SOFTWARE INSTALLATION The following sections list the procedures for installing the USB to HDMI and USB device drivers. Insert the CD (included in the package) into your CD-ROM drive, then begin the USB Install Disc and follow the below steps to install the driver and software. 7.1 Installing the DisplayLink Software Insert the CD driver included in the package and double click on the DisplayLink icon to execute the setup. -
Page 11: Installing The Usb Server Software
7.2 Installing the USB Server Software Double click on the USBServer Setup icon to execute the set up and click finish when the setup is complete. When both DisplayLink and USBServer has been installed completely the USB Server’s icon should appear on the desktop and in the system tray on the right hand side of the desktop. -
Page 12: Using The Usb Server
7.3 Using the USB Server Double click the USB Server icon on the desktop or in the system tray to launch the USB Server software. Connect the unit to the PC directly via USB or CAT cable or via CAT cable through a Router or network switch then press the 'Enable' button (on the front panel of the display) for each of the connected displays to enable them. -
Page 13: Using Displaylink Manager
8. USING DISPLAYLINK MANAGER 8.1 Using DisplayLink Manager After the driver is installed, the DisplayLink Manager utility will automatically appear in the system tray. Right clicking on the icon will bring up the context menu where you can quickly change the settings such as screen rotation and resolution. - Page 14 Color Quality: Select the screen color quality (available only in extended mode). Screen Rotation: Rotate the screen on the additional monitor by 90, 180 or 270 degrees.
- Page 15 Extend to: Reposition the extended screen to the top, bottom, left of right of the primary display. Extend: Set the DisplayLink Manager to Extended mode.
- Page 16 Set as Main Monitor: Set the monitor to be the main monitor. Notebook Monitor off: Set the PC/notebook's monitor off.
- Page 17 Mirror: Set the DisplayLink Manager to Mirror mode. You can see the same desktop image on the additional monitor. Off: Disable the DisplayLink Manager on the system.
-
Page 18: Using Additional Displaylink Managers
Advanced: Opening the Display Properties will allow you to adjust the resolution, color quality, position and refresh rate. 8.2 Using Additional DisplayLink Managers You don’t have to install a new driver as long as you have completed the above installation process in advance. It will automatically define the ID of the new Display Link Manager and will list everything in the Display properties or the display manager menu. -
Page 19: Uninstalling The Device Driver
9. UNINSTALLING THE DEVICE DRIVER Follow the steps below to uninstall the driver. Step 1: To open the Control Panel: Click on Start → Control Panel → Add or Remove Programs. Step 2: Select DisplayLink Core Software and click Remove. Step 3: Click Yes to confirm the removal. - Page 20 Step 4: Click Yes to restart your computer. Then select DisplayLink Graphics and click Remove. Finally, select USB Server and click Remove.
-
Page 21: Connection Diagram
10. CONNECTION DIAGRAM Example 1: Extender Mode PC or Laptop USB Connection Power Supply HDMI Outputs HDTV HDTV HDTV HDTV... - Page 22 Example 2: LAN Mode PC or Laptop LAN Router LAN Connection LAN Connection Power Supply HDMI Outputs HDTV HDTV HDTV HDTV...
-
Page 23: Specifications
11. SPECIFICATIONS Input Ports 1×USB, 1×RJ45, 1×3.5mm Mini-jack Output Port 4×HDMI Video Resolutions Up to 1600×1200/1920×1080 Network Protocol TCP/IP Operating System Windows XP SP2, Vista 32-bit & Windows 7 ESD Protection Human body model: ±15 kV (air-gap discharge) ±8 kV (contact discharge) Power Supply 5 V/2.6 A DC (US/EU standards, CE/FCC/UL certified) -
Page 24: Acronyms
12. ACRONYMS ACRONYM COMPLETE TERM CAT5e Category 5 Cable CAT6 Category 6 cable EDID Extended Display Identification Data HDMI High Definition Multimedia Interface Local Area Network Universal Serial Bus... - Page 28 CYPRESS TECHNOLOGY CO., LTD Home page: http://www.cypress.com.tw...
Need help?
Do you have a question about the CETH-4HDI and is the answer not in the manual?
Questions and answers