Table of Contents
Advertisement
Quick Links
Advertisement
Table of Contents

Subscribe to Our Youtube Channel
Related Manuals for DAPAudio GIG-6


Summary of Contents for DAPAudio GIG-6
- Page 1 GIG-6 ORDERCODE D2260...
- Page 2 Congratulations! You have bought a great, innovative product from DAP Audio. DAP Audio GIG-6 brings excitement to any venue. Whether you want simple plug-&-play action or a sophisticated show, this product provides the effect you need. You can rely on DAP Audio, for more excellent audio products.
-
Page 3: Table Of Contents
Front panel ................................6 Back panel ................................8 Installation ..................................8 Function ..................................9 Set up and operation ..............................13 Connection Cables ..............................13 Maintenance ................................14 Replacing the Fuse .............................. 14 Troubleshooting ................................. 14 Product Specifications .............................. 15 Appendix 1: GIG-6 block diagram ........................16... -
Page 4: Dap Audio Gig-6
Save the carton and all packing materials. In the event that a fixture must be returned to the factory, it is important that the fixture be returned in the original factory box and packing. Your shipment includes: • DAP GIG-6 • 1X AC/AC adapter 2x15Vac 350mA • User manual... -
Page 5: Operating Determinations
Do not insert objects into air vents. Do not connect this system to a dimmerpack. Do not switch the system on and off in short intervals, as this would reduce the system’s life. Do not open the device and do not modify the device. ... -
Page 6: Return Procedure
Connection with the mains Connect the device to the mains with the power-plug. Always pay attention, that the right color cable is connected to the right place. International EU (including UK) North America From April 2004 Brown Black Phase Blue White Neutral Green/Yellow... -
Page 7: Description
Features The DAP GIG-6 is an 6 channel compact versatile mixer with 16 build-in DSP echo presets. The USB port gives you the possibility to connect a PC or MAC and record your mix or use as external input source. It is an ideal mixer for small venues where ultimate performance and advanced features are needed. -
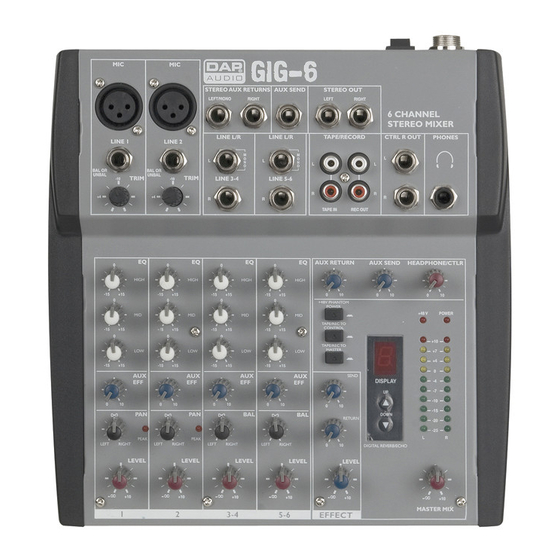
Page 8: Frontpanel
Frontpanel 1. Balanced mic input (mono channel 1-2) 2. Balanced line input mono (mono channel 1-2) 3. Left line input (stereo channel 3-6) 4. Trim control 5. Right line Input (stereo channel 3-6) 6. EQ high control, range -15 / +15 dB 7. - Page 9 Aux return control 14. Phantom power Switch 15. Tape/rec to control switch 16. Tape/rec to master switch 17. Send control 18. Return control 19. Level control 20. Aux send control 21. Display 22. Up button 23. Down button 24. Headphones/ control room level 25.
-
Page 10: Backpanel
38. USB connector 39. Power on/off Installation Remove all packing materials from the GIG-6. Check that all foam and plastic padding is removed. Connect all cables. Always disconnect from electric mains power supply before cleaning or servicing. Damages caused by non-observance are not subject to warranty. -
Page 11: Function
Functions 1.Mic Electronically balanced XLR-type inputs for connecting low- impedance microphones. The input provides extremely low noise and low hum signal processing. When connecting a microphone make sure that the pin assignment is correct. Always make sure to read the manual of the microphone you want to connect. The XLR- inputs are not suitable for connecting line level signals like an additional mixing console, FX-unit, etc. - Page 12 6 / 7 / 8. Equalizer SECTION (High / Mid / Low) The mixer’s Equalizer section allows shaping of the incoming audio signal. All mono input channels are fitted with 3-band EQ. The upper (High (6)) and lower (Low (8)) shelving controls have their frequencies fixed at 12 KHz and 80 Hz respectively.
- Page 13 25. Power LED The red power LED lights when the GIG-6 is turned on. If after switching the device on, the LED does not light, make sure that the AC adapter is connected properly. If the LED still doesn’t light up after everything is connected right, please contact your DAP audio dealer.
- Page 14 Please use the supplied DAP audio adapter only. USB slot The USB Slot can be used to connect the GIG-6 to your PC/ laptop. You can use this connector for playback or recording with suitable software installed. Make sure the length of the USB cable does not exceed 3m.
-
Page 15: Set Up And Operation
Set Up and Operation Before plugging the unit in, always make sure that the power supply matches the product specification voltage. Do not attempt to operate a 120V specification product on 230V power, or vice versa. Connection Cables Take care of your cables, always holding them by the connectors and avoiding knots and twists when coiling them: This gives the advantage of increasing their life and reliability. -
Page 16: Maintenance
Compensation of interference with balanced connections Maintenance DAP Audio GIG-6 requires almost no maintenance. However, you should keep the unit clean. Disconnect the mains power supply, and then wipe the cover with a damp cloth. Do not immerse in liquid. Do not use alcohol or solvents. -
Page 17: Product Specifications
Product Specification Input channels: 2 x Mic balanced 2 x Line mono 2 x Line stereo 1 x Aux stereo return 1 x CD/Tape stereo input Output channels: 1 x Main Stereo out by 2x 1/4" Jack 1 x Ctrl room stereo out by 2 x 1/4"... -
Page 18: Appendix 1: Gig-6 Block Diagram
Appendix 1: GIG-6 block diagram... - Page 19 2011 Dap Audio.
Need help?
Do you have a question about the GIG-6 and is the answer not in the manual?
Questions and answers