Table of Contents
Advertisement
Quick Links
MILKOTESTER
MILK ANALYZING DEVICE
Service manual: MASTER PRO
P1 and P2 included
Fat, Solids-Non-Fat (SNF), Protein, Lactose, Water content,
Temperature (°C), Freezing point, Salts, Density, pH
THE INFORMATION CONTAINED IN THIS MANUAL IS A SUBJECT TO CHANGE
WITHOUT NOTICE. FOR UPDATES, PLEASE CONTACT THE MANUFACTURER
OR USE THE FOLLOWING WEB ADDRESS:
http://www.milkotester.com
Advertisement
Table of Contents

Related Manuals for Milkotester Master Pro


Summary of Contents for Milkotester Master Pro
- Page 1 MILKOTESTER MILK ANALYZING DEVICE Service manual: MASTER PRO P1 and P2 included Fat, Solids-Non-Fat (SNF), Protein, Lactose, Water content, Temperature (°C), Freezing point, Salts, Density, pH THE INFORMATION CONTAINED IN THIS MANUAL IS A SUBJECT TO CHANGE WITHOUT NOTICE. FOR UPDATES, PLEASE CONTACT THE MANUFACTURER OR USE THE FOLLOWING WEB ADDRESS: http://www.milkotester.com...
- Page 2 • Do not disassemble the device in order to avoid possible electrical shock. In case of malfunction contact your local dealer. • Handle the liquids the device works with carefully, following all the instructions for their preparation. Operating Instructions Master Pro...
-
Page 3: Table Of Contents
7.1 Routine cleaning………………….……………………………………43 7.2 Complete flushing...…………….……………………………………..44 7.3 Weekly cleaning……...………….…………………………………….44 7.4 Peristaltic pump service...……….……………………………………46 8. Troubleshooting…….…………………………………………………..47 9. Technical specifications…..……………………………………………48 Appendix Freezing point determination….……………………………..50 Appendix internal printer…………………….……………………………53 Connecting to external printer……………..……………………………..54 PC connection…………….……………………………………………….55 Bluetooth.….………….……………………………………………………57 Flash drive….…………………………..…………………………….…...60 Warranty card……….……………………………………………...…..63 Operating Instructions Master Pro... -
Page 4: General Description
Most importantly, the one-button operation is extremely simple – you press only once to start measuring, you press only once for cleaning. Master PRO can analyze three types of milk defined by user. The measurement speed is 50 samples per hour with cleaning included. -
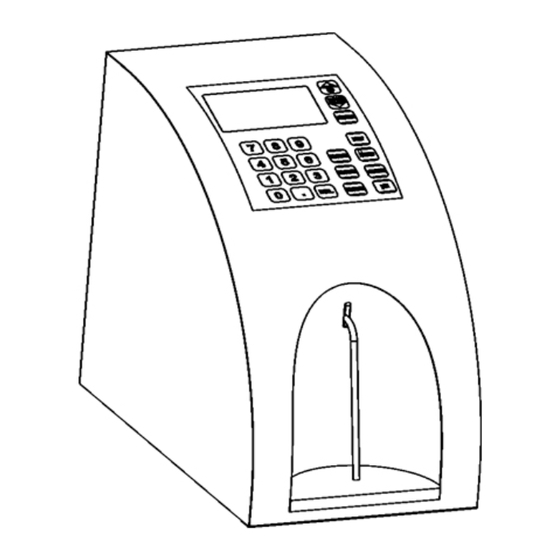
Page 5: Close-Up View
Milkotester Ltd Ultrasonic milk analyzers CHAPTER TWO Close-up view IN THIS CHAPTER Front panel Display Rear panel 2.1 Front panel 1 – Intake pipette 2 – Sample cup Operating Instructions Master Pro... -
Page 6: Display
3 – Arrow DOWN button 4 – ENTER button 5 – EXIT button 6 – MENU button 7 – CLEAN button 8 – pH measurement (active only on request) 9 – SAVE button 10 – PRINT button Operating Instructions Master Pro... -
Page 7: Rear Panel
Milkotester Ltd Ultrasonic milk analyzers 2.3. Rear Panel 2.3.1 Rear panel Master Pro – P1 1 – Serial port to printer 2 – Serial port PC 3 – pH connector (option) 4 – Power switch 5 – Power ‘IN’ socket 12V DC... - Page 8 Milkotester Ltd Ultrasonic milk analyzers 2.3.2 Rear Panel Master Pro – P2 1 – Serial port to printer 2 – Serial port to PC 3 – pH connector (option 4 – Power switch 5 – Power ‘IN’ socket 12V DC 6 –...
-
Page 9: Samples Preparation
Mixing spoon with long handle is used, allowing the lowest layers of the liquid to be reached. The milk in the milk-cans is stirred 5 to 8 times from the surface to the bottom and reverse with slow circular movements. Operating Instructions Master Pro... - Page 10 If there is separated liquefied fat or white particles with irregular form on the vessel’s walls reliable results could not be expected. Do not make analyses if the acidity of the milk is more than 17 Operating Instructions Master Pro...
-
Page 11: Working Description
(the outlet has to be grounded, see “Important Safety Instructions”. 3. Turn ON the POWER switch and MILKOTESTER MASTER will be ready for use. Before proceeding with using the unit, please read... -
Page 12: Measuring Samples
If the unit does not start up after it is connected to the power source, check the fuse inside the connector plugged into the electrical lighter socket. 4.2 MEASURING SAMPLES After MILKOTESTER MASTER is turned ON from the POWER switch, the display reads first: Milk Analyzer... - Page 13 Down button. (active only on request) ↓ Page1 The results will be printed immediately after F=xx.xx P=xx.xx they are ready. S=xx.xx L=xx.xx By choosing the ENTER button you can start D=xx.xx Sl=xx.xx measuring anew. Fp=x.xxx W=xx.xx Operating Instructions Master Pro...
-
Page 14: Making Corrections
(Gerber for fat, Kjeldahl for proteins etc). In order to establish the possible discrepancy and to correct the readings of the milk analyzer do the following: Operating Instructions Master Pro... - Page 15 For example М% of the reference samples: 2,20 3,00 3,80 4,60 5,20 М% average when measuring with the analyzer: 2,38 3,17 4,01 4,79 5,42 Difference: 0,18 0,17 0,21 0,19 0,22 Operating Instructions Master Pro...
- Page 16 To select Service menu, System or Settings use the ↑↓ (up and down) arrows and press ENTER. Service menu System Settings Memory MENU > Service menu Enter password Default password is 00000. 00000 Correction Calibration Security Res. d. point Operating Instructions Master Pro...
- Page 17 (two) pages of components thus scroll up and down). Density Protein Lactose Salts Water Press the ↑↓ (up and down) arrows to correct the value with 0.01. Correction Of Fat 0.01 Press ENTER to validate the correction or EXIT to keep the previous value. Operating Instructions Master Pro...
-
Page 18: Determination Of The Milk And Calibration
Changes in the analyzed parameters in the samples, have, if possible, to cover the whole measuring range – i.e. used samples to be with low and high content of the analyzed components. Operating Instructions Master Pro... -
Page 19: Necessary Quality Parameters Values Determination
А/ Röse-Gottlieb method The fat content is determined using the gravimetric method, fat extraction from ammonia-alcohol milk solution using diethyl and petroleum ether, evaporation of the solvent and weighting the residuum. Operating Instructions Master Pro... - Page 20 During the lactation period and under the influence of different zoo engineering factors the density of the different milk kinds varies in the following bounds: Milk kind Minimum Maximum Average 1,027 1,033 1,030 Buffalo 1,026 1,032 1,029 Goat 1,027 1,033 1,030 Sheep 1,031 1,040 1,034 Operating Instructions Master Pro...
- Page 21 5.1.2.1.5. Determination of salts in milk. For the salts in milk and its derivatives is judged by its ashes content. Milk dries, becomes carbonized and turns to ashes till constant mass. The ashes received are calculated in percentage. Operating Instructions Master Pro...
- Page 22 For determination of SNF the correlation dependence exists between the milk’s density, fat and SNF in the milk. When the density and the fat are known, the SNF can be calculated. There are several formulas with different applicability. Operating Instructions Master Pro...
- Page 23 – constant coefficient. B/ for sheep milk Lact. = SNF* 0,45 (% ) where –solids-non-fat content in percentages (%), 0,45 – constant coefficient. This is an actual coefficient for sheep breeds on the territory of the Balkan Peninsula. Operating Instructions Master Pro...
- Page 24 B/ for sheep milk Protein = SNF * 0,475 (% ) where – solids-non-fat content in percentages (%), 0,475 - constant coefficient. This is an actual coefficient for sheep breeds on the territory of the Balkan Peninsula Operating Instructions Master Pro...
-
Page 25: Advisable Scheme For Independently Determination The Content Of Different Parameters In Milk And Its Derivatives
Lact. = SNF * 0,55 = 8.23 * 0.55 = 4.53 % Fifth – determine the solids content by formula (p.3.2.3.3.А / Salts = SNF * 0,083 = 8.50 * 0.083 = 0.71 % Salts = SNF * 0,083 = 8.23 * 0.083 = 0.68 % Operating Instructions Master Pro... - Page 26 Suppose that the results are 1,0352 for the first sample and 1,0300 for the second Third – Calculate the SNF content using the formula (p.3.2.3.1.B) ∗ − ∗ − , 1 / 0352 , 1 / 0300 Operating Instructions Master Pro...
-
Page 27: Calibration
– cow milk/. You need two samples of milk with known values of their parameters – one with comparatively high percentage of Fat and one with comparatively low percentage of Fat. After pressing ENTER on the display appears: Operating Instructions Master Pro... - Page 28 (mind that there are 2 (two) pages of components thus scroll up and down). By confirming the last figure of the last parameter the following text appears on the display: Set Low sample FAT=x.xx SNF=x.xx DEN=x.xx Operating Instructions Master Pro...
- Page 29 The sample of milk with low Fat must be measured 5 consecutive times. Put the first cup with the sample and press ENTER. After measurement the following text appears on the display: Put Sample Low Milk 2/5 times and Press ENTER Operating Instructions Master Pro...
- Page 30 / choose Restore from the MENU to validate the last backed up calibration and press ENTER. MENU > Service menu > Calibration > Restore Cow – calibr. 1 Sheep – calibr.2 UHT – Calibr. 3 Choose the type of milk calibration for Restore and press ENTER Operating Instructions Master Pro...
- Page 31 400 measurements 600 measurements OFF counter Limits the number of measurements (suitable for samples) MENU > Service menu > Security>Edit password ON password OFF password Change password MENU > Service menu >Res d point xx.x xx.xx Operating Instructions Master Pro...
-
Page 32: Settings And Options
Method of determination Conductivity calibration 6.1. System, Settings and Memory MENU > System System Info Language Time and Date PC connection ---------------------------- Printer En/Dis Choose Options and press ENTER. MENU > System > System info. Operating Instructions Master Pro... - Page 33 It is used for sending data to PC MENU > System >Printer En/Dis Printer On Printer Off It is used to turn the printer on and off The printer will automatically show result after each measurement if it’s ON. Operating Instructions Master Pro...
-
Page 34: Measurement Of Ph
Press ENTER to confirm. After Press ENTER dialing the last symbol press ENTER to confirm To Set the new value. 6.2. Measurement of pH MENU > Settings > Set pH (active only on request) Set pH: pH calibration pH mode Operating Instructions Master Pro... - Page 35 Temperature effects on the value of pH buffers T (ºC) 4.01 7.12 9.52 4.00 7.06 9.38 4.00 7.02 9.26 4.01 7.00 9.21 4.01 6.99 9.16 4.03 6.97 9.06 4.06 6.97 8.99 4.10 6.98 8.93 4.16 7.00 8.88 4.22 7.04 8.83 4.30 7.09 8.79 Operating Instructions Master Pro...
- Page 36 Ref. Value: xxxxx Wait until the electrode and the buffer stabilize /the reference value should change the least possible/. Press ENTER to set the value. The following text will appear on the display: pH high buffer: x.xx Operating Instructions Master Pro...
- Page 37 The milk analyzer has two service menus of work – manual and automatic. They are selected from MENU > Settings > set pH > pH service menu Choose pH service menu and press ENTER. Operating Instructions Master Pro...
- Page 38 Press the EXIT button to stop measurement of pH and enter the main menu: Cow Milk Sheep Milk UHT Milk In automatic pH mode, you have to put the electrode on the top of the analyzer. There is protective cap with white top in it. Operating Instructions Master Pro...
- Page 39 Ultrasonic milk analyzers Unscrew the black cap one turn, but do not remove it. Then pull out the white gasket in the center. After that, put in the pH electrode and tighten the black protective cap: Operating Instructions Master Pro...
-
Page 40: Thermometer
ENTER Put a sampe of water with temperature 15°C and press ENTER The following text will appear on the display: Put probe 25°C and press ENTER Repeat the procedure with a sample of 25°C Operating Instructions Master Pro... -
Page 41: Measurement Of Conductivity
Following message is displayed: Put sample 5.0mS/cm 1/5 times And press Enter Serves for conductivity measuring system calibration. Clean the analyzer before starting conductivity measurement. You need a standard buffer with conductivity 5.0[mS/cm], with temperature 25С. Operating Instructions Master Pro... -
Page 42: Method Of Determination And Calibration
Last 5 analysis Last 10 analysis All analysis Sends the recorded results to printer or PC MENU >Memory >Clear memory Delete all recorded results MENU >Memory > Auto save ON/OFF ON Rec. measur. OFF Rec. measur. Operating Instructions Master Pro... -
Page 43: Cleaning And Maintenance
This is repeated 5 consecutive times and after that the cup has to be removed from the sample shelf. After the end of the procedure the device is ready for measurement. Operating Instructions Master Pro... -
Page 44: Complete Flushing
In the end of the day after you finished work with the device and it is already cleaned with Master Daily solution, put sample with clean water and choose from the cleaning menu ‘Power OFF’. Cleaning > power OFF Fast cleaning Daily cleaning Weekly cleaning Power OFF Operating Instructions Master Pro... - Page 45 Remember to put empty cup on the milk analyzer when switching it ON, because the water from the system will drain on start. After that, the device is ready to work. Operating Instructions Master Pro...
-
Page 46: Peristaltic Pump Service
Milkotester Ltd Ultrasonic milk analyzers 7.5 Peristaltic pump service Operating Instructions Master Pro... -
Page 47: Troubleshooting
START’ (see menu settings – of box is high exceeded fast start) acceptable at work. - Needs replacement of the sensor. Contact Error 11 Fault in sensor - Milkotester Ltd for - advice and assistance. Operating Instructions Master Pro... -
Page 48: Technical Specifications
Proteins 2% to 7% Lactose 0.01 % ÷ 6 % Added water 0 % ÷ 70 % 1 °С ÷ 40 °С Sample temperature – 0,3 ÷ – 0,7 °С Freezing point Salts 0,4 ÷ 1,5% Operating Instructions Master Pro... - Page 49 30% to 80% Electrical parameters: AC Power supply 95÷250V DC Power supply (active only on request) 0.05 ± Conductivity ± Dimensions: 150x290x285 mm 5. Weight – 2.8 kg Milk sample volume per 1 measurement: 25 cm (=25 ml) Operating Instructions Master Pro...
-
Page 50: Appendix Freezing Point Determination
Or the basic freezing point is an average of freezing points of milk, taken from many cows. When a laboratory checks a producer, it is only comparing the average of the producer’s cows against a larger area average. Operating Instructions Master Pro... - Page 51 After determination the freezing point of your sample via the milk analyzer, the added water is calculated using the following formula: − FrPo FrPo ∗ Base Calc AddedWater FrPo Base Where: FrPointBase is the basic freezing point FrPointCalc is measured freezing point Operating Instructions Master Pro...
- Page 52 “cowshed sample” is entered as basic freezing point in the formula for calculation of added water. Then the result from this formula will give us the absolute value of the added water for the corresponding milk supplier. Operating Instructions Master Pro...
-
Page 53: Appendix Internal Printer
Paper width: 57,5±0,5mm Printing density: 8dot/mm, 384dot/line Printing speed: 50mm/s or 20line/s Printing width: 48mm Feeding speed: 50mm/s or 20line/s Power: DC 5V , 3A 1. On/Off 2. FEED Button 3. Power LED 4. Cover opening Operating Instructions Master Pro... -
Page 54: Connecting To External Printer
MILKOTESTER MASTER can be connected to an optional serial printer for printing out the results. MILKOTESTER MASTER is set to work only with printers supplied by Milkotester Ltd. We warn you that the unit is not set to work with other types of printers. -
Page 55: Pc Connection
Milkotester Ltd Ultrasonic milk analyzers PC CONNECTION Milkotester milk analyzers usually operate with two type communication port – RS232 COM and USB 2.0 connectors It is recommended always to connect the USB connector to the analyzer before switching the device ON. - Page 56 After successful installation, connect the milk analyzer with USB cable and turn it ON. If it’s on USB the device will find new COM PORT on your computer. Open Milk data bank and open the com port in the bottom right corner. Operating Instructions Master Pro...
-
Page 57: Bluetooth
● Modulation: GFSK(Gaussian Frequency Shift Keying) ● Emission power: ≤4dBm, Class 2 ● Sensitivity: ≤-84dBm at 0.1% BER ● Speed: Asynchronous: 2.1Mbps(Max) / 160 kbps, Synchronous: 1Mbps/1Mbps ● Security: Authentication and encryption ● Profiles: Bluetooth serial port Operating Instructions Master Pro... - Page 58 The PC software starts and chooses scanning of the available devices. The software shows the available devices. Double click on the milk analyzer you want to connect to. After that - right click and choose connect, as shown on the picture. Operating Instructions Master Pro...
- Page 59 Most probably for the different client numbers the number will be different (COM XX). After that the work is the same as with standard “Serial Port”. The data collection program, “Milk Data Bank”, can be launched or another application for the milk analyzer. Operating Instructions Master Pro...
-
Page 60: Flash Drive
Ultrasonic milk analyzers CONNECTING FLASH DRIVE Each analyzer of Milkotester LTD can be upgraded with the option ‘flash drive’ on customer request. With this option you can save your measurements instantly or collect them in the end of the working process without using PC connection, cables and installation discs. - Page 61 Milkotester Ltd Ultrasonic milk analyzers Master Pro and Master Pro Touch have internal memory for 500 measurements and have the option to send all saved results to flash drive. You can choose to save each measurement after the results are on display: Or you can choose ‘auto save’...
- Page 62 For each different day of measurements, the analyzer will create different file in the flash drive, named after the time and date that the measurement has been made until the capacity of the flash drive is full. Operating Instructions Master Pro...
-
Page 63: Warranty Card
MILKOTESTER products are warranted against defects in materials and workmanship from the date of delivery trough the duration of the warranty period. During the warranty period Milkotester will repair, or, at its option, replace any components (S) that proves to be defective at no charge, provided that the product is returned, freight prepaid, to MILKOTESTER.
Need help?
Do you have a question about the Master Pro and is the answer not in the manual?
Questions and answers