Table of Contents

Related Manuals for Savant SSC-0012


Summary of Contents for Savant SSC-0012
- Page 1 Savant® SmartControl 12 Controller SSC-0012 Deployment Guide Document Number: 009-1268-01 Document Date: March 2016 Document Supports: da Vinci 7.0 45 Perseverance Way, Hyannis, MA 02601 Copyright © 2016 Savant Systems, LLC Savant.com | 508.683.2500...
-
Page 2: Table Of Contents
.............................. Making Connections ..........................RacePoint Blueprint® Configuration ..............Upload Configuration ....................Additional Documentation ..................Appendix A: Document Revision History ..............Network Requirements ....................Important Notice ....................... SmartControl 12 Controller Deployment Guide Copyright © 2016 Savant Systems, LLC 009-1268-01 | 160308... -
Page 3: Introduction
........................Unique ID (UID) of the controller ..........................(located on the bottom of the unit) Savant Host (Smart or Pro Host) licensed and running da Vinci 7.0 or higher .......... Savant Development Environment (SDE) MacBook® ................... (with RacePoint Blueprint da Vinci 7.0 or higher installed) Ethernet network meeting Savant requirements .................... -
Page 4: Deployment Steps Checklist
2. Deployment Steps Checklist Follow these steps to successfully deploy the SmartControl 12 (SSC-0012) controller. This page can be used as a checklist to record which steps have been completed. Review the SSC-0012 Connections and Controls .................. SmartControl 12 Overview Mount Controller .............................. -
Page 5: Smartcontrol 12 Overview
3. SmartControl 12 Overview Box Contents and Specifications Refer to the Quick Reference Guide for this product located on the Savant Customer Community for Box Contents and Specifications Front Panel Press and hold for 5 seconds while powered On to clear network Reset Button settings. -
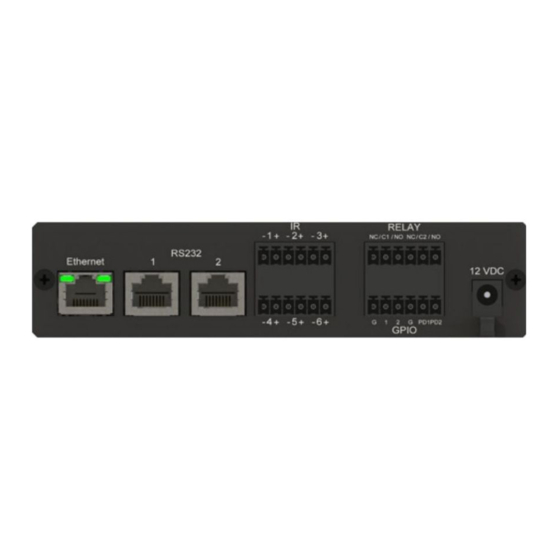
Page 6: Rear Panel
6-pin Screw Down Plug-in Connector Input Power 12V DC 1.6A – Connect to included power supply. Cable Lance Use with included cable tie to secure power supply connection. SmartControl 12 Controller Deployment Guide Copyright © 2016 Savant Systems, LLC 009-1268-01 | 160308... -
Page 7: Installation
Mark the two mounting holes on the wall. Install wall anchors and screw mounting plate to the wall. Snap the SSC-0012 controller into the bracket so the tabs on the mounting bracket seat into the slots on the side of the controller. -
Page 8: Wiring And Connections
Savant uses RJ-45 connectors for RS-232/422/485, other manufacturers devices may use the standard DB9. To make connection easy, Savant offers RJ-45 to DB9 adapters in a variety of configurations that can be used for RS-232/422/485 control. Be sure and choose the adapter that provides a proper connection to the devices RS-232/422/485 port. -
Page 9: Ir Wiring
GPIO Wiring General Purpose Input/Outputs (GPIO) are binary I/O ports used on Savant controllers to trigger an action within the system. Events can control a device, such as turning on an amplifier (output) or detecting a state change for a device (input) to perform a workflow. -
Page 10: Relay Wiring
Repeat for each wire till all wires are installed in that connector. Repeat steps above for all connectors as required. Plug terminal blocks back into rear of the controller. Reapply power. SmartControl 12 Controller Deployment Guide Copyright © 2016 Savant Systems, LLC 009-1268-01 | 160308... -
Page 11: Racepoint Blueprint® Configuration
View > Show Inspector Enter the SmartControl 12 Unique ID (UID) for the SSC-0012 being used in the system. In order to be recognized by the Host, the UID located on the bottom of the SmartControl 12 is required within Blueprint. -
Page 12: Upload Configuration
7. Upload Configuration After the SSC-0012 has been added to Racepoint Blueprint and the configuration is complete, it needs to be uploaded to the host. Save the configuration. Select File > Save from the Blueprint menu bar. Select the Generate Services icon in the Blueprint toolbar. The State icon on the Blueprint toolbar will change to green indicating the services for the configuration were created. -
Page 13: Additional Documentation
8. Additional Documentation Additional documentation is available on the Savant Customer Community. • SmartControl 12 Smart Controller (SSC-0012) QRG - 009-1255-xx • Relay and General Purpose Input/Output Profiles Application Note - 009-0482-xx • Savant Controllers Family video in the Savant University pages SmartControl 12 Controller Deployment Guide Copyright ©... -
Page 14: Appendix A: Document Revision History
• Updated Power Supply specifications Rear Panel • Added Upload Configuration section • Updated RacePoint Blueprint Configuration section 009-1268-00 - November 2014 Section Update Initial release of this Deployment Guide SmartControl 12 Controller Deployment Guide Copyright © 2016 Savant Systems, LLC 009-1268-01 | 160308... -
Page 15: Network Requirements
Connect all Savant devices to the same local area network (LAN) or subnet as the host. Savant recommends not implementing any type of traffic or packet shaping in your network topology for the Savant devices as this may interfere with performance. -
Page 16: Important Notice
Savant Systems, LLC. shall not be liable for any technical or editorial errors or omissions contained herein or for incidental or consequential damages resulting from the performance, furnishing, reliance on, or use of this material.
Need help?
Do you have a question about the SSC-0012 and is the answer not in the manual?
Questions and answers