Table of Contents
Advertisement
Quick Links
Advertisement
Table of Contents

Subscribe to Our Youtube Channel
Related Manuals for Kanomax 4431


Summary of Contents for Kanomax 4431
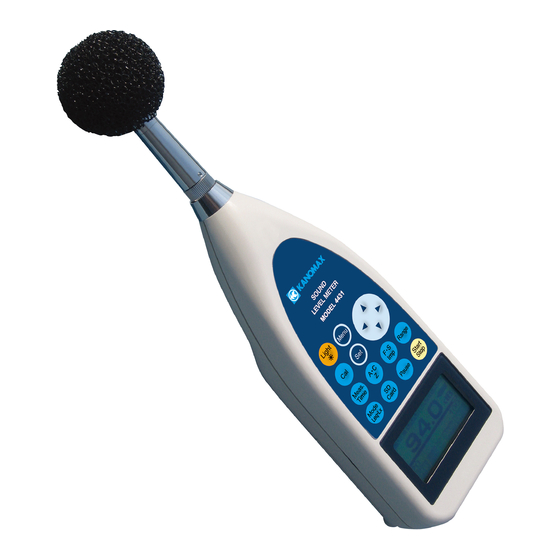
- Page 1 Sound level meter MODEL 4431 Instruction manual KANOMAX JAPAN INC.
- Page 2 Components of this Instruction manual This instruction manual refers to the functions of, and operating instructions for, Sound Level Meter MODEL 4431 (abbreviated to “this equipment” in what follows) This instruction manual consists of following chapters. Outline The components, characteristics, block diagram of this equipment are described Locations and their functions The names and functions of keys and terminals are briefly described.
-
Page 3: Safety Precautions
Safety precautions To prevent bodily injury or damage to property, the following safety precautions must be observed. This manual contains important safety and operating instructions for this equipment. Read all instructions, before using the instrument. After reading all instructions, keep this manual for quick reference 1... - Page 4 2 2 2 2 . . . . Important safety instructions WARNING Stop using the instrument, when producing smoke, bad smell or noise. It causes fire or shock hazard. Turn off the POWER switch and unplug the AC adaptor (optional) from outlet as soon as possible.
- Page 5 3 3 3 3 . . . . Cautions for usage This equipment is assembled with precision parts. To prevent bodily injury or damage to the instrument, the following cautions must be observed. CAUTION Keep the instrument away from the children. If the instrument falls down, it is very dangerous.
- Page 6 2) The software product, together with attached documents such as instruction manuals, belongs to KANOMAX and is protected by the Copyright Law., etc. The customer is not permitted either to copy, modify, alter this software product, or remove the product label.
- Page 7 The Quantifier form of International standard and JIS (Japanese Industrial Standards). The Quantifier is excerpted from ISO 1996、3891、IEC 60804、JIS Z 8202、8731. Frequency Notation of Name weighting MODEL4431 characteristics A-weighted sound A-weighted - pressure level C-weighted sound C-weighted - - - pressure level Z-weighted Sound pressure level...
-
Page 8: Table Of Contents
Contents Overview Locations and their functions Front / Back / Side view of the main body Operating Portion Side view of the main body System components AC adaptor AC-1026 Mounting on the tripod Memory Card(SD card)and program card(Option) Extension Cable(BC-0046) Connection with printer(BS2-80TS)... -
Page 9: Overview
), A-weighted sound pressure level (L ), etc., is possible. The 4431 was developed to keep comfortable sound environment as well as safe and healthy life of people, both to be realized by the evaluation of environmental noise such as traffic noise or industrial equipment noise, or by better understanding of the labor health environment at offices, factories, etc. -
Page 10: Locations And Their Functions
Locations and their functions Front/Back/Side view of the main body: Wind screen(φ50) Microphone Preamplifier Threaded retaining ring Front panel Female screw for tripod Display Battery cover Side panel Female screw for tripod Front Microphone Preamplifier The microphone and the preamplifier are comprised as one body. They can be placed apart from the main body and connected to it with the optional extension cable Display... -
Page 11: Operating Portion
Operating Portion Light key The backlight illuminates the display in darkness, which goes out automatically 30 seconds later or by pushing the key again. Menu key It is pushed to set up the measurement condition, when the display is adjusted to 1/3 page of the menu panel. -
Page 12: Side View Of The Main Body
Side view of the main body Side panel Calibration potentiometer AC OUT connector DC OUT connector Card slot POWER switch AC power adaptor connector External Input/Output connector AC power adaptor connector By using the optional AC adaptor, AC100V is available for the measurement. Please do not use any other power supplyies than specified AC adaptor. -
Page 13: System Components
System configuation Example of system configuration ※ The function can be extended by the connecting various option measuring instruments. Printer Oscilloscope BS2-80TS Data recorder RS-232C interface cable Level recorder BC-0026PC TYPE5008A Windscreen(φ90) NA-0301 BNC pin cord BC-0071 Program cards ( SD Card ) Sound Level Meter 1/1 and 1/3-octave Real-time Analysis Card 0-dB function[0~80dB(A)]... -
Page 14: Ac Adaptor Ac-1026
Mounting on the tripod It is possible to mount this equipment on the camera tripod in lengthy measurement. Please be careful enough not to drop the equipment or fell the tripod Memory card (SD card) and program card (Option) The measurement results can be stored in Memory card (SD card) to reedit it on personal computer Moreover, option program cards enable to set up the conditions of 1/1 or 1/3 octave filter card, FFT analysis card, and RSR card (Real sound recording card) -
Page 15: Connection With Personal Computer
Connection with personal computer External connect I/O on the side panel to USB terminal of personal computer with the option interface cable. External I/O connector USB cable To USB terminal of personal computer... -
Page 16: Display (Explanation Of Measurement Screen)
Display (Explanation of measurement screen) Measurement screen Measurement time Displays the elapsed time of the measurement With [Start/Stop] key entry, time count operation is carried out until completion of the measurement time. Display data: Displays the current value 10 10 10... - Page 17 Frequency characterisitic and Calculation function Style Sound pressure level Equivalent continuous sound pressure level Sound exposure level Maximum sound pressure level ― ― Amax Minimum sound pressure level ― ― Amin Percentile (5%) sound pressure level ― ― Percentile (10%) sound pressure level ―...
-
Page 18: Preparation
Preparation Battery installation When LCD display tells low battery, install new batteries. It will blink, For long-term measurement, install new batteries in advance. if"ENPTY" is displayed, and a power supply is The following displays tell you the condition of the batteries. shut off. -
Page 19: Lcd Back-Light
LCD back-light You can use LCD back-light, when your measurement is carried out in the dark situations. [Light] key 1) Press [Light] key, LCD back-light goes on. 2) If you press [Light] key again, LCD back-light goes out. The light automatically goes out in about 30 seconds after the light goes on. 3) When the batteries is low, LCD back-light dims. -
Page 20: Lcd Adjustment
LCD adjustment You can adjust LCD contrast, when the batteries were low, or when the new batteries were installed. The procedure is as follows. [Menu] key Cursol key [Set] key 1) When you press the [Menu] key, the following screen appears. <System>... -
Page 21: Calendar Adjustment
Calendar adjustment To adjust the calendar (time), operate as follows. You can adjust calendar in the Menu mode in the same way as LCD adjustment. [Menu] key Cursor key [Set] key When you press the [Menu] key, the following screen appears <System>... -
Page 22: Calibration
Calibration You need to calibrate the instrument regularly before you start taking measurements. There are two types of calibration. One is the way using the internal generator, the other is the way using the pistonphone. Note that calibration is disabled when “Peak measurement” is selected Calibration using internal generator You can calibrate the instrument using the internal generator (1kHz, sine wave) [Cal] key... -
Page 23: Calibration
Pistonphone ( MODEL 2124 A) or Calibration using Sound Calibrator ( MODEL 2127 ) CAL key Range key 1) Turn off the POWER of Pistonphone (MODEL 2124A) or Sound Calibrator (MODEL 2127). 2) Turn on the POWER of this equipment 3) For the Pistonphone, Set the frequency weighting to Z with Frequency weighting key, set the time weighting to Fast with Time weighting key and set the range to 40~130dB with [Range] key. -
Page 24: Menu Screen 23~27
Menu screen Menu key With [Menu] key pressed, the following Menu screen appears. (Under the situation with [Start/Stop] key not pressed). <System>1/3 → <Memory> 2/3 → <View Mode> 3/3 → <System> 1/3 → <Memory> 2/3 ・・・ ・・・ ・・・ ・・・ Each [Menu] key pressed, you can select one of three screens as above, and return to the measurement setting screen. - Page 25 <System> (1/3) <System> <System> <System> <System> Mode Mode : : : : Normal Normal Mode Mode Normal Normal Data delet Data delet Data delet Data delet : : : : off LCD cont LCD cont LCD cont LCD cont :*** :***...
- Page 26 < < < < Memory> > > > (2/3) <Memory> <Memory> <Memory> <Memory> <Memory> <Memory> <Memory> <Memory> Select to Mode Mode : : : : Auto Auto Mode Mode Auto Auto Mode Mode Mode Mode : : : : Normal Normal Normal Normal...
- Page 27 NOTE Measurement starts when the selected level is exceeded after the time specified with Sta Time, In the following example : :When the level exceeds 65dB after 18:16 October 10, Recording starts and the measurement is made once during the time specified with Meas Time. Recording is continued, in Interval Repeat mode, until the level falls or until 20:16 October 12,.
- Page 28 < < < < View Mode> > > > 3/3 Select the category of displayed data. The data registered here is displayed in the standard screen, one by one with [Mode] key pressed on the main body. <View Mode> <View Mode> <View Mode>...
-
Page 29: Sound Pressure Level(Lp)Measurement : Frequency Weighting Key Z
Measurement Procedure Sound pressure level ( ( ( ( L ) ) ) ) measurement: : : : Frequency weighting key Z ③Time weighting key (F:Fast, S:Slow, Imp: Impulse ①Frequency weighting key ④[ [ [ [ Range] key (A・C, Z) ②Display mode key <... -
Page 30: Temporal Level Display Of Sound Pressure Level(Lp)Measurement
Temporal level display of Sound pressure level (L < < < < Parameter setting >: >: >: >: The temporal level is displayed at each contiguous push (1.5s) of [Mode] key as follows, returning to the standard display screen when the key is pushed again. The key operation is similar to the measurement of sound pressure level (Lp). -
Page 31: A-Weighted Sound Pressure Level(L
A-weighted sound pressure level (L ) measurement: : : : Frequency weighting key A, C ③Time weighting key (F:Fast, S:Slow, Imp: Impulse ①Frequency weighting key ④[Range] key (A・C, Z) ②Display mode key < < < < Parameter setting > > > > Measurement is mede according to the following procedure ①... -
Page 32: Time Level Display Of A-Weighted Sound Pressure Level(L
Time level display of A-weighted sound pressure level (L < < < < Parameter setting > > > > The key operation is similar to the measurement of A-weighted sound pressure level (L < < < < Display > > > > ①Range Instantaneous value:... -
Page 33: Equivalent Continuous A-Weighted Sound Pressure Level(L
Equivalent continuous A-weighted sound pressure level (L measurement 2) [Menu] key < < < < Menu> > > > ①Frequency <View Mode> ③Time weighting weighting key :INST (A・C, Z) (A)View LA05 :OFF (F:Fast, S:Slow) LA10 :OFF LAeq LAeq LAeq LAeq : : : : ON ⑤Measuring LAE :OFF LA50 :OFF... -
Page 34: Single Event Sound Exposure Level(L
Single event sound exposure level( ( ( ( L ) ) ) ) measurement < < < < Menu> > > > 2) [Menu] key <View Mode> ①Frequency :INST weighting key ③Time weighting (A)View LA05:OFF (A・C, Z) LAeq :OFF LA10:OFF (F:Fast, S:Slow, L L L L A A A A E E E E :... -
Page 35: Amin )Measurement
Maximum A-weighted Sound pressure Level (L ) Measurement < < < < Menu> > > > 2) [Menu] key ①Frequency <View Mode> <View Mode> <View Mode> <View Mode> weighting key :INST :INST :INST :INST ③Time weighting (A・C, Z) LA05 :OFF (A)View (A)View (A)View... -
Page 36: Precentile Level(Lan )Measurement
Percentile level (L ) measurement < < < < Menu> > > > 2) [Menu] key <View Mode> <View Mode> <View Mode> <View Mode> ①Frequency :INST :INST :INST :INST weighting key ③Time weighting (A)View (A)View (A)View (A)View LA05 LA05 : : : : ON LA05 LA05 (A・C, Z) -
Page 37: Peak )Measurement
Peak sound pressure level (L ) measurment peak The peak sound pressure level is peak sound pressure level of the sound wave before smoothed with the time weighting characteristics. is peak sound level for Z characteristics. peak ①Frequency weighting key ③Time weighting (A・C, Z) (F:Fast, S:Slow,... -
Page 38: Cpeak )Measurement
C-weighted peak sound pressure level (L ) measurement Cpeak The peak sound level is peak sound pressure level before smoothed with the time weighting characteristics. Lcpeak is wavy peak level of C characteristic. ① Frequency weighting ③Time weighting key (A・C, Z) (F:Fast, S:Slow, ⑤Measuring Imp: I mpulse) -
Page 39: Ceq )Measurement
C-weighted equivalent continuous sound pressure level (L ) measurement Lceq is C-weighted equivalent continuous sound pressure level. ①Frequency weighting ③Time weighting key (A・C, Z) (F:Fast, S:Slow, Imp: I mpulse) ⑤Measuring time key ④[Range] key ②Display mode key < < < < Parameter setting > > > > Measurement is mede according to the following procedure ①... -
Page 40: Measurement
Power average value of the maximum sound pressure level in a given interval (L ) measurement Atm5 Power average value of the maximum sound pressure level in a given interval (L ) is power average of the maximum value of A-weighted sound pressure level in successive 5-sec intervals. It can be measured only when A characteristics is selected in the standard screen. - Page 41 Impulse sound pressure level(L ) measurement Impulse sound pressure level (L ) is A-weighted sound pressure level with time weighting characteristics, ‘Impulse’. It can be used only when A characteristics is selected in the default screen. ① Frequency weighting ③Time weighting key (A・C, Z) (F:Fast, S:Slow, Imp: I mpulse)
-
Page 42: Measurement
Impulse equivalent continuous A-weighted sound pressure level (L AIeq measurement Impulse equivalent continuous A-weighted sound pressure level (L ) is equivalent AIeq continuous sound pressure level with time weighting characteristics, ‘Impulse’. It can be used only when A characteristics is selected in the default screen. ①... -
Page 43: Memory Function
Memory function Record of memory 【 【 【 【 Nomal】 】 】 】 mode <Memory> <Memory> <Memory> <Memory> Mode Mode : : : : Normal Normal Mode Mode Normal Normal Interval Interval Interval Interval : : : : Single Single Single Single Mode... - Page 44 【 【 【 【 Auto】 】 】 】 mode < < < < Operation > > > > By changing Mode: Normal in < Memory>2/3 of [Menu] screen to Mode: Auto with the ▲▼key , and fixing it with [Set] key, the following screen appears: <Memory>...
- Page 45 ≪ ≪ ≪ ≪ Interval : : : : Single At time of setting≫ ≫ ≫ ≫ ●Samp Time : Meas.Time at time of setting If instantaneous value is beyond a set point, I record for once of “Meas.Time”. instantaneous value setting Meas.Time...
- Page 46 < Standby screen > < During a measurement > 10 10 10 10m m m m 000 000 000 000h h h h 00 00 00m m m m 0 0 0 0 0 0 0 0 s s s s 00...
-
Page 47: Data Recall From The Memory
Data recall from the memory < < < < Operation> > > > <System> <System> <System> <System> Mode Mode Mode Mode : : : : Mem call Mem call Mem call Mem call Data delet Data delet Data delet Data delet :... -
Page 48: How To Use The Memory Card (Sd Card -Standard-) 47~48
How to use the Memory Card ( SD Card - - - - Standard- - - - ) The measured data can be stored on the memory card (SD card) to be processed by personal computer. When the memory card (SD card) is inserted after the POWER of this equipment supply is turned on, display 【STD】... - Page 49 Eject the card 0 0 0 0 3s 3s 3s 3s 000 000 000 000h h h h 00 00 00m m m m 00 00 00 00s s s s 00 63.5 dB 63.5 dB 63.5 dB 63.5 dB 4 4 4 4 0 0 0 0 1 1 1 13 3 3 3 0 0 0 0 ④Eject the Card.
-
Page 50: Example Of File Creation
Example of file creation The file is created as follows. : When A characteristics (Time constant F and S) is selected: ・Single 001.csv ← :Whenever [Start/Stop] key is pushed, this single data line is made. (a single data since the mode is Single. ) 002.csv ↓... -
Page 51: Print/Data Management
Print/Data management Print This equipment is provided with a function of printing the measured data with a specified serial printer. <System> <System> <System> <System> Mode Mode Mode Mode : : : : Print Print Print Print ← Set to D D D D ata delet ata delet :... -
Page 52: Saveing Data To Pc
Saving Data to PC This equipment is provided with data saving function using the specified data management software. Data management with USB port <System> <System> <System> <System> ← ← Set Mode to PC out display Mode Mode : : : : PC out PC out Mode Mode... -
Page 53: Output Terminal
Output terminal AC、 、 、 、 DC Output AC Output The AC Output is the frequency-weighted signal. Output: 1Vrms (FS), Output impedance: 600Ω, Load impedance > 10kΩ DC Output The DC Output is the frequency-weighted, root-mean-square-detected, and then logarithmic converted signal. Output: 2.5V (FS), 0.25V/10dB, Output impedance: 50Ω, Load impedance >... -
Page 54: Specifications
Specification 1) Type :MODEL 4431 2) Description :Sound Level Meter 3) Applicable Standards :JIS C1509-1:2005 ClassⅡ, IEC 61672-1:2002 Class Ⅱ 4) Frequency Range :20Hz~20kHz(Conforms with measurement law 20Hz~8kHz) 5) Microphone(Sensitivity) :TYPE 7052NR(-33dB, Stand-alone-31dB) 6) Level Range Control :10dB 6step 20~80dB, 20~90dB, 20~100dB, 20~110dB, 30~120dB 40~130dB... - Page 55 18) Calibration signal :Electric calibration with internal oscillator (1kHz sine wave) 19) Outputs AC output :φ2.5 Jack Output :1Vrms (FS) Output impedance:600Ω Load impedance :more than 10kΩ DC output :φ2.5 Jack Output :2.5V (FS), 0.25V/10dB, Output impedance :50Ω Load impedance :more than 10kΩ 20) RMS detection circuit :True RMS detection circuit (computing type) 21) Processing...
- Page 56 Frequency analysis band :1/1- octave filter;16Hz, 31.5 Hz, 63 Hz, 125 Hz, 250 Hz, 500Hz, 1kHz, 2kHz,4kHz, 8kHz, AP 1/3- octave filter ;12.5Hz, 16Hz, 20 Hz,25 Hz,31.5Hz,40Hz, 50Hz, 63Hz, 80Hz, 100Hz, 125Hz, 160Hz, 200Hz, 250Hz, 315Hz, 400Hz, 500Hz, 630Hz, 800Hz, 1kHz, 1.25kHz, 1.6kHz, 2kHz, 2.5kHz, 3.15kHz, 4kHz, 5kHz, 6.3kHz,8kHz,10kHz ,12.5kHz, 16kHz, AP ・FFT Analysis Card...
- Page 57 Appearance diagram of Sound Level Meter MODEL 4431...
-
Page 58: Pin Connections And How To Connect The Extension Cable 57~58
Pin Connections and How to Connect the Extension cable 1) Detach microphone from the body of the meter. Microphone The threaded reraining ring ① Turn the threaded reraining ring a little to the left. ② Pull out microphone as shown. ③... - Page 59 3) Attach microphone to the female connector of extension cable. Mach key ⑦Mach key groove of body’s connector with the connector of extension cable and insert. ⑧Push the connector of extension cable. ⑨Turn the threaded reraining ring a little as shown repeat ⑧ and ⑨ 5-8 times and you can connect.
-
Page 60: Communication Command 59~64
Communication Command Interface USB: LSI FT245 Transfer Speed :9600~921600bps Data size :8bit Stop bit :1bit Parity check :non RS-232C: Transfer Speed :9600,19200,38400bps Data size :8bit Stop bit :1bit Parity check :non Format Data:Variable size(ASCII) Command:1byte(ASCII)... - Page 61 Command table( ( ( ( CMD) ) ) ) Capital letters pertain to PC command Small letters paertain to 4431 command Normal Command: : : : Nomal Sound Level Meter MODE 4431 № Function Item ↑ ↑ Function Outline 4431...
- Page 62 【 【 【 【 Option】 】 】 】 FFT Command: : : : When FFT card is installed、 、 、 、 An additional receipt is done by a usual sound level meter command. 4431 № Function Item ↑ ↑ Function Outline...
- Page 63 Detail of Command Normal Command: : : : Nomal Sound Level Meter MODE Function Item Data Item Function Outline Time data YYMMDDHHMMSS ASCII(13) setting request Time data Data division note setting completed Transfer ASCII(5) A B C D E configuration file A :Meas Time select(1)...
- Page 64 Version request Data division note Data transfer Wave out request Data division note Data transfer 【 【 【 【 Option】 】 】 】 Filter command: : : : At Filter Card setting, it is usually added to a Sound level meter command Function Item Data Item Function Lutline...
- Page 65 Lp Lp Fast Fast Inhibiting any other key access than Memu. Nest time you power on, it stars with [Remote]. To cancel it, select [Menu] in Menu. 2. Communication timing After Power ON 4431 Waitin Command Various Command Data and Answer...
Need help?
Do you have a question about the 4431 and is the answer not in the manual?
Questions and answers