
Subscribe to Our Youtube Channel
Related Manuals for Kanomax OMX-ADM


Summary of Contents for Kanomax OMX-ADM
- Page 1 Handheld Odor Meter OMX-ADM Operation Manual Ver. 2 GlobalTestSupply 20160719 www. .com Find Quality Products Online at: sales@GlobalTestSupply.com...
-
Page 2: Table Of Contents
Table of Contents Introduction....................... 4 1-1. Supplied Components List ..................4 1-2. Warning ........................5 1-3. Cautions ........................6 1-4. Unit Dimension ...................... 7 General Description ....................8 2-1. Features ........................9 2-1-1. LCD Display ......................9 2-1-2. Base Unit ......................10 2-2. - Page 3 4-4. Open Software ...................... 18 Specification ......................19 Maintenance and Servicing ..................20 6-1. Replacement of “AA” Alkaline Batteries ............20 6-2. Replacement of Button Battery ................20 6-3. Maintenance of Air Purifying Unit ..............21 6-4. Replacement of Filter for Suction Nozzle ............21 6-5.
-
Page 4: Introduction
Handheld Odor Meter is packaged carefully and includes all the components necessary for full operation. Upon receipt, check the contents and find you received the items as below in good condition. The instrument kit contains: Name Q’ty OMX-ADM Base Unit Suction Nozzle AC Adaptor ‘AA’ Alkaline Battery USB Connection Cable Air Purifying Unit... -
Page 5: Warning
1-2. Warning Warning Do not use any adaptors except supplied original AC adaptor. Do not use in explosive atmosphere. Do not use the device where combustible and/or explosive gasses exist. The device is not designed for explosion proof. Do not dismantle the base unit. -
Page 6: Cautions
1-3. Cautions Cautions Do not install, use, or store the unit at a place where: Ambient temperature is not in the range of -10 to 40 degree in C. (14 to 104 degree in Ambient humidity exceeds 90%R.H. Condensation occurs due to rapid temperature change. Corrosive and/or explosive gases exist. -
Page 7: Unit Dimension
1-4. Unit Dimension Unit: mm GlobalTestSupply www. .com Find Quality Products Online at: sales@GlobalTestSupply.com... -
Page 8: General Description
2. General Description Handheld Odor Meter is the most popular simplified tool for odor analysis which enables to show the relative odor strength numerically by comparing odor gases and purified air. The reading shown on the display is calculated based on our original principle. With the installation of data filing software, measured data can be transferred to PC in easy steps. -
Page 9: Features
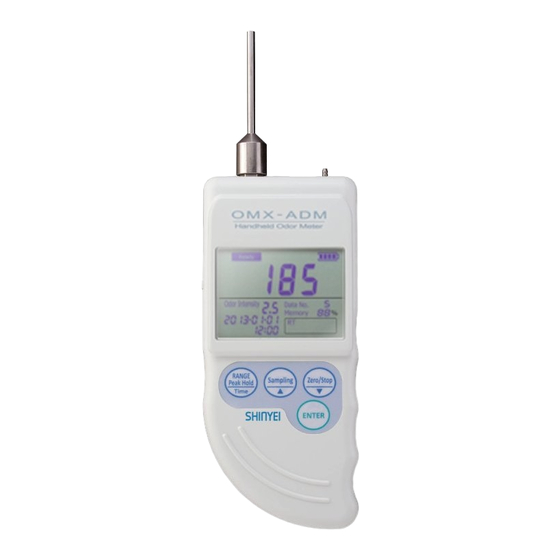
2-1. Features 2-1-1. LCD Display Name Function Blinks for about 10min for initializing when the unit is turned on. Ready ① Start measuring when it stops blinking. Displays odor strength in numeric value from 0 to 999. Odor Strength ② Start blinking when overflowed. -
Page 10: Base Unit
2-1-2. Base Unit Name Function Hold 3 seconds for “peak-hold function”. (See 3-3.) ① Hold and turn on the device at the same time to set calendar. Select sampling rate. (See 3-2.) ② Set calendar. Use for “zero-point function". (See 3-4.) ... -
Page 11: Accessories
2-2. Accessories Name Function AC Adaptor Connect to the unit during the measurement if necessary. Air Purifying Unit Attach to the unit for “zero-point function”. (See 3-4.) Exchange activated carbon when deodorization using air Activated Carbon purifying unit is not effective. Replace filter when deodorization using air purifying unit is not Replacement Filter for Air effective. -
Page 12: Measurement
3. Measurement 3-1. Real-time Sampling Mode 3-1-1. Measurement Preparation 1. Place filter to suction nozzle. 2. Attach suction nozzle to the unit before measurement. 3. Use “AA” alkaline batteries or AC adaptor. 4. Turn on the unit at clean ambient. It takes about 10 min for the unit initializing and start measuring. -
Page 13: Measurement
3-1-2. Measurement 1. Turn on the unit and wait for about 10 minutes until “Ready” stop blinking and the initializing is done. 2. Start measuring. 3. Use data filing software if necessary. 4. Turn off the unit when odor strength shows close to “0”. 3-2. -
Page 14: Memory Overflow
3-2-3. Memory Overflow Memory overflow occurs when the internal memory is full. If there is no space remained, calendar on LCD display starts blinking and data number becomes “0”. To delete saved memory, press at the same time while the unit is turned off. -
Page 15: Peak-Hold Function
3-3. Peak-hold Function Press for over 3 seconds during Real-time sampling. By using this function, the highest value of odor strength keeps being displayed until the unit measures higher value. NOTE Press for over 3 seconds again to cancel the function. NOTE The function is not displayed on the saved data. -
Page 16: How To Install Usd Drivers Software
How to Install USB Drivers Software Install USB Drivers software before connecting USB cable to PC. 1. Download the latest software from the link as below. https://www.silabs.com/products/mcu/Pages/USBtoUARTBridgeVCPDrivers.aspx 2. Install the software. NOTE If PC CPU is 32bit, select “CP210xVCPInstaler_x86.exe”. If CPU is 64bit, select “CP210xVCPInstaler_x64.exe”. -
Page 17: Preparation
4-3. Preparation Connect the unit to PC by USB connection cable. 4-4. Open Software 1. Double-click shortcut icon on desktop, or open the file from program files. 2. Confirm main screen appears. 3. Read “Handheld Odor Meter Data Filing Software Manual” for details. GlobalTestSupply www. -
Page 18: Specification
5. Specification Detection Method Semiconductor gas sensors Object Gas Hydrogen sulfide, methyl mercaptan, ammonia, etc. Sampling Method Continuous sampling by built-in pump Detection Range 0 ppm to 25 ppm approx. (ammonia concentration) Digital LCD display Display Odor Strength (0 to 999) Odor Intensity (2.5 to 5.0) Ammonia (2ppm): Reaches 90% responsiveness within 20 seconds Response Time... -
Page 19: Maintenance And Servicing
6. Maintenance and Servicing 6-1. Replacement of “AA” Alkaline Batteries Replace “AA” alkaline batteries when battery status on LCD display becomes “Low”. 6-2. Replacement of Button Battery The unit uses a button battery (model: CR2032) for memory back up. When to replace: Pasts 5 years approx. -
Page 20: Maintenance Of Air Purifying Unit
6-3. Maintenance of Air Purifying Unit Top Wire Gauze Replace activated carbon and filters in Air Purifying Unit to prevent gases absorbed in the unit. Top Filter Arrow Label Activated Carbon Bottom Filter 1. Twist the Air Purifying Unit to open. Bottom Wire Gauze Bottom 2. -
Page 21: Troubleshooting
6-5. Troubleshooting If you find: Check: Check battery status or connect AC adaptor. The unit does not operate. ① Check battery polarity. Get the unit closer to object. Connect Air Purifying Unit to clean the absorbed gas in the Odor Strength does not change. ②...
Need help?
Do you have a question about the OMX-ADM and is the answer not in the manual?
Questions and answers