Table of Contents
Advertisement
Quick Links
Advertisement
Table of Contents

Related Manuals for Kanomax 6700


Summary of Contents for Kanomax 6700
- Page 1 Micromanometer Model 6700 Instruction Manual Be sure to read this manual thoroughly before using the instrument , fully understand and pay attention to each cautions mentioned. Please well-keeping this manual for long time service reference. 01003 15.05...
-
Page 2: Table Of Contents
CONTENTS Product Configuration............................ 3 Caution................................4 1. Introduction ..............................6 1.1. Features ............................. 6 1.2. Specifications ............................. 6 2. Outlook & Structure ............................ 6 3. Settubg up ..............................6 3.1. Micromanometer ..........................6 3.2. Shoulder Strap ..........................7 4. - Page 3 8.1. Product Warranty ........................... 17 8.2. After service ............................. 17...
-
Page 4: Product Configuration
Product Configuration. 6700 Standard: Item. Qt’y Micromanometer Model 6700 Carrying case Pressure tubing Communication cable Calibration certificate CD-Rom(Manual and software inside) Quick-Guide Shoulder Strap 6700 Optional Parts: Item. Specifications Velocity Grid Pitot tube (2.3 x 200mm) Pitot tube (4 x 300mm) -
Page 5: Caution
If abnormal smells, noises or smoke occur, or if liquid enters the instrument, pull out the AC adapter and remove the batteries immediately. Then send it to the maintenance Dept. of KANOMAX for after service. „ or, there is possible of an electric shock or a fire or instrument malfunction. - Page 6 CAUTION ○ Always unplug when the instrument not in use. „ Failure to do so may cause an electric shock, an fire or circuit damage. Using properly ○ Remove the batteries when storing the instrument for a long period. Do not leave the exhaused batteries in the battery comparement and exchange the battereis on time.
-
Page 7: Introduction
1. Introduction Micromanometer Model 6700 is a high-accuracy intelligent test instrument. 1.1. Features 3.5 inch true color LCD. Ultra-large Storage capacity: 8000 records Blue tooth communication makes remote monitoring and data transferring available. Light weight, compact configuration for easy carrying. -
Page 8: Shoulder Strap
Device under test (+) (-) 3.2. Shoulder Strap For convenient view and easy operation, the shoulder strap can be fit for using. 4. Operating Instruction 4.1. Power supply 1.Power by AC adapter. AC adapter will be as the priority power supply when the AC adapter and batteries are all available using. The specification of the AC adapter is: I/P:AC 110-240V 50/60HZ O/P:DC 5V/2A。... -
Page 9: Start On / Power Off
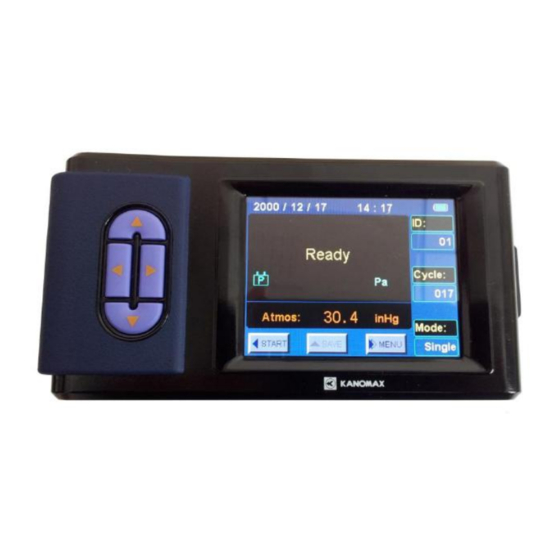
Atmos: Mode: SAVE Single START MENU 1. Start On Press button【POWER】for 2 seconds for start On, displaying “ KANOMAX” then enter into the testing interface. 2. Power Off Press【POWER】for 2 seconds, shut down and power off. 4.3. Keypad operation UP/SAVE... -
Page 10: Function Test
OK:In the “General Setting”, pressing for 2 seconds will save the date or time ; While in the “Record Processing”, pressing for 2 seconds will delete saved data. START:Begin a measurement in main menu STOP:Stop a measurement in main menu BACK:Cancel or end an operation or return to the previous screen EXIT:Return to the main menu ESC:Stop printing when printing... -
Page 11: Average Mode
Note: 1) START: Left-button for the Micromanometer. 2) After testing start for about 8s with stably measuring,output displaying the test data and testing wind direction. 3) Testing stop when finish outputting. 4) Press SAVE for data record with adding 1 to the Cycle value. 5.3. -
Page 12: Time
General Setting General Setting 2014 / 03 / 20 Date Date 2014 / 04 / 01 (1) press for data modify. Time 13 : 10 Time 13 : 10 DOWN DOWN Auto Shut Auto Shut (2)press , for selecting Year/Month/day. Backlight High Backlight... -
Page 13: Communication
lower the brightness, the less battery power will be needed. General Setting General Setting Date 2014 / 03 / 20 Date 2014 / 03 / 20 (1)Press for options change. Time Time 13 : 10 13 : 10 DOWN DOWN Auto Shut Auto Shut (2)Press... -
Page 14: Test Setting
fetching Software>> . 2)For printing out the testing record, the optional printer and cables for special are necessary. Printer baud rate is set to 19200 bps and Do not change it. Refer to the << Manuel for RD series Mini printer >> . 3)Bluetooth make the remote control and data monitoring available by Hand phone. -
Page 15: Test Mode
Test Setting Test ID (1) Test ID is up to 20. Select Tool Select ID Test ID Add New ID (2) Set different Test ID for the different tool. DOWN DOWN Test Mode RunAvg Unit (3) 100 data records can be stored in a single Data Record Total ID: BACK... - Page 16 Test Setting Select Tool Test ID DOWN Test Mode RunAvg Unit Data Record BACK Data Record Test ID: Total: 20 Cycle: Total: 01 Pressure: Display the Record 0.000 Max: Atmos : 101.3 Delete the Record DOWN DOWN DOWN Time: Min : 2014 / 03 / 18 13 : 10 : 18 Avg:...
-
Page 17: Error And Troubleshooting
7 Error and Troubleshooting Symptom Possible causes Corrective action incorrect specification of the AC Check and refer to Chapter4.1 Adapter in Manuel Check and refer to Chapter4.1 No display when power On Battery installation error in Manuel Low or dead battery power Replace the batteries Low battery charge Replace new batteries... -
Page 18: Warranty And Service
This limited warranty covers all defects encountered in normal use of the PRODUCT, and does not apply in the following cases: (1) Use of parts or supplies other than the PRODUCT sold by KANOMAX GROUP COMPANIES, which cause damage to the PRODUCT or cause abnormally frequent service calls or service problems. - Page 19 Repair after warranty expiration: Upon request, we will repair the instrument at the customer’s expense, if the instrument’s performance is found to be recoverable by providing the repair. Replacement parts are available for a minimum period of five (5) years after termination of production. This storage period of replacement parts is considered as the period during which we can provide repair service.
- Page 20 Kanomax Group Companies ■ Americas, Europe, Mid-East, Africa, Oceania KANOMAX USA, INC. 219 US Highway. 206, Andover, New Jersey 07821 TEL: 1-800-247-8887(USA) / 1-973-786-6386 FAX: 1-973-786-7586 URL: www.kanomax-usa.com E-Mail: info@kanomax-usa.com ■ Japan & Asia KANOMAX JAPAN, INC. 2-1 Shimizu Suita City, Osaka Japan 565-0805...
Need help?
Do you have a question about the 6700 and is the answer not in the manual?
Questions and answers