Table of Contents
Advertisement
Quick Links
Advertisement
Table of Contents

Related Manuals for Kanomax 3443


Summary of Contents for Kanomax 3443
- Page 1 Light Scattering Digital Dust Monitor MODEL 3443 Operation Manual Please read this operation manual carefully and understand the warnings described within before operating this instrument. Keep this manual handy for future reference. 01001 10.06...
- Page 2 Component List ■ Standard Item Model Function Main Unit 3443 AC Adapter 6113-02 Filter Spare Filter (For cleaning) Shoulder Strap Operation Manual Manganese Batteries Size AA batteries (for testing) Measurement Software S344-30 CD-R Communication Cable USB Communication Cable LCD Protective Sheet...
-
Page 3: Important Safety Information
…… It may result in electric shock, fire or damage to the instrument. Contact your distributor or your KANOMAX service center for repair. Do not use this instrument in an ambient temperature above 40 ˚C. ¤... - Page 4 Important Safety Information WARNING ¤ Unplug the power cable when the instrument is not in use. …… Failure to observe the above may result in electric shock, fire or damage to the internal circuitry. ¤ When using the AC adapter, ensure there is no dust on the power plug. The AC outlet used must be within the specified power requirement of 100 ~ 240 V.
-
Page 5: Table Of Contents
Table of Contents 1. Part Names and Functions ................1 1.1 General Outline ....................1 1.2 Measurement Principle..................1 1.3 Laser Handling ....................1 1.4 Part Names ......................2 2. Getting Started ....................4 2.1 Setting batteries or AC adapter ................4 2.1.1 Setting batteries ....................... 4 2.1.2 Setting AC Adapter.................... - Page 6 4. Consumables Replacement ................35 4.1 Filter Replacement ...................35 4.2 Protective LCD Sheet Replacement ..............36 5. Main Specification ..................37 6. Troubleshooting .................... 39 6.1 Check Power.....................39 6.2 Check while Measuring..................39 6.3 Zero Check .......................40 6.4 Sensitivity Check....................40 6.5 Calibration Check.....................41 6.6 Analog Output ....................41 6.7 Pulse Output .....................42 6.8 Alarm Output....................42...
-
Page 7: Part Names And Functions
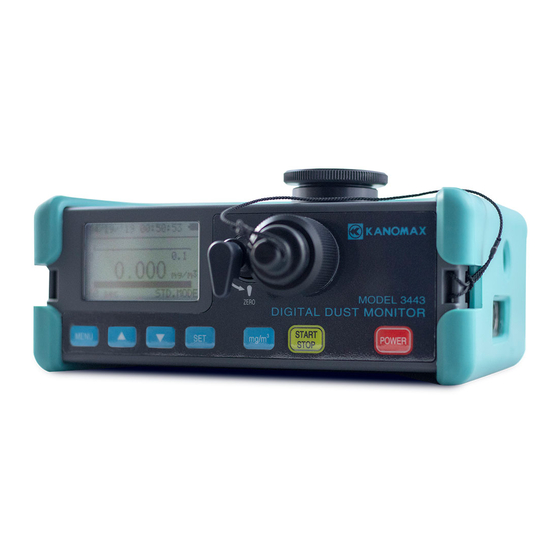
1. Part Names and Functions 1.1 General Outline This instrument (Model 3443) is a light scattering portable dust monitor using a semiconductor laser radiation light source. The measurement data is displayed on the LCD and can be saved to internal memory. -
Page 8: Part Names
1. Part Names and Functions 1.4 Part Names Inlet This is where sample air is taken in. A filter is built-in in order to remove Unit: mm coarse particles. Approx. 162 Sensitivity Check Knob Filter Holder Display Strap Mount The shoulder strap shall be attached here. - Page 9 1. Part Names and Functions <Part Description> Name Function This is a changeover switch to check sensitivity. When checking sensitivity, turn the knob to the “FULL” side and check if there is any Sensitivity Check significant change in the standard count value. (Refer to 2.4 Calibration) Knob At times other than the sensitivity check, turn the knob to the “ZERO”...
-
Page 10: Getting Started
2. Getting Started 2. Getting Started 2.1 Setting batteries or AC adapter This instrument can use batteries or AC adaptor for its power. Set batteries in the instrument or connect the AC adaptor. 2.1.1 Setting batteries 1. Slightly push the latch of the battery compartment lid in the direction of an arrow. -
Page 11: Setting Ac Adapter
2. Getting Started 2.1.2 Setting AC Adapter Connect the supplied AC adapter into the DC-in Jack on the side of the main unit. When the AC adapter is connected, the power is supplied by the AC adapter. It is OK to leave batteries in the battery compartment. -
Page 12: Precautions For Storing And Transporting The Instrument
2. Getting Started 2.2 Precautions for Storing and Transporting the Instrument Precautions for Storing the Instrument Caution: If the unit is not used for a prolonged time, do not leave the batteries in the battery compartment. Otherwise, the batteries may corrode, causing contact failure. Precautions for Transporting the Instrument Caution: For long periods of transporting the instrument, as mentioned above, do not leave the batteries in the battery compartment. -
Page 13: Cleaning
2. Getting Started 2.3 Cleaning To maintain the accuracy, make sure to perform cleaning before using the instrument. Rubber Cap (When measuring for all day, please perform cleaning before and after measuring.) START/STOP Key Sensitivity Check Knob MENU Key ▼ Key (1) Confirm that the surrounding atmosphere is clean. -
Page 14: Calibration
2. Getting Started 2.4 Calibration In order to ensure accuracy you should perform a calibration before use. (When measuring all day, please perform calibration before a measurement.) Rubber Cap For calibration there are background adjustments and sensitivity adjustments (SPAN). START/STOP Key Sensitivity Check Knob MENU Key ▼... -
Page 15: Display Description And Operation Procedure
3. Display Description and operation Procedure 3. Display Description and Operation Procedure 3.1 Boot Screen Press [POWER] button to turn ON the instrument. Then the boot screen will be displayed and start warming up for 10 seconds. On the screen the version information and remaining time for warming up will be displayed. -
Page 16: Screen While Measuring
3. Display Description and operation Procedure <Measurement Mode> There are four different measurement modes. You can select a measurement mode on the menu screen. Refer to 3.4.1 Measurement Mode and 3.4.2 Calculation Mode. 1) Standard Mode: Perform a measurement based on a pre-selected measurement time. You can select a measurement time from 6sec, 10sec, 30sec, 1min, 2min, 3min, 5min, 10min or TWA. - Page 17 3. Display Description and operation Procedure In Calculation Mode the measurement result can be displayed successively on the graph. The vertical axis indicates CPM and the horizontal axis indicates measurement time. Up to 110 data points can be displayed. Once the number of data points exceeds 110, the graph will be scrolled so that the latest 110 data points will be displayed.
-
Page 18: Menu
3. Display Description and operation Procedure 3.4 MENU Press [MENU] key on the initial screen to display the menu screen. On the menu screen you can select the followings; MODE: Measurement Mode To set a measurement mode => 3.4.1 Measurement Mode CALCULATION: Calculation Mode To set calculation mode and to start a measurement =>... -
Page 19: A) Standard Mode (Std. Mode)
3. Display Description and operation Procedure A) Standard Mode (STD. MODE) In the Standard Mode select the time from the pre-set measurement time. The selectable measurement time is 6 sec, 10 sec, 30 sec, 1 min, 2 min, 3 min, 5 min 10 min or TWA (Time Weighted Average) mode. While the measurement time is highlighted, you can change the time by using [▲] [▼] keys. - Page 20 3. Display Description and operation Procedure You can switch over the indicated value as described below by pressing [mg/m3] key in real time. Switching over measurement value mg/m3 (Instantaneous Value) Mg/m3 [mg/m3] key ↓ CPM (COUNT) [mg/m3] key ↓ mg/m3 (Instantaneous Value) CPM(COUNT) <TWA Mode>...
-
Page 21: B) Free Setting Mode
3. Display Description and operation Procedure B) Free Setting Mode In Free Setting Mode you can set the measurement time in the range of 1~59 sec in increments of one second or in the range of 1 ~ 99 minutes in increments of one minute. -
Page 22: Calculation Mode
3. Display Description and operation Procedure 3.4.2 Calculation Mode Select “CALCULATION” mode on the menu screen to display the screen shown on the left. In the CALCULATION MODE you can set date & time to start a measurement, sampling time and number of sampling trials. Use [▲] [▼] keys to move the cursor to the item to be set. - Page 23 3. Display Description and operation Procedure <Stand-by Screen> Press [SET] key to start stand-by for a measurement. When the configured date and time comes, a measurement will start. User also starts measurement manually by pushing START/STOP Key. CALCILATOIN Mode shows the error message when the data storage is full.
-
Page 24: Data Display
3. Display Description and operation Procedure After a measurement, use [▲] [▼] keys to scroll the graph display. The number of data points that can be displayed in one screen is 110. To switch the graph display to the count display after a measurement, press [MENU] key. - Page 25 3. Display Description and operation Procedure Time-line graph of the measurement data will be displayed. Up to 110 data points can be displayed on one screen. The unit selected on the numerical display applies to the vertical axis. The range changes as the measurement value increases in three steps. * mg/m3 0-0.1mg/m3 range 0-1mg/m3 range...
-
Page 26: Deleting Data
3. Display Description and operation Procedure 3.4.4 Deleting Data Select DATA CLEAR on the menu screen to display the screen shown on the left. You can select to delete either only the selected data or all measurement data. Press [▲] [▼] keys to move the cursor and press [SET] key to select the item. -
Page 27: Calibration
3. Display Description and operation Procedure 3.4.5 Calibration To perform an accurate calibration make sure that the instrument is acclimatized to the ambient temperature of the place where the calibration work is performed. (Leave the instrument for at least 20 minutes.) An accurate calibration cannot be performed without sufficient warm-up operation To calibrate the instrument →... - Page 28 When the background adjustment value differs from the manufacturer’s calibrated value by ±20 counts, it is considered as an error and the adjustment value cannot be stored. If that is the case, please contact your sales representative or KANOMAX service center. * Sensitivity Adjustment Just as the Background Adjustment, performing Sensitivity Adjustment in the highly concentrated environment or making an operation error will influence a measurement value significantly.
-
Page 29: Utility
* Required cleaning time is different depending on the use environment. * If an error occurs during calibration and background adjustment after cleaning for more than 10 minutes, the internal cleaning is required. Please contact your distributor or KANOMAX service center. -
Page 30: B) Time Adjustment
3. Display Description and operation Procedure B) Time Adjustment To configure the date format and time setting STYLE: Date Format Selection DATE: Date Setting TIME: Time Setting Press [▲] [▼] keys to move the cursor, and press [SET] key to select it. Press [MENU] key to go back to the UTILITY screen. -
Page 31: C) K Factor
How to obtain K-factor is as follows: Prepare the instrument (Model 3443) and a filtration instrument which uses a particle size analyzer. When placing these two units, keep their suction direction and the height of the suction points same. Select “MANUAL” mode on the instrument and start measuring using those units at the same time. -
Page 32: D) Lcd / Beep Sound Setting
3. Display Description and operation Procedure D) LCD / Beep Sound Setting You can set the screen contrast, the backlight-out time and to turn ON/ OFF the beep sound. CONTRAST: To set contrast of the display BACKLIGHT OFF: To set the backlight-out time BEEP: To turn ON/OFF beep sound Press [▲] [▼] keys to move the cursor, and then press [SET] key to... - Page 33 3. Display Description and operation Procedure <Beep Sound Setting (On/OFF)> You can set whether to activate the beep ON or OFF for key operation. When ON/OFF setting is highlighted, you can change the setting by using [▲] [▼] keys. After setting, press [SET] key. The setting will stop being highlighted, and now you can select the next item to be configured.
-
Page 34: E) Analog Output & Alarm Setting
3. Display Description and operation Procedure Analog Output & Alarm Setting Set the analog output and alarm range. ANALOG OUT: Analog Output Setting ALARM: Alarm ON/OFF Setting Press [▲] [▼] keys to move the cursor and select the item pressing [SET] key. - Page 35 3. Display Description and operation Procedure (1) Data Update Interval: The output data is output every one second. (2) Load Impedance: 1 KΩ or higher (3) Output Cable: Please purchase our optional output cable (3442-01). Method to output measurement data (in case of analog output) Explanation Voltage Concentration value...
- Page 36 3. Display Description and operation Procedure The range setting is also required in CPM mode as well. 10000 [▼] key to decrease ↓ ↑ [▲] key to increase 9999 Use [▲][▼] keys to move the cursor and select [SAVE INFO]. Then press [SET] key.
-
Page 37: F) Pulse Output
3. Display Description and operation Procedure Pulse Output With this instrument the pulse that corresponds to CPM value (instantaneous value) can be output. Connect the output cable sold separately. (1) Pulse Frequency Update Interval: The output data is updated every one second. (2) Pulse Range: 0.0166 Hz –... -
Page 38: H) Twa Mode
3. Display Description and operation Procedure H) TWA MODE If you select TWA on the menu screen, the screen shown on the left will be displayed. You can configure TWA measurement setting and alarm setting. TWA TIME (m): Measurement time setting (1 min ~ 48 hrs, settable by minutes) TWA VALUE: Time-weighted average (0.001 ~ 10.000, STEL>TWA) STEL VALUE:... -
Page 39: Usb Communication Connector
3. Display Description and operation Procedure <Alarm Classification> The alarm sound will be different depending on the content of an alarm. The alarm in the TWA measurement mode will be indicated on the measurement screen and beep will sound. Please note that it will not output to the external output terminal. Time-weighted average (TWA) alarm Short beeps Short-term exposure limit (STEL) alarm... -
Page 40: Measurement Procedure
3. Display Description and operation Procedure 3.5 Measurement Procedure To perform an accurate measurement, make sure that the instrument is acclimatized to the ambient temperature before use. (Leave the instrument in the measurement environment at least for 20 minutes.) Rubber Cap Cleaning Air Vent START/STOP Key Sensitivity Check Knob... -
Page 41: Consumables Replacement
4. Consumables Replacement 4. Consumables Replacement 4.1 Filter Replacement Please replace the filter following the procedure below when error occurs even if you perform calibration several time, you can see the filter is damaged or the filter is very dirty. <Preparing for replacement part>... -
Page 42: Protective Lcd Sheet Replacement
4. Consumables Replacement 4.2 Protective LCD Sheet Replacement When the protective LCD sheet becomes dirty or is damaged, replace it. <Preparing for replacement part> Prepare the provided protective LCD sheet for replacement or purchase the provided protective LCD sheet (3442-04). <Replacing protective LCD sheet>... -
Page 43: Main Specification
5. Main Specification 5. Main Specification Product Name Light Scattering Digital Dust Monitor Model Name MODEL 3443 0.001 ~ 10.000 mg/m Measurement Range (1 CPM=0.001 mg/m when using standard particle) Measurement Accuracy ±(10% of reading + 1) count Linearity ±5% of reading... - Page 44 For analog, pulse & alarm output Rubber Cap (3431-02) 1 pc Filter (3431-03) 1 set (10 pc) Optional Extras, LCD Protective Sheet (3442-04) 1 set (2 pc) Consumables Sold Carrying Case (3442-05) 1 pc Separately 1 pc AC Adapter (6113-02) 1 pc Rubber Protector (3443-02)
-
Page 45: Troubleshooting
6. Troubleshooting 6. Troubleshooting 6.1 Check Power Symptom Possible Cause / Solution Refer to - When using battery: The battery is exhausted. Even when the power switch => Turn the power off and charge the battery. is turned ON, on-screen display does not appear or - When using AC adapter: The dedicated adapter is not being used. -
Page 46: Zero Check
If it does not become stable even after cleaning, the instrument needs to be disassembled for further cleaning. Please contact your distributor or KANOMAX service center. The instrument may not be used under the specified usage environment. Operating temperature limit is 5 ~ 40 ˚C and humidity limit is 95 %RH or lower. -
Page 47: Calibration Check
If the ZERO adjustment range exceeds the standard range ± 20 counts (BACK GROUND) before shipping, it is a calibration error. Please contact your distributor or KANOMAX service center for repair. The sensitivity may be beyond the specified sensitivity adjustment range. When the sensitivity adjustment range is beyond the range before Sensitivity cannot be shipping by ±20%, it is considered as calibration error. -
Page 48: Pulse Output
The backup battery may start becoming weak. We recommend replacing the backup battery. Date and time are lagging Please contact your sales representative or KANOMAX service center. dramatically, or after setting * The backup battery life is about 10 years. This is just an indication... -
Page 49: Warranty And After-Sales Service
7. Warranty and After-sales Service KANOMAX Limited Warranty The limited warranty set below is given by KANOMAX with respect to the KANOMAX brand Light Scattering Digital Dust Monitor and other accessories (hereafter referred to as “PRODUCT”) that you have purchased. - Page 50 If the PRODUCT is malfunctioning, please check with “Troubleshooting” to find possible cause first. Repair parts are retained for a minimum period of five (5) years after production cessation of the PRODUCT. This storage period of repair parts is considered as the period during which KANOMAX can provide repair service.
Need help?
Do you have a question about the 3443 and is the answer not in the manual?
Questions and answers