Advertisement
Quick Links
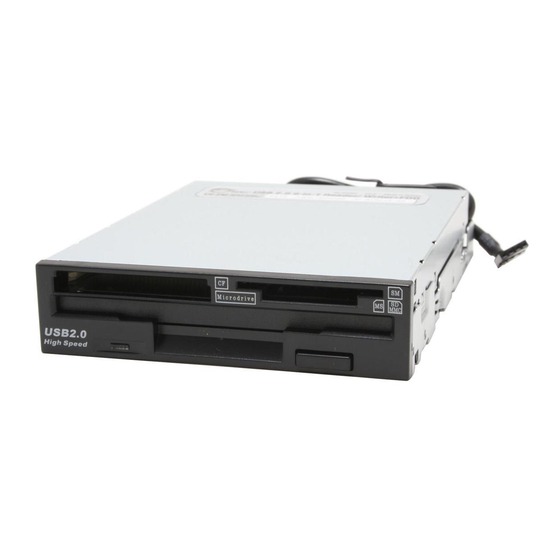
USB 2.0 9-in-1 R/W+FDD
Quick Installation Guide
Introducing the Reader/Writer+Floppy
The Reader/Writer+Floppy is the perfect choice for
computer users who need a flash memory card
reader/writer that supports multiple card formats as
well as reads Floppy disks.
Features and Benefits
•
Fits into either 3.5" or 5.25" (with included mounting
rack) drive bay
•
Dual color Activity/Access LED:
- Red: Flash memory card interface
- Green: Floppy drive interface
Flash memory card interface:
•
Compliant with USB specification rev. 2.0
•
Works with CompactFlash (CF) Type I & Type II,
Microdrive, SmartMedia (SM), SecureDigital (SD),
MultimediaCard (MMC) and Memory Stick
(incl. MagicGate & Pro) memory cards
Note: USB 2.0 devices are limited to USB 1.1
speeds when they are connected to a USB 1.1 host
adapter.
Floppy drive interface:
•
Supports 1.44MB and 2MB Floppy disks
04-0361A
1
Advertisement

Related Manuals for SIIG JU-91RW12-S4


Summary of Contents for SIIG JU-91RW12-S4
- Page 1 USB 2.0 9-in-1 R/W+FDD Quick Installation Guide Introducing the Reader/Writer+Floppy The Reader/Writer+Floppy is the perfect choice for computer users who need a flash memory card reader/writer that supports multiple card formats as well as reads Floppy disks. Features and Benefits •...
- Page 2 System Requirements • PC computer with an internal USB port (USB 2.0 recommended) • One available 3.5" or 5.25" drive bay • CD-ROM drive (for driver installation) • Windows 98SE/ME/2000/XP/Server 2003 Package Contents • USB 2.0 9-in-1 R/W+FDD • (1) 5.25 inch mounting rack •...
- Page 3 Power connector Floppy drive connector Figure 2. Rear Layout 5.25" Mounting Rack Assembly Important: Use the Mounting Rack Assembly only when installing the hub into a 5.25" drive bay. Depending on the model purchased, the color of your product may vary from what is shown.
- Page 4 4-pin USB Connector Figure 4. 4-pin USB Connector USB Pin-out Header On most motherboards, the USB header/pin-out consists of 9 pins arranged in 2 rows; and each header allows for 2 USB connections (i.e. USB1 and USB2). Normally, the pins for USB1 and USB2 are in seperate rows. USB2 Pin Assignments USB1...
- Page 5 4-pin header-to-type A USB Adapter This USB adapter is only needed if you plan to connect the Reader/Writer+Floppy to a type A USB port instead of a USB pin-out header. Match up the wires by color when connecting the Reader/Writer+Floppy's 4-pin USB connector to the 4-pin header, then plug the other end into a type A port.
- Page 6 Select an available 3.5" or 5.25" drive bay for the Reader/Writer+Floppy, remove the cover plate from selected drive bay. Secure Reader/Writer+Floppy to the drive bay by using the supplied mounting screws. Note: When installing the Reader/Writer+Floppy into a 5.25" drive bay install it into the 5.25" mounting rack before mounting into the drive bay and follow the same assembly instructions.
-
Page 7: Driver Installation
Connect the Reader/Writer+Floppy's 4-pin USB connector to the system's internal USB port. Refer to USB Pin-out Header, on page 4 for more information. Check your system documentation for the location of the USB pin-out header. Note: If your system has an internal type A USB port you may choose to connect the Reader/Writer+Floppy's 4-pin USB connector via the included 4-pin header to USB adapter. - Page 8 Windows 2000 With Service Pack 2 (SP2) or earlier: Boot up Windows, then insert the driver CD. Click Start, then Run. Type D:\setup.exe, then click OK. (Change D: to match your CD-ROM drive letter) Follow the on-screen instructions to install the driver.
- Page 9 Windows ME/XP/Server 2003 Important: Windows ME, XP and Server 2003 automatically detects and installs the correct drivers for this device. No driver installation is needed. Refer to Accessing Memory Cards, on page 10, for the order in which the memory slots appear. However, you may choose to install the provided software that labels each drive.
-
Page 10: Accessing Memory Cards
Windows ME/2000 w/SP3 or later/XP/Server 2003: USB Mass Storage Device should be listed. Double click Disk drives: Windows 98SE/ME/2000/XP/Server 2003: USB2.0 CF Card CF... and USB2.0 MULTI Card MS... should be listed. Inserting Memory Cards and Floppy Disk For CompactFlash, IBM MicroDrive, Memory Stick, MultiMediaCard and SecureDigital memory cards, insert with the top label facing up. -
Page 11: Technical Support
The 5-year manufacturer warranty supplied with this product is offered by SIIG, Inc. If you should happen to encounter any problems with this product, please follow the procedures below. - Page 12 Fremont, CA 94538-3152 USB 2.0 9-in-1 R/W+FDD is a trademark of SIIG, Inc. SIIG and SIIG logo are registered trademarks of SIIG, Inc. Microsoft and Windows are registered trademarks of Microsoft Corporation. Pentium is a registered trademark of Intel Corporation. Other names used in publication are for identification only and may be trademarks of their respective companies.
Need help?
Do you have a question about the JU-91RW12-S4 and is the answer not in the manual?
Questions and answers