
Related Manuals for AES StylusAB


Summary of Contents for AES StylusAB
- Page 1 Installation & User Manual Styluscom W ired Video Intercom System Models StylusAB, StylusABK, StylusAS Manual Version 1 P a g e...
- Page 2 Contents …………….Pg 3 Overview of system …………….Pg 3 Site Survey …………….Pg 3 SIM card …………….Pg 3 Power …………….Pg 4 Installation …………….Pg 4 Architectural panels …………….Pg 4 Hooded Panels …………….Pg 4 Flush Panels …………….Pg 5 Installing the SIM card …………….Pg 5 Connections on GSM controller …………….Pg 6 Codelock Keypad connections...
- Page 3 Overview of System Please read this entire manual before attempting to install this system. This system should only be installed by a professional automatic gate installer or access control specialist dealer. It is recommended that the system be set up, configured, commissioned and tested on a workshop bench before taken to site for installation.
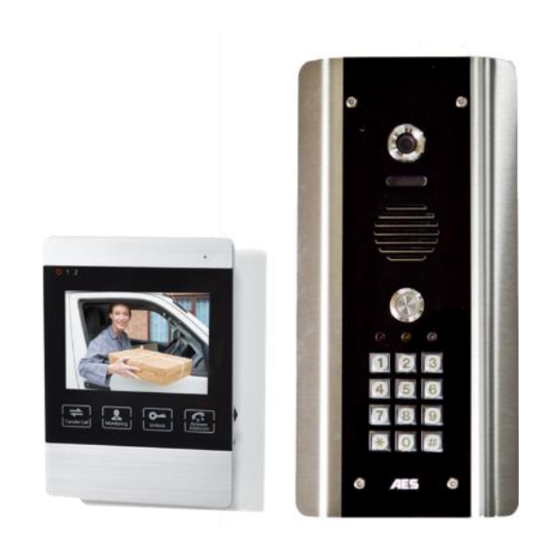
- Page 4 Monitor Mounting 2. Plug monitor into ribbon cable only once all wiring is complete. 1. Mount monitor mounting assembly to wall. Door Station Mounting Mount the intercom at the desired height for pedestrian or car users. The camera angle is wide at 110 degrees to cover most scenarios. Hinge front door Side View Tip: Do not drill holes in the wall with the intercom in positon, otherwise dust may get...
- Page 5 Door Station & Monitor Wiring P a g e...
- Page 6 Wiring Tips for Locks and Gates Note: The manufacturer can only support the use, operation and functionality of the intercom and keypad themselves. Professional wiring to door release or automatic gate systems is the responsibility of the installer. Please consult a security integrator for further support.
- Page 7 Full Keypad Programming Enter programming mode.. The unit is now in programming mode. Amber LED on the keypad should remain permanently on. 0000 is the default programming passcode. Exit programming mode.. The unit should exit programming mode and the amber LED should start flashing again.
- Page 8 Delete an entire group of codes 10=relay1 group Super delete code Validate 20=relay2 group 30=relay3 group Programming super user codes… A super user code can activate any of the 3 relays Location 4-8 digit code Validate Restoring defaults When in programming mode, you can enter the following sequence… When the master code is forgotten….
- Page 9 Sound and Volumes With intercoms operating as a loud speaker and the monitor also acting as a loud speaker, it is important to set up the speech volumes carefully. MICROPHONE Keep at complete DOOR STATION minimum if possible. SPEAKER Increase if necessary (keep as low as possible) 1.
- Page 10 Additional Monitor Wiring Tip: Up to 4 monitors in total (1 master + 3 slaves) can be used together, depending on cable used and distance between monitors and distance to the door/gate station. Tip: See next page on how to set MASTER and SLAVE monitor modes. P a g e | 10...
- Page 11 Monitor Settings System Ring Mode -Change language, -Adjust ring volume and -Use to set master time and update or ring tone. monitor to master mode, reboot. and additional slave monitors to slave mode. Alarm -Activate door 2. -Set input sensor -Adjust relay trigger time.
- Page 12 TV Out This connection can be used to send video (not audio) from the master monitor to a TV, a digital recording system, or modulator for distribution through the TV network (consult a TV/CCTV professional). P a g e | 12...
- Page 13 Trouble Shooting TIP: The best way to troubleshoot any problem is by a process of elimination. Try to install one part of a system at a time, check it works, and then add additional monitors and other items one by one. Q: I cannot hear the visitor at the gate/door.
- Page 14 Change History Key: P = Panel version H = Hardware PCB version S = Software version Version Reason for change First version. Second gasket for lens spacing. P a g e | 14...
- Page 15 P a g e | 15...
- Page 16 P a g e | 16...
Need help?
Do you have a question about the StylusAB and is the answer not in the manual?
Questions and answers